Pella 802X0104 installation instructions Setting and Fastening the Window

Models: 802X0104

1 8
Download 8 pages 45.13 Kb
Page 4
Image 4
Î
&YUFSJPS7JFX

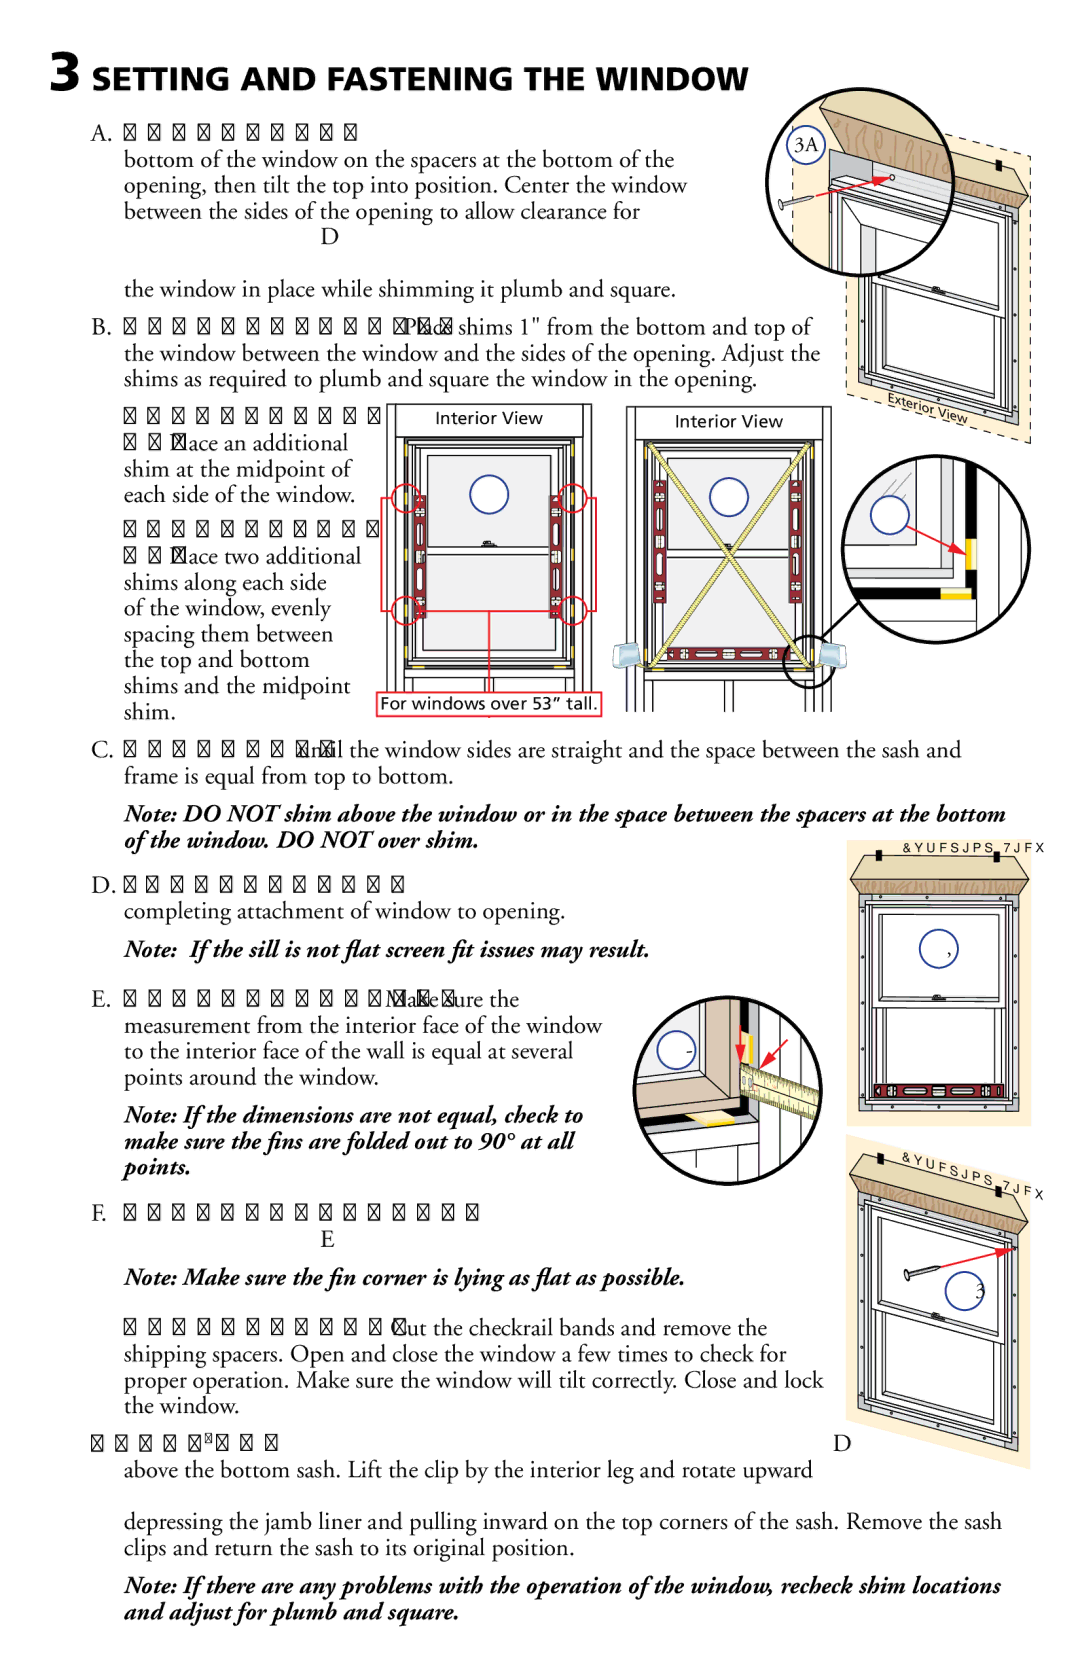
3 SETTING AND FASTENING THE WINDOW

A. Insert the window FROM THE EXTERIOREOF THE BUILDING 0LACE THE

3A

bottom of the window on the spacers at the bottom of the


opening, then tilt the top into position. Center the window


between the sides of the opening to allow clearance for


SHIMMING MANDNINSERTTONEOROOlNGlNAIL INNTHEIlRST HOLE FROM THE


CORNER ONEEACH END OFETHECTOP NAILING lNF4HESEEAREEUSED TOEHOLDD


the window in place while shimming it plumb and square.

B.Plumb and square window. Place shims 1" from the bottom and top of the window between the window and the sides of the opening. Adjust the

shims as required to plumb and square the window in the opening.

For windows up to 53" tall: Place an additional shim at the midpoint of each side of the window.

For windows over 53" tall: Place two additional shims along each side of the window, evenly spacing them between the top and bottom shims and the midpoint shim.

Interior View

3B

Forwindows over 53” tall.

Interior View

3B

3B

C.Adjust the shims until the window sides are straight and the space between the sash and frame is equal from top to bottom.

Note: DO NOT shim above the window or in the space between the spacers at the bottom of the window. DO NOT over shim.

D. Verify the sill is flat ON THE EXTERIOREEDGE NOTIBOWED OR HUMPED HPRIORPTO completing attachment of window to opening.

Note: If the sill is not flat screen fit issues may result.

E.Check the interior reveal. Make sure the measurement from the interior face of the window

to the interior face of the wall is equal at several

Î

points around the window.


Note: If the dimensions are not equal, check to make sure the fins are folded out to 90° at all points.

““Ó

ä

£

 -


Îä


Ó


Èä

Çä


Î

F. Fasten the window to opening BYYDRIVINGI GALVANIZED ROOlNGlNAILS INTO EACH PREPUNCHEDNHOLE INDTHEHNAILING lN

Note: Make sure the fin corner is lying as flat as possible.

Î

' Check window operation. Cut the checkrail bands and remove the shipping spacers. Open and close the window a few times to check for proper operation. Make sure the window will tilt correctly. Close and lock the window.

ProLine® only: 4OOREMOVEESIDE SPACERS SSLIDECTHEM UP TO APPROXIMATELY E

above the bottom sash. Lift the clip by the interior leg and rotate upward

TO REMOVE 2AISE THE BOTTOMTSASH APPROXIMATELY  AND TILTTHE SASHAIN BYY

depressing the jamb liner and pulling inward on the top corners of the sash. Remove the sash clips and return the sash to its original position.

Note: If there are any problems with the operation of the window, recheck shim locations and adjust for plumb and square.

Page 4
Image 4
Pella 802X0104 Setting and Fastening the Window, Bottom of the window on the spacers at the bottom

802X0104 specifications

The Pella 802X0104 is a remarkable example of modern window design that seamlessly combines aesthetics with superior functionality. This product is particularly favored by homeowners looking for energy-efficient and durable window options that enhance the overall appearance of their properties.

One of the main features of the Pella 802X0104 is its advanced energy efficiency capabilities. It typically employs triple-pane glass technology, which significantly reduces heat transfer and increases insulation. This feature is crucial for maintaining a comfortable indoor environment regardless of outdoor temperatures. The windows are often treated with low-emissivity (Low-E) coatings that further minimize heat loss while allowing natural daylight to enter, making it ideal for energy-conscious consumers.

In terms of durability, the Pella 802X0104 boasts a robust frame construction designed to withstand various weather conditions, including high winds and heavy precipitation. The frame is often made from a composite material that resists warping, cracking, and fading over time. This enhances the longevity of the windows and reduces the need for frequent maintenance.

Another significant characteristic of the Pella 802X0104 is its versatility in design. Available in multiple colors and finishes, it can easily complement a variety of architectural styles, from traditional to contemporary. Homeowners can choose from different grid patterns and hardware options, allowing them to customize the look to their personal preferences.

Additionally, the Pella 802X0104 is equipped with advanced security features. Its construction often includes reinforced locking mechanisms and laminated glass options, providing an extra layer of protection against intruders. This makes the window not only a beautiful addition to a home but also a practical one in terms of safety.

Another key consideration for many buyers is the ease of installation and maintenance. The Pella 802X0104 is designed for straightforward installation, reducing labor time and cost. Furthermore, the low-maintenance nature of its materials means that regular upkeep is minimal, allowing homeowners to enjoy their windows without a significant time commitment.

In summary, the Pella 802X0104 stands out in the crowded window market due to its blend of energy efficiency, durability, design flexibility, security features, and low maintenance requirements. This window option is a smart investment for homeowners seeking both style and substance in their living spaces.