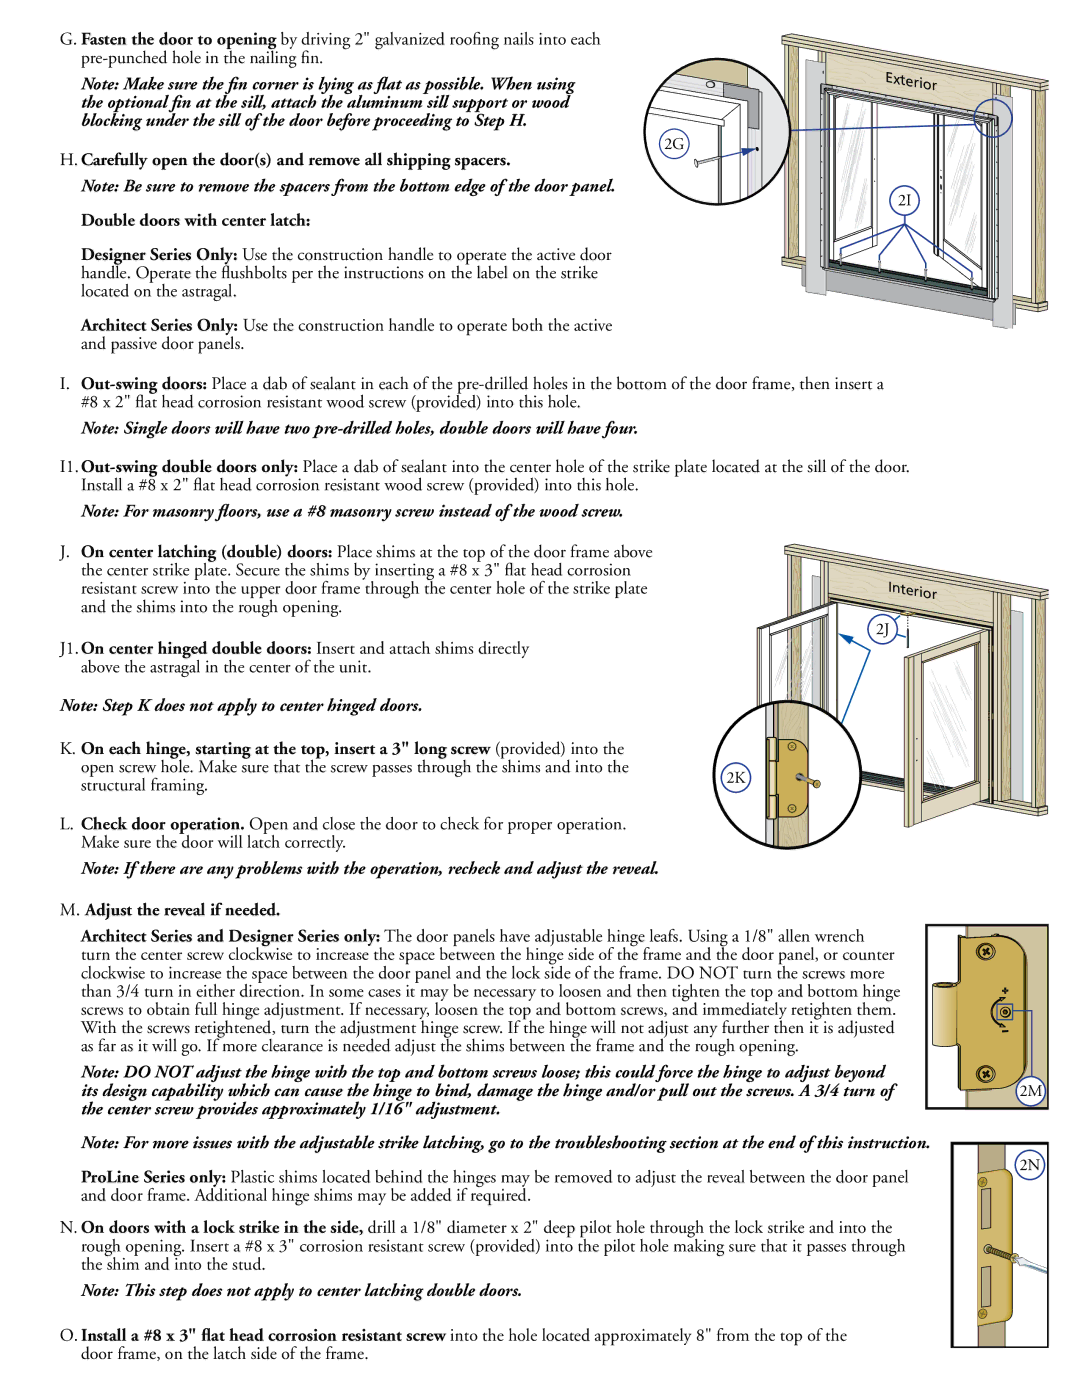
' Fasten the door to opening BYYDRIVINGI GALVANIZED ROOlNGlNAILS INTO EACHS PREPUNCHEDNHOLE INDTHEHNAILING lN

Note: Make sure the fin corner is lying as flat as possible. When using the optional fin at the sill, attach the aluminum sill support or wood blocking under the sill of the door before proceeding to Step H.

Ó

&YUFSJPS

( Carefully open the door(s) and remove all shipping spacers.

Note: Be sure to remove the spacers from the bottom edge of the door panel.

Ó

Double doors with center latch:

Designer Series Only: Use the construction handle to operate the active door

HANDLED/PERATE THE mUSHBOLTS PER THE INSTRUCTIONSION THE LABEL ONOTHE STRIKE

located on the astragal.

Architect Series Only: Use the construction handle to operate both the active and passive door panels.

I.Out-swing doors: Place a dab of sealant in each of the pre-drilled holes in the bottom of the door frame, then insert a

 X XmATHEAD CORROSIONIRESISTANT WOODNSCREWWPROVIDED INTO THISHHOLE

Note: Single doors will have two pre-drilled holes, double doors will have four.

)Out-swing double doors only: 0LACE A DAB OF SEALANT INTO THE CENTERAHOLE OFITHETSTRIKE PLATEELOCATEDCAT THE SILLAOF THE DOOR )NSTALL A LX  mAT HEADXCORROSIONIRESISTANT WOODNSCREWWPROVIDED EINTO THISNHOLE

Note: For masonry floors, use a #8 masonry screw instead of the wood screw.

J.On center latching (double) doors: Place shims at the top of the door frame above

THEHCENTER STRIKEEPLATE 3ECUREETHETSHIMS BYYINSERTING A  XAmATmHEAD CORROSIONI RESISTANT SCREWWINTO THE UPPER DOOR FRAMEPTHROUGH THE CENTEREHOLE OF THEFSTRIKE PLATE and the shims into the rough opening.

*On center hinged double doors: Insert and attach shims directly above the astragal in the center of the unit.

Note: Step K does not apply to center hinged doors.

K. On each hinge, starting at the top, insert a 3" long screw PROVIDED INTO THEI


OPEN SCREWWHOLEO-AKEKSUREETHAT THE SCREWWPASSES THROUGH THE SHIMSMAND INTO THE

Ó

structural framing.


L.Check door operation. /PENEAND CLOSEDTHECDOOR TOECHECKHFOR PROPER OPERATIONE -AKEKSUREETHETDOOR WILLOLATCH CORRECTLY

*OUFSJPS Ó

Note: If there are any problems with the operation, recheck and adjust the reveal.

M. Adjust the reveal if needed.

Architect Series and Designer Series only: 4HEHDOOR PANELSRHAVEEADJUSTABLE HINGE LEAFS 5SING A AALLENNWRENCH TURN THE CENTERESCREWWCLOCKWISECTO INCREASE THE SPACE BETWEENETHE HINGE SIDEGOF THE FRAME AND THE DOOREPANEL ORMCOUNTERN CLOCKWISEKTO INCREASE THE SPACE BETWEENETHE DOOR PANEL AND THE LOCK SIDE OF THE FRAMEF$/ ./44TURN THE SCREWS MOREE THAN  TURNIN EITHERRDIRECTIONI)NNSOME CASES ITCMAYSBE NECESSARYYTO LOOSENLANDOTHEN TIGHTEN THE TOP AND BOTTOMGHINGEE

screws to obtain full hinge adjustment. If necessary, loosen the top and bottom screws, and immediately retighten them. With the screws retightened, turn the adjustment hinge screw. If the hinge will not adjust any further then it is adjusted as far as it will go. If more clearance is needed adjust the shims between the frame and the rough opening.

Note: DO NOT adjust the hinge with the top and bottom screws loose; this could force the hinge to adjust beyond its design capability which can cause the hinge to bind, damage the hinge and/or pull out the screws. A 3/4 turn of the center screw provides approximately 1/16" adjustment.

Note: For more issues with the adjustable strike latching, go to the troubleshooting section at the end of this instruction.

ProLine Series only: Plastic shims located behind the hinges may be removed to adjust the reveal between the door panel and door frame. Additional hinge shims may be added if required.

N. On doors with a lock strike in the side, DRILL A  DIAMETER X  DEEP PILOT HOLERTHROUGH THE LOCKHSTRIKE AND INTONTHE ROUGH OPENINGP)NSERTTA  X CORROSIONIRESISTANT SCREWWPROVIDED EINTO THE PILOT HOLEHMAKING SUREETHAT ITAPASSES THROUGH

the shim and into the stud.

Note: This step does not apply to center latching double doors.

O. Install a #8 x 3" flat head corrosion resistant screw INTONTHEOHOLE LOCATED APPROXIMATELY EFROM THE TOP OF THEO

door frame, on the latch side of the frame.

Ó

Ó

Page 4
Image 4
Pella 80KM0103 Structural framing, Shim and into the stud, Door frame, on the latch side of the frame

80KM0103 specifications

The Pella 80KM0103 is a versatile and efficient window solution that exemplifies Pella's commitment to quality and innovation in the window and door industry. Designed with both aesthetics and performance in mind, this model is particularly suitable for homeowners looking to enhance the energy efficiency and visual appeal of their living spaces.

One of the standout features of the Pella 80KM0103 is its advanced energy efficiency technologies. The window utilizes double or triple-pane glass, effectively reducing heat transfer and minimizing energy costs. The insulated glass unit is filled with argon gas, which provides additional thermal protection and contributes to a comfortable indoor environment, regardless of external weather conditions. This energy-efficient design not only lowers heating and cooling bills but also enhances the overall comfort of a home year-round.

In terms of durability, the Pella 80KM0103 is constructed with high-quality materials that resist warping, rotting, and other common issues faced by traditional windows. Its exterior features a fiberglass frame that offers superior strength and protection against the elements, ensuring longevity and reliability. The composite material is designed to withstand extreme weather conditions without requiring extensive maintenance, making it an ideal choice for various environments.

The window is also designed with a focus on noise reduction. The multi-layer glass construction helps to minimize outside noise, creating a quieter and more serene indoor atmosphere. This feature is particularly appealing for homes located in busy urban areas or those situated near highways.

Another significant characteristic of the Pella 80KM0103 is its customizable design. Homeowners can choose from a variety of styles, colors, and finishes to perfectly match their home’s architecture and personal preferences. This flexibility allows for seamless integration into any design scheme, enhancing the overall aesthetic of the property.

Moreover, the Pella 80KM0103 includes an array of hardware options and locking mechanisms, promoting enhanced security. The incorporation of advanced locking systems ensures that the windows are not only visually appealing but also provide peace of mind for residents.

In summary, the Pella 80KM0103 stands out as an excellent choice for anyone seeking high-performance, energy-efficient, and customizable windows. Its exceptional features, including energy efficiency, noise reduction, durability, and design flexibility, make it a popular option among homeowners looking to upgrade their living spaces while ensuring comfort and security.