Door Switching Instructions – Single Door Refrigerator
Tools Required
■Large Flathead Screwdriver.
■Regular
■Small
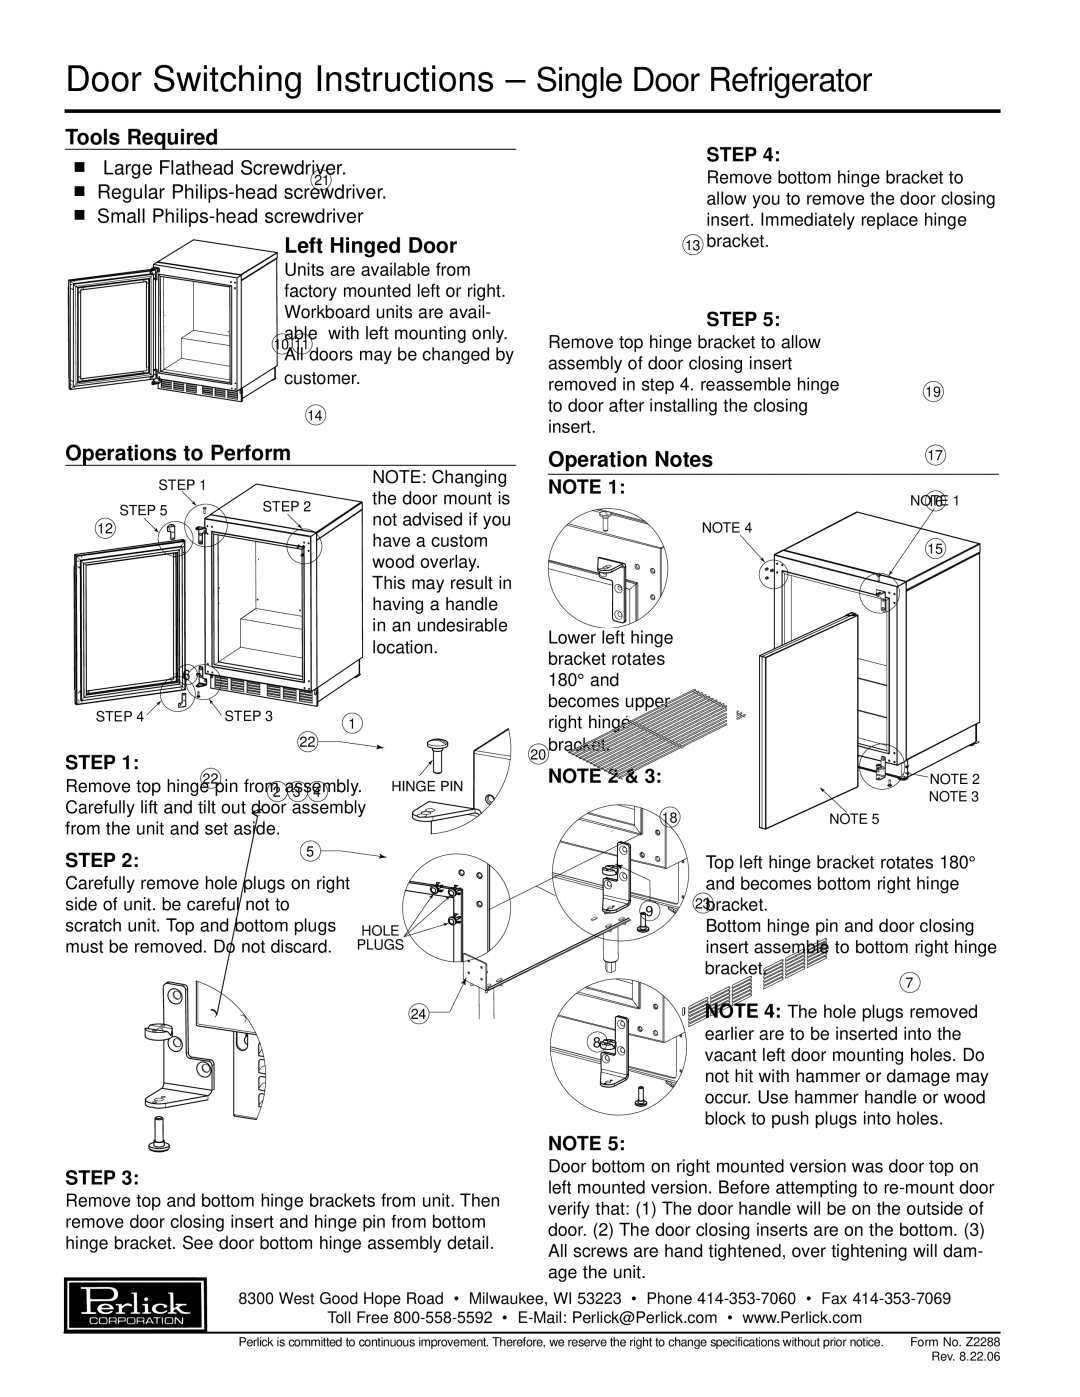
 Left Hinged Door
Units are available from factory mounted left or right. Workboard units are avail-
HINGE
BRACKET
CLOSING ![]()
![]() INSERT
INSERT ![]()
STEP 4:
Remove bottom hinge bracket to allow you to remove the door closing insert. Immediately replace hinge bracket.![]()
| HINGE |
STEP 5: | BRACKET |
|
![]() able with left mounting only. All doors may be changed by
able with left mounting only. All doors may be changed by ![]()
![]()
![]()
![]()
![]()
![]()
![]() customer.
customer.
Remove top hinge bracket to allow assembly of door closing insert removed in step 4. reassemble hinge to door after installing the closing insert.
Operations to Perform
Operation Notes
STEP 1 |
| NOTE: Changing | |
| the door mount is | ||
STEP 5 | STEP 2 | ||
not advised if you | |||
|
| ||
|
| have a custom | |
|
| wood overlay. | |
|
| This may result in | |
|
| having a handle | |
|
| in an undesirable | |
|
| location. | |
STEP 4 | STEP 3 |
|
STEP 1:![]() Remove top hinge pin from assembly. HINGE PIN Carefully lift and tilt out door assembly
Remove top hinge pin from assembly. HINGE PIN Carefully lift and tilt out door assembly ![]() from the unit and set aside.
from the unit and set aside.![]()
NOTE 1:
NOTE 4
Lower left hinge bracket rotates 180° and becomes upper right hinge bracket.
NOTE 2 & 3:
NOTE 1
![]() NOTE 2
NOTE 2
NOTE 3
NOTE 5
STEP 2:
Carefully remove hole plugs on right side of unit. be careful not to
scratch unit. Top and bottom plugs HOLE ![]() must be removed. Do not discard. PLUGS
must be removed. Do not discard. PLUGS
Top left hinge bracket rotates 180° and becomes bottom right hinge bracket.
Bottom hinge pin and door closing insert assemble to bottom right hinge bracket.
HINGE | DOOR | |
HINGE | ||
BRACKET | ||
BRACKET | ||
| ||
CLOSING | UNIT | |
INSERT | ||
HINGE | ||
DOOR | ||
CLOSING | BRACKET | |
INSERT |
| |
BOTTOM | HINGE | |
HINGE PIN | ||
PIN | ||
|
STEP 3:
Remove top and bottom hinge brackets from unit. Then remove door closing insert and hinge pin from bottom hinge bracket. See door bottom hinge assembly detail.
NOTE 4: The hole plugs removed earlier are to be inserted into the vacant left door mounting holes. Do not hit with hammer or damage may occur. Use hammer handle or wood block to push plugs into holes.
NOTE 5:
Door bottom on right mounted version was door top on left mounted version. Before attempting to
8300 West Good Hope Road • Milwaukee, WI 53223 • Phone
Toll Free
Perlick is committed to continuous improvement. Therefore, we reserve the right to change specifications without prior notice. | Form No. Z2288 |
| Rev. 8.22.06 |