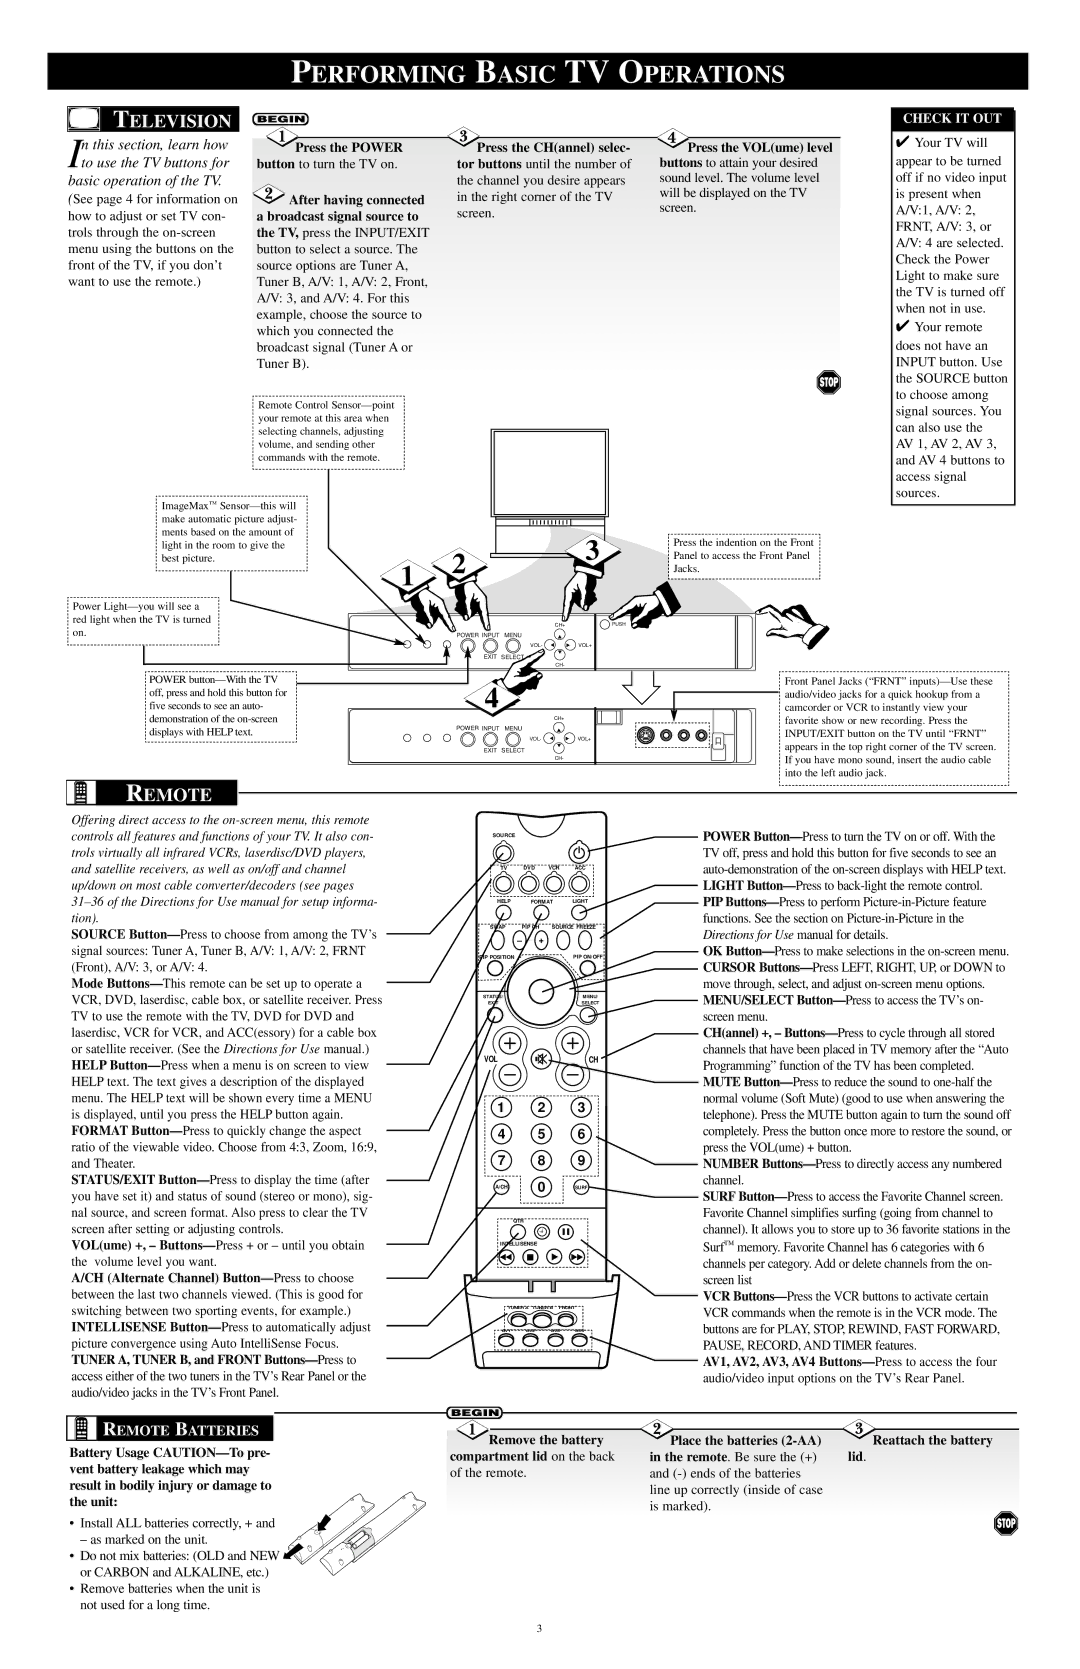
Remote Control Sensor—point your remote at this area when selecting channels, adjusting volume, and sending other commands with the remote.
ImageMax™ Sensor—this will make automatic picture adjust- ments based on the amount of light in the room to give the best picture.
1
Power Light—you will see a red light when the TV is turned on.
POWER button—With the TV off, press and hold this button for five seconds to see an auto- demonstration of the on-screen displays with HELP text.
REMOTE
Offering direct access to the on-screen menu, this remote controls all features and functions of your TV. It also con- trols virtually all infrared VCRs, laserdisc/DVD players, and satellite receivers, as well as on/off and channel up/down on most cable converter/decoders (see pages 31–36 of the Directions for Use manual for setup informa- tion).
SOURCE Button—Press to choose from among the TV’s signal sources: Tuner A, Tuner B, A/V: 1, A/V: 2, FRNT (Front), A/V: 3, or A/V: 4.
Mode Buttons—This remote can be set up to operate a VCR, DVD, laserdisc, cable box, or satellite receiver. Press TV to use the remote with the TV, DVD for DVD and laserdisc, VCR for VCR, and ACC(essory) for a cable box or satellite receiver. (See the Directions for Use manual.) HELP Button—Press when a menu is on screen to view HELP text. The text gives a description of the displayed menu. The HELP text will be shown every time a MENU is displayed, until you press the HELP button again. FORMAT Button—Press to quickly change the aspect ratio of the viewable video. Choose from 4:3, Zoom, 16:9, and Theater.
STATUS/EXIT Button—Press to display the time (after you have set it) and status of sound (stereo or mono), sig- nal source, and screen format. Also press to clear the TV screen after setting or adjusting controls.
VOL(ume) +, – Buttons—Press + or – until you obtain the volume level you want.
A/CH (Alternate Channel) Button—Press to choose between the last two channels viewed. (This is good for switching between two sporting events, for example.) INTELLISENSE Button—Press to automatically adjust picture convergence using Auto IntelliSense Focus. TUNER A, TUNER B, and FRONT Buttons—Press to access either of the two tuners in the TV’s Rear Panel or the audio/video jacks in the TV’s Front Panel.
 REMOTE BATTERIES
Battery Usage CAUTION—To pre- vent battery leakage which may result in bodily injury or damage to the unit:
•Install ALL batteries correctly, + and
– as marked on the unit.
•Do not mix batteries: (OLD and NEW or CARBON and ALKALINE, etc.)
•Remove batteries when the unit is not used for a long time.
signal sources. You can also use the AV 1, AV 2, AV 3, and AV 4 buttons to access signal sources.
Press the indention on the Front
Panel to access the Front Panel
Jacks.
Front Panel Jacks (“FRNT” inputs)—Use these audio/video jacks for a quick hookup from a camcorder or VCR to instantly view your favorite show or new recording. Press the INPUT/EXIT button on the TV until “FRNT” appears in the top right corner of the TV screen. If you have mono sound, insert the audio cable into the left audio jack.
POWER Button—Press to turn the TV on or off. With the TV off, press and hold this button for five seconds to see an auto-demonstration of the on-screen displays with HELP text. LIGHT Button—Press to back-light the remote control. PIP Buttons—Press to perform Picture-in-Picture feature functions. See the section on Picture-in-Picture in the Directions for Use manual for details.
OK Button—Press to make selections in the on-screen menu. CURSOR Buttons—Press LEFT, RIGHT, UP, or DOWN to move through, select, and adjust on-screen menu options.
MENU/SELECT Button—Press to access the TV’s on- screen menu.
CH(annel) +, – Buttons—Press to cycle through all stored channels that have been placed in TV memory after the “Auto Programming” function of the TV has been completed. MUTE Button—Press to reduce the sound to one-half the normal volume (Soft Mute) (good to use when answering the telephone). Press the MUTE button again to turn the sound off completely. Press the button once more to restore the sound, or press the VOL(ume) + button.
NUMBER Buttons—Press to directly access any numbered channel.
SURF Button—Press to access the Favorite Channel screen. Favorite Channel simplifies surfing (going from channel to channel). It allows you to store up to 36 favorite stations in the Surf™ memory. Favorite Channel has 6 categories with 6 channels per category. Add or delete channels from the on- screen list
VCR Buttons—Press the VCR buttons to activate certain VCR commands when the remote is in the VCR mode. The buttons are for PLAY, STOP, REWIND, FAST FORWARD, PAUSE, RECORD, AND TIMER features.
AV1, AV2, AV3, AV4 Buttons—Press to access the four audio/video input options on the TV’s Rear Panel.
Place the batteries (2-AA) | Reattach the battery |
in the remote. Be sure the (+) | lid. |
and (-) ends of the batteries | |
line up correctly (inside of case | |
is marked). | |

 Remove the battery