1 |
English | Controls/Power Supply |
Power Supply | General operation/Tuner |
1 | 2 | 3 | 4 5 |
|
|
| |
@ ! 09 8 7 6 |
| ||
|
|
| # |
|
|
| $ |
|
|
| % |
| 6 x R14 • |
| |
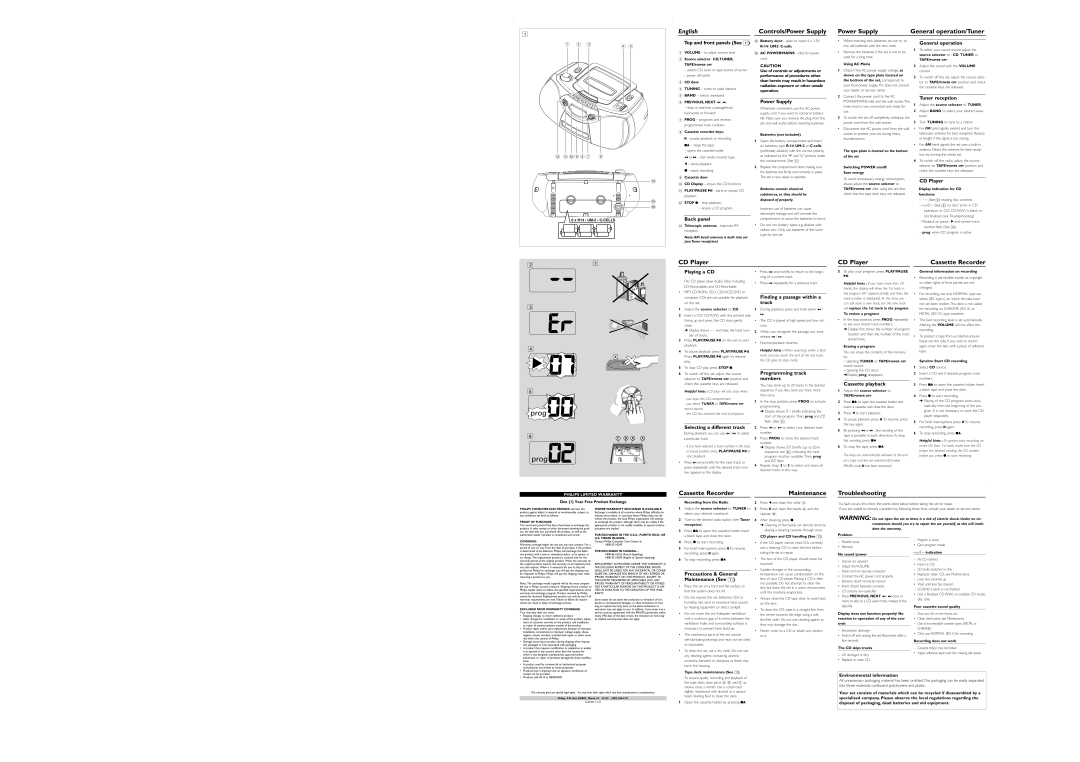
Top and front panels (See 1)
1VOLUME – to adjust volume level
2Source selector : CD,TUNER,
TAPE/POWER OFF
– selects CD, tuner or tape source of sound
–power off switch
3CD door
4TUNING – tunes to radio stations
5BAND – selects waveband
6PREVIOUS, NEXT ∞ , §
– skips or searches a passage/track backwards or forward
7PROG – programs and reviews programmed track numbers
8Cassette recorder keys:
; – pauses playback or recording
9/ – stops the tape;
– opens the cassette holder
5or 6 – fast winds/ rewinds tape
1– starts playback
0– starts recording
9Cassette door
0CD Display – shows the CD functions
!PLAY/PAUSE 2; - starts or pauses CD playback.
@STOP 9 – stop playback;
–erases a CD program.
Back panel
#Telescopic antenna - improves FM reception.
Note: AM band antenna is built into set (see Tuner reception)
$Battery door - open to insert 6 x 1.5V
%AC POWER/MAINS - inlet for power cord.
CAUTION
Use of controls or adjustments or performance of procedures other than herein may result in hazardous radiation exposure or other unsafe operation.
Power Supply
Whenever convenient, use the AC power supply cord if you want to conserve battery life. Make sure you remove the plug from the set and wall outlet before inserting batteries.
Batteries (not included)
1Open the battery compartment and insert six batteries, type
2Replace the compartment door, making sure the batteries are firmly and correctly in place. The set is now ready to operate.
Batteries contain chemical substances, so they should be disposed of properly.
Incorrect use of batteries can cause electrolyte leakage and will corrode the compartment or cause the batteries to burst:
•Do not mix battery types: e.g. alkaline with carbon zinc. Only use batteries of the same type for the set.
•When inserting new batteries, do not try to mix old batteries with the new ones.
•Remove the batteries if the set is not to be used for a long time.
Using AC Mains
1Check if the AC power supply voltage, as shown on the type plate located on the bottom of the set, corresponds to your local power supply. If it does not, consult your dealer or service center.
2Connect the power cord to the AC POWER/MAINS inlet and the wall socket. The mains lead is now connected and ready for use.
3To switch the set off completely, withdraw the power cord from the wall socket.
•Disconnect the AC power cord from the wall socket to protect your set during heavy thunderstorms.
The type plate is located on the bottom of the set.
Switching POWER on/off: Save energy
To avoid unnecessary energy consumption, always adjust the source selector to TAPE/POWER OFF after using the set. Also check that the tape deck keys are released.
General operation
1To select your sound source adjust the source selector to : CD, TUNER or
TAPE/POWER OFF.
2Adjust the sound with the VOLUME control.
3To switch off the set, adjust the source selec- tor to TAPE/POWER OFF position and check the cassette keys are released.
Tuner reception
1Adjust the source selector to TUNER.
2Adjust BAND to select your desired wave- band.
3Turn TUNING to tune to a station.
•For FM band signals, extend and turn the telescopic antenna for best reception. Reduce its length if the signal is too strong.
•For AM band signals, the set uses a
4To switch off the radio, adjust the source selector to TAPE/POWER OFF position and check the cassette keys are released.
CD Player
Display indication for CD
functions:
–--: (See 2) reading disc contents
–no/Er: (See 3) no disc/ error in CD operation or CD/
–Playback on pause : 2 and current track number flash (See 4).
–prog: when CD program is active
2 | 7 |
CD Player
CD Player | Cassette Recorder |
3 |
4 |
X |
5 |
prog ![]()
![]()
![]()
![]()
6
C B A A
prog ![]()
![]()
![]()
Playing a CD
This CD player plays Audio Discs including
•MP3
1Adjust the source selector to CD.
2Insert a CD/
➜Display shows
3Press PLAY/PAUSE 2; on the set to start playback.
4To pause playback press PLAY/PAUSE 2;. Press PLAY/PAUSE 2; again to resume play.
5To stop CD play, press STOP 9.
6To switch off the set, adjust the source selector to TAPE/POWER OFF position and check the cassette keys are released.
Helpful hints : CD play will also stop when:
- you open the CD compartment;
- you select TUNER or TAPE/POWER OFF sound source;
- the CD has reached the end of playback.
Selecting a different track
During playback you can use ∞ / § to select
a particular track.
-If you have selected a track number in the stop or pause position, press PLAY/PAUSE 2; to start playback.
•Press § once briefly for the next track, or press repeatedly until the desired track num- ber appears in the display.
•Press ∞ once briefly to return to the begin- ning of a current track.
•Press ∞ repeatedly for a previous track.
Finding a passage within a track
1During playback, press and hold down ∞ / §.
•The CD is played at high speed and low vol- ume.
2When you recognize the passage you want release ∞ / §.
•Normal playback resumes.
Helpful hints : When searching within a final track and you reach the end of the last track, the CD goes to stop mode.
Programming track numbers
You may store up to 20 tracks in the desired sequence. If you like, store any track more than once.
1In the stop position, press PROG to activate programming.
➜Display shows 01 briefly, indicating the start of the program. Then, prog and 00 flash. (See 5)
2Press ∞ or § to select your desired track number.
3Press PROG to store the desired track number.
➜Display shows 02 briefly (up to 20 in sequence. see 6), indicating the next program location available. Then, prog and 00 flash.
4Repeat steps 2 to 3 to select and store all desired tracks in this way.
5To play your program, press PLAY/PAUSE 2;.
Helpful hints : If you store more than 20 tracks, the display will show the 1st track in the program (01 appears briefly and then, the track number is displayed). At this time, you can still store a new track, but the new track will replace the 1st track in the program.
To review a program
•In the stop position, press PROG repeatedly to see your stored track numbers.
➜Display first shows the number of program location and then, the number of the track stored here.
Erasing a program
You can erase the contents of the memory by:
–selecting TUNER or TAPE/POWER OFF sound source;
–opening the CD door;
➜Display: prog disappears.
Cassette playback
1Adjust the source selector to
TAPE/POWER OFF.
2Press 9/ to open the cassette holder and insert a cassette and close the deck.
3Press 1 to start playback.
4To pause playback press ;. To resume, press the key again.
5By pressing 5 or 6 , fast winding of the tape is possible in both directions. To stop fast winding, press 9/
6To stop the tape, press 9/.
The keys are automatically released at the end of a tape and the set switched off (unless PAUSE mode ; has been activated.)
General information on recording
•Recording is permissible insofar as copyright or. other rights of third parties are not infringed.
•For recording, use only NORMAL type cas- settes (IEC type I) on which the tabs have not yet been broken. This deck is not suited for recording on CHROME (IEC II) or METAL (IEC IV) type cassettes.
•The best recording level is set automatically. Altering the VOLUME will not affect the recording.
•To protect a tape from accidental erasure, break out the tabs. If you wish to record again, cover the tabs with a piece of adhesive tape.
Synchro Start CD recording
1Select CD source.
2Insert a CD and if desired, program track numbers.
3Press 9/ to open the cassette holder. Insert a blank tape and close the deck.
4Press 0 to start recording.
➜Playing of the CD program starts auto- matically from the beginning of the pro- gram. It is not necessary to start the CD player separately.
5For brief interruptions press ;. To resume recording, press ; again.
6To stop recording, press 9/.
Helpful hints : To synchro start recording an entire CD from 1st track, make sure the CD player has finished reading the CD content before you press 0 to start recording.
PHILIPS LIMITED WARRANTY
Cassette Recorder | Maintenance |
Troubleshooting
One (1) Year Free Product Exchange
Recording from the Radio
2 Press 1 and clean the roller C. |
If a fault occurs, first check the points listed below before taking the set for repair.
PHILIPS CONSUMER ELECTRONICS warrants this product against defect in material or workmanship, subject to any conditions set forth as follows:
PROOF OF PURCHASE:
You must have proof of the date of purchase to exchange the product. A sales receipt or other document showing the prod- uct, the date that you purchased the product, as well as the
WHERE WARRANTY EXCHANGE IS AVAILABLE:
Exchange is available in all countries where Philips officially dis- tributes the product. In countries where Philips does not dis- tribute the product, the local Philips organization will attempt to exchange the product, although there may be a delay if the appropriate product is not readily available, or special customs processes are implied.
1 | Adjust the source selector to TUNER to |
| select your desired waveband. |
2 | Tune to the desired radio station (see Tuner |
| reception). |
3 | Press 9/ to open the cassette holder. Insert |
3 | Press ; and clean the heads A, and the |
| capstan B. |
4 | After cleaning, press 9. |
| ➜ Cleaning of the heads can also be done by |
| playing a cleaning cassette through once. |
If you are unable to remedy a problem by following these hints, consult your dealer or service center.
WARNING: Do not open the set as there is a risk of electric shock. Under no cir- cumstances should you try to repair the set yourself, as this will invali- date the warranty.
authorized retailer included, is considered such proof.
COVERAGE:
Warranty coverage begins the day you buy your product. For a period of one (1) year from the date of purchase, if the product is determined to be defective, Philips will exchange the defec- tive product with a new or renewed product, at its option, at no charge. The replacement product is covered only for the warranty period of the original product. When the warranty on the original product expires, the warranty on all replaced prod- ucts also expires. When it is necessary for you to ship the product to Philips for exchange, you will pay the shipping cost for shipment to Philips. Philips will pay the shipping costs when returning a product to you.
Note: The exchange model supplied will be the most compara- ble one in Philips current inventory. Shipping of your product to Philips implies intent to follow the specified requirements of the warranty and exchange program. Product received by Philips cannot be returned. Replacement product can only be sent if all warranty requirements are met. Failure to follow all require- ments can result in delay of exchange process.
EXCLUDED FROM WARRANTY COVERAGE
Your warranty does not cover:
• Shipping charges to return defective product. |
• Labor charges for installation or setup of the product, adjust- |
ment of customer controls on the product, and installation |
or repair of antenna systems outside of the product. |
• Product repair and/or part replacement because of improper |
installation, connections to improper voltage supply, abuse, |
neglect, misuse, accident, unauthorized repair or other cause |
not within the control of Philips. |
• Damage occurring to product during shipping when improp- |
erly packaged or cost associated with packaging. |
• A product that requires modification or adaptation to enable |
it to operate in any country other than the country for |
which it was designed, manufactured, approved and/or |
authorized, or repair of products damaged by these modifica- |
tions. |
• A product used for commercial or institutional purposes |
(including but not limited to rental purposes). |
• Products lost in shipment and no signature verification of |
FOR EXCHANGE IN THE U.S.A., PUERTO RICO, OR U.S. VIRGIN ISLANDS…
Contact Philips Customer Care Center at:
FOR EXCHANGE IN CANADA…
REPLACEMENT AS PROVIDED UNDER THIS WARRANTY IS THE EXCLUSIVE REMEDY OF THE CONSUMER. PHILIPS SHALL NOT BE LIABLE FOR ANY INCIDENTAL OR CONSE- QUENTIAL DAMAGES FOR BREACH OF ANY EXPRESS OR IMPLIED WARRANTY ON THIS PRODUCT. EXCEPT TO THE EXTENT PROHIBITED BY APPLICABLE LAW, ANY IMPLIED WARRANTY OF MERCHANTABILITY OR FITNESS FOR A PARTICULAR PURPOSE ON THIS PRODUCT IS LIM- ITED IN DURATION TO THE DURATION OF THIS WAR- RANTY.
Some states do not allow the exclusions or limitation of inci- dental or consequential damages, or allow limitations on how long an implied warranty lasts, so the above limitations or exclusions may not apply to you. In addition, if you enter into a service contract agreement with the PHILIPS partnership within ninety (90) days of the date of sale, the limitation on how long an implied warranty lasts does not apply.
| a blank tape and close the deck. |
4 | Press 0 to start recording. |
5 | For brief interruptions press ;. To resume |
| recording, press ; again. |
6 | To stop recording, press 9/. |
Precautions & General
Maintenance (See 7)
• Place the set on a hard and flat surface so |
that the system does not tilt. |
• Do not expose the set, batteries, CDs to |
humidity, rain, sand or excessive heat caused |
by heating equipment or direct sunlight. |
• Do not cover the set. Adequate ventilation |
with a minimum gap of 6 inches between the |
ventilation holes and surrounding surfaces is |
necessary to prevent heat |
• The mechanical parts of the set contain |
or lubricated. |
• To clean the set, use a dry cloth. Do not use |
any cleaning agents containing alcohol, |
ammonia, benzene or abrasives as these may |
harm the housing. |
Tape deck maintenance (See 7) |
CD player and CD handling (See 7)
•If the CD player cannot read CDs correctly, use a cleaning CD to clean the lens before taking the set to repair.
•The lens of the CD player should never be touched!
•Sudden changes in the surrounding temperature can cause condensation on the lens of your CD player. Playing a CD is then not possible. Do not attempt to clean the lens but leave the set in a warm environment until the moisture evaporates.
•Always close the CD-tape door to avoid dust on the lens.
•To clean the CD, wipe in a straight line from the center towards the edge using a soft,
•Never write on a CD or attach any stickers to it.
Problem
–Possible cause
• Remedy
No sound /power
–Volume not adjusted
• Adjust the VOLUME
–Power cord not securely connected
•Connect the AC power cord properly
– Batteries dead/ incorrectly inserted
•Insert (fresh) batteries correctly
–CD contains
•Press PREVIOUS, NEXT ∞ , § once or more to skip to a CD audio track, instead of the data file.
Display does not function properly/ No
reaction to operation of any of the con-
trols
–Electrostatic discharge
•Switch off and unplug the set. Reconnect after a few seconds
The CD skips tracks
–CD damaged or dirty
• Replace or clean CD
–Program is active
• Quit program mode
no/Er indication
–No CD inserted
• Insert a CD
–CD badly scratched or dirty
•Replace/ clean CD, see Maintenance
– Laser lens steamed up
•Wait until lens has cleared
–
•Use a finalized
Poor cassette sound quality
–Dust and dirt on the heads, etc.
• Clean deck parts, see Maintenance
–Use of incompatible cassette types (METAL or
CHROME)
• Only use NORMAL (IEC I) for recording
Recording does not work
–Cassette tab(s) may be broken
• Apply adhesive tape over the missing tab space
receipt can be provided. |
• Products sold AS IS or RENEWED. |
To ensure quality recording and playback of |
the tape deck, clean parts A, B and C as |
shown, once a month. Use a cotton bud |
Environmental information
All unnecessary packaging material has been omitted.The packaging can be easily separated into three materials: cardboard, polystyrene and plastic.
This warranty gives you specific legal rights. You may have other rights which vary from state/province to state/province.
Philips, P.O. Box 520890, Miami, FL 33152 (402)
EL6587E001 /
slightly moistened with alcohol or a special |
head cleaning fluid to clean the deck. |
1Open the cassette holder by pressing 9/.
Your set consists of materials which can be recycled if disassembled by a specialized company. Please observe the local regulations regarding the disposal of packaging, dead batteries and old equipment.