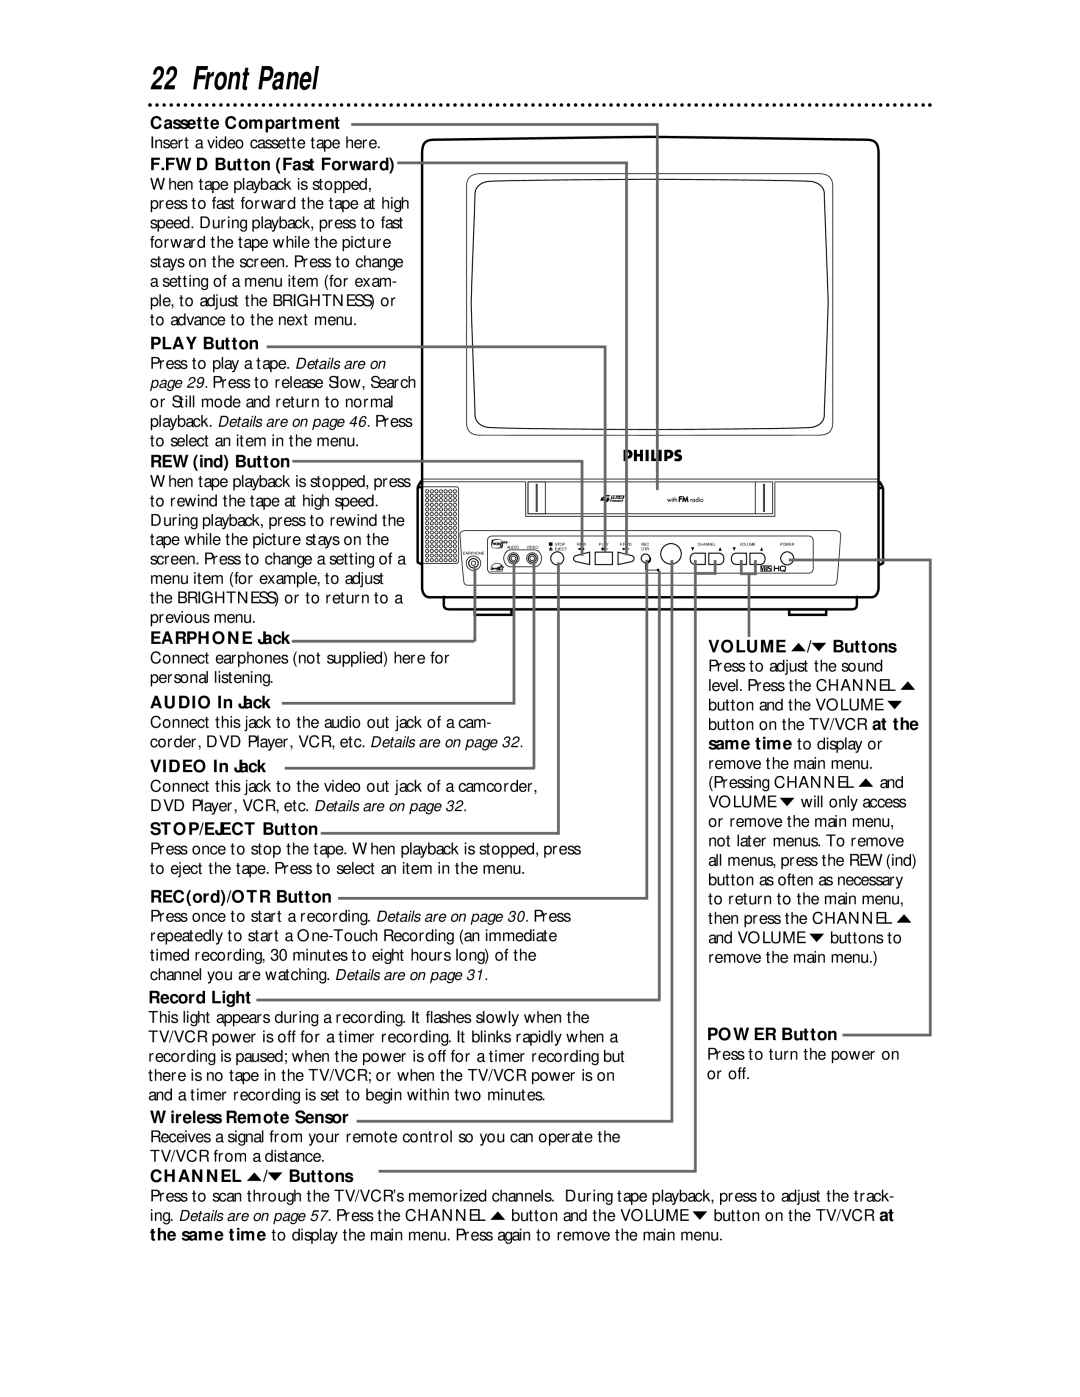
22 Front Panel

Cassette Compartment

Insert a video cassette tape here.

F.FWD Button (Fast Forward) When tape playback is stopped, press to fast forward the tape at high speed. During playback, press to fast forward the tape while the picture stays on the screen. Press to change a setting of a menu item (for exam- ple, to adjust the BRIGHTNESS) or to advance to the next menu.

PLAY Button


Press to play a tape. Details are on


page 29. Press to release Slow, Search


or Still mode and return to normal


playback. Details are on page 46. Press


to select an item in the menu.


REW(ind) Button


When tape playback is stopped, press


to rewind the tape at high speed.


During playback, press to rewind the


tape while the picture stays on the


AUDIO VIDEO EJECT

OTR

CHANNELVOLUMEPOWER


STOP REW PLAY F.FWD

REC

screen. Press to change a setting of a

EARPHONE


menu item (for example, to adjust


the BRIGHTNESS) or to return to a


previous menu.


EARPHONE Jack


VOLUME o/p Buttons

Connect earphones (not supplied) here for


Press to adjust the sound

personal listening.


level. Press the CHANNEL o

AUDIO In Jack


button and the VOLUME p

Connect this jack to the audio out jack of a cam-


button on the TV/VCR at the

corder, DVD Player, VCR, etc. Details are on page 32.


same time to display or

VIDEO In Jack


remove the main menu.

Connect this jack to the video out jack of a camcorder,


(Pressing CHANNEL o and

DVD Player, VCR, etc. Details are on page 32.


VOLUME p will only access

STOP/EJECT Button


or remove the main menu,


not later menus. To remove

Press once to stop the tape. When playback is stopped, press


all menus, press the REW(ind)

to eject the tape. Press to select an item in the menu.


button as often as necessary

REC(ord)/OTR Button


to return to the main menu,

Press once to start a recording. Details are on page 30. Press


then press the CHANNEL o

repeatedly to start a One-Touch Recording (an immediate


and VOLUME p buttons to

timed recording, 30 minutes to eight hours long) of the


remove the main menu.)

channel you are watching. Details are on page 31.


Record Light


This light appears during a recording. It flashes slowly when the


POWER Button

TV/VCR power is off for a timer recording. It blinks rapidly when a


recording is paused; when the power is off for a timer recording but


Press to turn the power on

there is no tape in the TV/VCR; or when the TV/VCR power is on


or off.

and a timer recording is set to begin within two minutes.


Wireless Remote Sensor

Receives a signal from your remote control so you can operate the

TV/VCR from a distance.

CHANNEL o/p Buttons

Press to scan through the TV/VCR’s memorized channels. During tape playback, press to adjust the track- ing. Details are on page 57. Press the CHANNEL o button and the VOLUME p button on the TV/VCR at the same time to display the main menu. Press again to remove the main menu.

Page 22
Image 22
Philips CCC 134AT, CCC 194AT owner manual Front Panel

CCC 194AT, CCC 134AT specifications

Philips has long been a pioneer in the development of high-quality electronic components, and the CCC 134AT and CCC 194AT models are no exception. Both devices have been engineered to meet the demands of modern audio-visual systems, boasting advanced features and innovative technologies that set them apart in the market.

The CCC 134AT is notable for its high-performance capabilities. One of its defining characteristics is its exceptional sound quality, which is achieved through a combination of advanced digital signal processing and precise analog circuitry. This model supports a wide frequency range, allowing it to reproduce both the deepest bass notes and the most delicate high frequencies with remarkable clarity. Furthermore, it incorporates built-in noise reduction technology to enhance audio fidelity, making it suitable for professional applications where sound quality is paramount.

On the other hand, the CCC 194AT focuses on versatility and adaptability. It features a multi-channel architecture that enables seamless integration with various audio formats, ensuring compatibility with both conventional and cutting-edge sound systems. This model also emphasizes user-friendliness, with an intuitive interface that allows users to customize their audio experience easily. Additionally, the CCC 194AT offers multiple connectivity options, including HDMI, optical, and analog inputs, catering to a wide range of devices from televisions to gaming consoles.

One of the standout technologies found in both models is Philips' proprietary Dynamic Audio Calibration. This feature automatically adjusts the audio settings to suit the acoustics of the environment, delivering optimized sound regardless of the room's characteristics. Furthermore, the CCC 134AT and CCC 194AT are designed with energy efficiency in mind, incorporating power-saving modes that minimize consumption without sacrificing performance.

In terms of build quality, both models feature robust enclosures crafted from durable materials, ensuring longevity and resilience in demanding environments. Their sleek, modern designs are aesthetically pleasing, making them suitable for both commercial and residential settings.

In summary, the Philips CCC 134AT and CCC 194AT exemplify the company's commitment to innovation and quality in audio technology. With their high-performance capabilities, intuitive features, and cutting-edge technologies, these models are well-equipped to meet the needs of even the most discerning audio enthusiasts. Whether for professional use or home entertainment, they represent a significant advancement in the world of audio components.