... cont.
| LABEL |
|
|
|
|
|
|
|
|
STANDBY |
| OPEN/CLOSE |
|
|
|
|
|
| EJECT |
ON |
|
|
|
|
|
|
|
|
|
OPEN |
|
|
|
|
|
|
|
|
|
|
|
|
|
|
| SOURCE | RECORD PAUSE STOP | REW | PLAY F.FWD |
|
|
|
|
|
| DVD |
|
|
|
|
|
|
|
|
| VCR |
|
|
|
1 |
| TV/VIDEO | DVD |
| VCR | OPEN/CLOSE | 3 4 3 | ||
| OR |
|
|
|
| ||||
|
| RETURN |
|
|
| DISPLAY |
|
|
|
| 6 | LIST/DISC |
|
|
| SYSTEM |
|
|
|
| MENU |
|
|
| MENU |
|
|
| |
|
|
|
|
|
|
|
|
| |
|
|
|
| OK |
| PAUSE/STEP |
| ||
|
|
|
|
|
|
| |||
|
| STOP |
| PLAY | PAUSE/STEP |
|
| 5 | |
| 2 | D.DUBBING | REW |
| FWD | RECORD |
|
| |
| THUMBNAIL | CHAPTER | TIMER | REC MODE |
|
|
| ||
|
|
|
|
|
| RECORD |
|
| |
|
| REPEAT | TITLE | AUDIO | ZOOM |
|
| ||
|
| SEARCH | MARKER | CLEAR SHOWVIEW |
|
| 4 | ||
|
|
|
|
|
| VIDEOPLUS + |
|
| |
|
|
|
|
|
|
|
|
| |
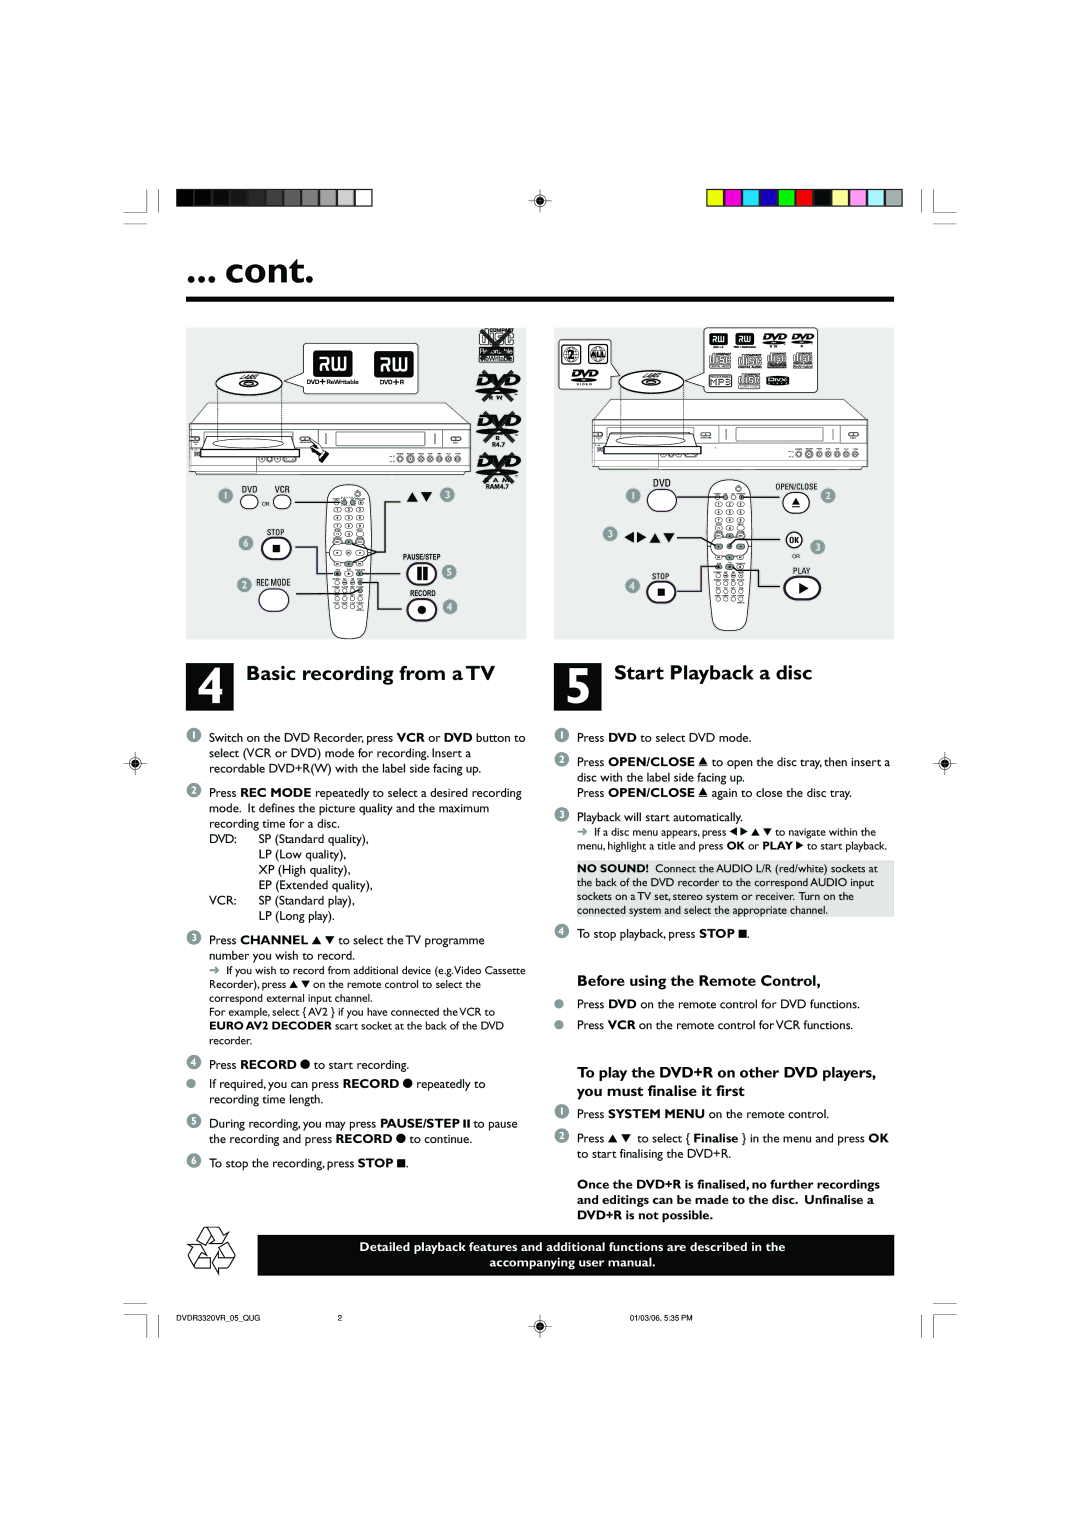
4 Basic recording from a TV
1Switch on the DVD Recorder, press VCR or DVD button to select (VCR or DVD) mode for recording. Insert a recordable DVD+R(W) with the label side facing up.
2Press REC MODE repeatedly to select a desired recording mode. It defines the picture quality and the maximum recording time for a disc.
DVD: SP (Standard quality), LP (Low quality), XP (High quality), EP (Extended quality),
VCR: SP (Standard play), LP (Long play).
2 | ALL |
|
|
|
|
|
|
|
|
|
|
|
| LABEL |
|
|
|
|
|
|
|
|
|
|
|
|
|
|
|
| SUPER VIDEO |
|
|
|
|
|
|
|
| STANDBY | OPEN/CLOSE |
|
|
|
|
|
|
|
|
| EJECT |
| ON |
|
|
|
|
|
|
|
|
|
|
|
|
|
|
|
|
| SOURCE | RECORD | PAUSE | STOP | REW | PLAY | F.FWD |
|
|
|
|
|
| DVD |
|
|
|
|
|
|
|
|
|
|
|
| VCR |
|
|
|
|
|
|
| 1 | TV/VIDEO | DVD | VCR | OPEN/CLOSE |
|
| 2 |
|
| ||
|
|
|
|
|
|
|
|
| ||||
|
| RETURN |
|
| DISPLAY |
|
|
|
|
|
|
|
| 3 1 2 3 4 | LIST/DISC |
| SYSTEM |
|
|
|
|
|
|
| |
| MENU |
|
| MENU | OK |
|
|
|
|
|
| |
|
| OK |
| 3 |
|
|
|
| ||||
|
|
|
|
|
|
|
|
| ||||
|
|
|
|
|
|
|
|
|
|
| ||
|
|
|
|
|
| OR |
|
|
|
|
|
|
|
| STOP | PLAY | PAUSE/STEP |
|
|
|
|
|
|
| |
|
| D.DUBBING | REW | FWD | RECORD | PLAY |
|
|
|
|
| |
|
|
|
|
|
|
|
|
|
|
| ||
| 4 | THUMBNAIL | CHAPTER | TIMER | REC MODE | 2 |
|
|
|
|
| |
| REPEAT | TITLE | AUDIO | ZOOM |
|
|
|
|
| |||
| SEARCH | MARKER | CLEAR | SHOWVIEW |
|
|
|
|
| |||
|
|
|
|
| VIDEOPLUS + |
|
|
|
|
|
|
|
5 Start Playback a disc
1Press DVD to select DVD mode.
2Press OPEN/CLOSE / to open the disc tray, then insert a disc with the label side facing up.
Press OPEN/CLOSE / again to close the disc tray.
3Playback will start automatically.
➜ If a disc menu appears, press 1 2 3 4 to navigate within the menu, highlight a title and press OK or PLAY 2 to start playback.
NO SOUND! Connect the AUDIO L/R (red/white) sockets at the back of the DVD recorder to the correspond AUDIO input sockets on a TV set, stereo system or receiver. Turn on the connected system and select the appropriate channel.
3Press CHANNEL 3 4 to select the TV programme number you wish to record.
➜ If you wish to record from additional device (e.g.Video Cassette Recorder), press 3 4 on the remote control to select the correspond external input channel.
For example, select { AV2 } if you have connected the VCR to EURO AV2 DECODER scart socket at the back of the DVD recorder.
4Press RECORD 0 to start recording.
●If required, you can press RECORD 0 repeatedly to recording time length.
5During recording, you may press PAUSE/STEP ; to pause the recording and press RECORD 0 to continue.
6 To stop the recording, press STOP 9.
4To stop playback, press STOP 9.
Before using the Remote Control,
●Press DVD on the remote control for DVD functions.
●Press VCR on the remote control for VCR functions.
To play the DVD+R on other DVD players, you must finalise it first
1Press SYSTEM MENU on the remote control.
2Press 3 4 to select { Finalise } in the menu and press OK to start finalising the DVD+R.
Once the DVD+R is finalised, no further recordings and editings can be made to the disc. Unfinalise a DVD+R is not possible.
Detailed playback features and additional functions are described in the
accompanying user manual.
DVDR3320VR_05_QUG | 2 | 01/03/06, 5:35 PM |