1Connect
Basic Connection
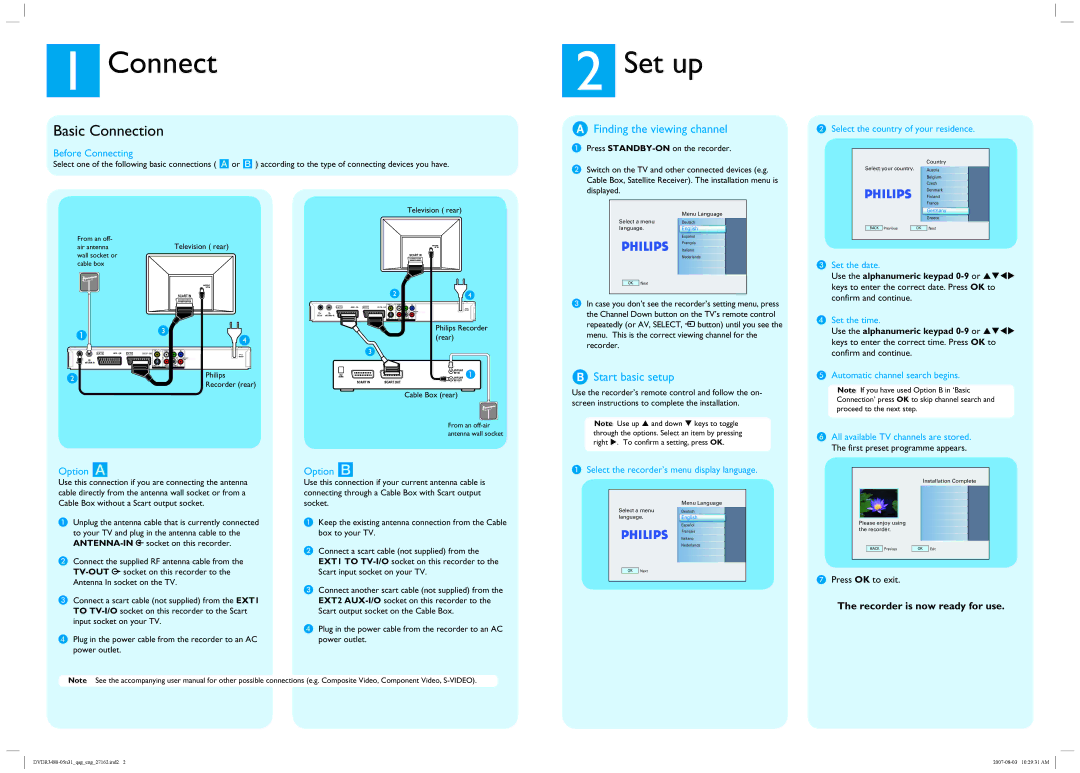
Before Connecting
Select one of the following basic connections ( A or B ) according to the type of connecting devices you have.
Television ( rear)
2Set up
AFinding the viewing channel
APress
BSwitch on the TV and other connected devices (e.g. Cable Box, Satellite Receiver). The installation menu is displayed.
| Menu Language |
Select a menu | Deutsch |
language. | English |
BSelect the country of your residence.
|
|
|
| Country |
Select your country. |
| Austria | ||
|
|
|
| Belgium |
|
|
|
| Czech |
|
|
|
| Denmark |
|
|
|
| Finland |
|
|
|
| France |
|
|
|
| Germany |
|
|
|
| Greece |
|
|
|
|
|
BACK | Previous |
| OK | Next |
From an off- air antenna wall socket or cable box
Television ( rear)
SCART IN |
SCART IN |
|
|
| CVBS | Y | Pb | |
EXT2 | AUX - I/O | EXT1 | TO TV - I/O |
|
|
|
|
|
|
|
| COAXIAL | MAINS |
|
|
|
|
| COMPONENT | |
|
|
|
|
|
| VIDEO |
|
|
|
|
|
| |
|
|
| DIGITAL AUDIO | Pr |
OUTPUT
Philips Recorder (rear)
Español |
Français |
Italiano |
Nederlands |
OK Next
CIn case you don’t see the recorder’s setting menu, press
the Channel Down button on the TV’s remote control repeatedly (or AV, SELECT, ° button) until you see the menu. This is the correct viewing channel for the recorder.
C Set the date. |
Use the alphanumeric keypad |
keys to enter the correct date. Press OK to |
confirm and continue. |
D Set the time. |
Use the alphanumeric keypad |
keys to enter the correct time. Press OK to |
CVBS | Y | Pb |
EXT2 | AUX - I/O | EXT1 | TO TV - I/O |
| COAXIAL | MAINS |
| COMPONENT | |
|
| VIDEO |
|
DIGITAL AUDIO | Pr |
OUTPUT
Philips
Recorder (rear)
Cable Box (rear)
From an
Option A | Option B |
BStart basic setup
Use the recorder’s remote control and follow the on- screen instructions to complete the installation.
Note Use up S and down T keys to toggle through the options. Select an item by pressing right X. To confirm a setting, press OK.
ASelect the recorder’s menu display language.
confirm and continue. |
E Automatic channel search begins. |
Note If you have used Option B in ‘Basic Connection’ press OK to skip channel search and proceed to the next step.
FAll available TV channels are stored. The first preset programme appears.
Use this connection if you are connecting the antenna cable directly from the antenna wall socket or from a Cable Box without a Scart output socket.
AUnplug the antenna cable that is currently connected to your TV and plug in the antenna cable to the ![]() socket on this recorder.
socket on this recorder.
BConnect the supplied RF antenna cable from the ![]() socket on this recorder to the Antenna In socket on the TV.
socket on this recorder to the Antenna In socket on the TV.
CConnect a scart cable (not supplied) from the EXT1 TO
DPlug in the power cable from the recorder to an AC power outlet.
Use this connection if your current antenna cable is connecting through a Cable Box with Scart output socket.
AKeep the existing antenna connection from the Cable box to your TV.
BConnect a scart cable (not supplied) from the EXT1 TO
CConnect another scart cable (not supplied) from the EXT2
DPlug in the power cable from the recorder to an AC power outlet.
|
|
| Menu Language |
Select a menu | Deutsch | ||
language. | English | ||
|
|
| Español |
|
|
| Français |
|
|
| Italiano |
|
|
| Nederlands |
|
|
|
|
| OK | Next |
|
|
|
|
|
Installation Complete
Please enjoy using the recorder.
BACK | Previous | OK | Exit |
GPress OK to exit.
The recorder is now ready for use.
Note See the accompanying user manual for other possible connections (e.g. Composite Video, Component Video,