Preparing for use
Filling the water tank
Never immerse the iron in water.
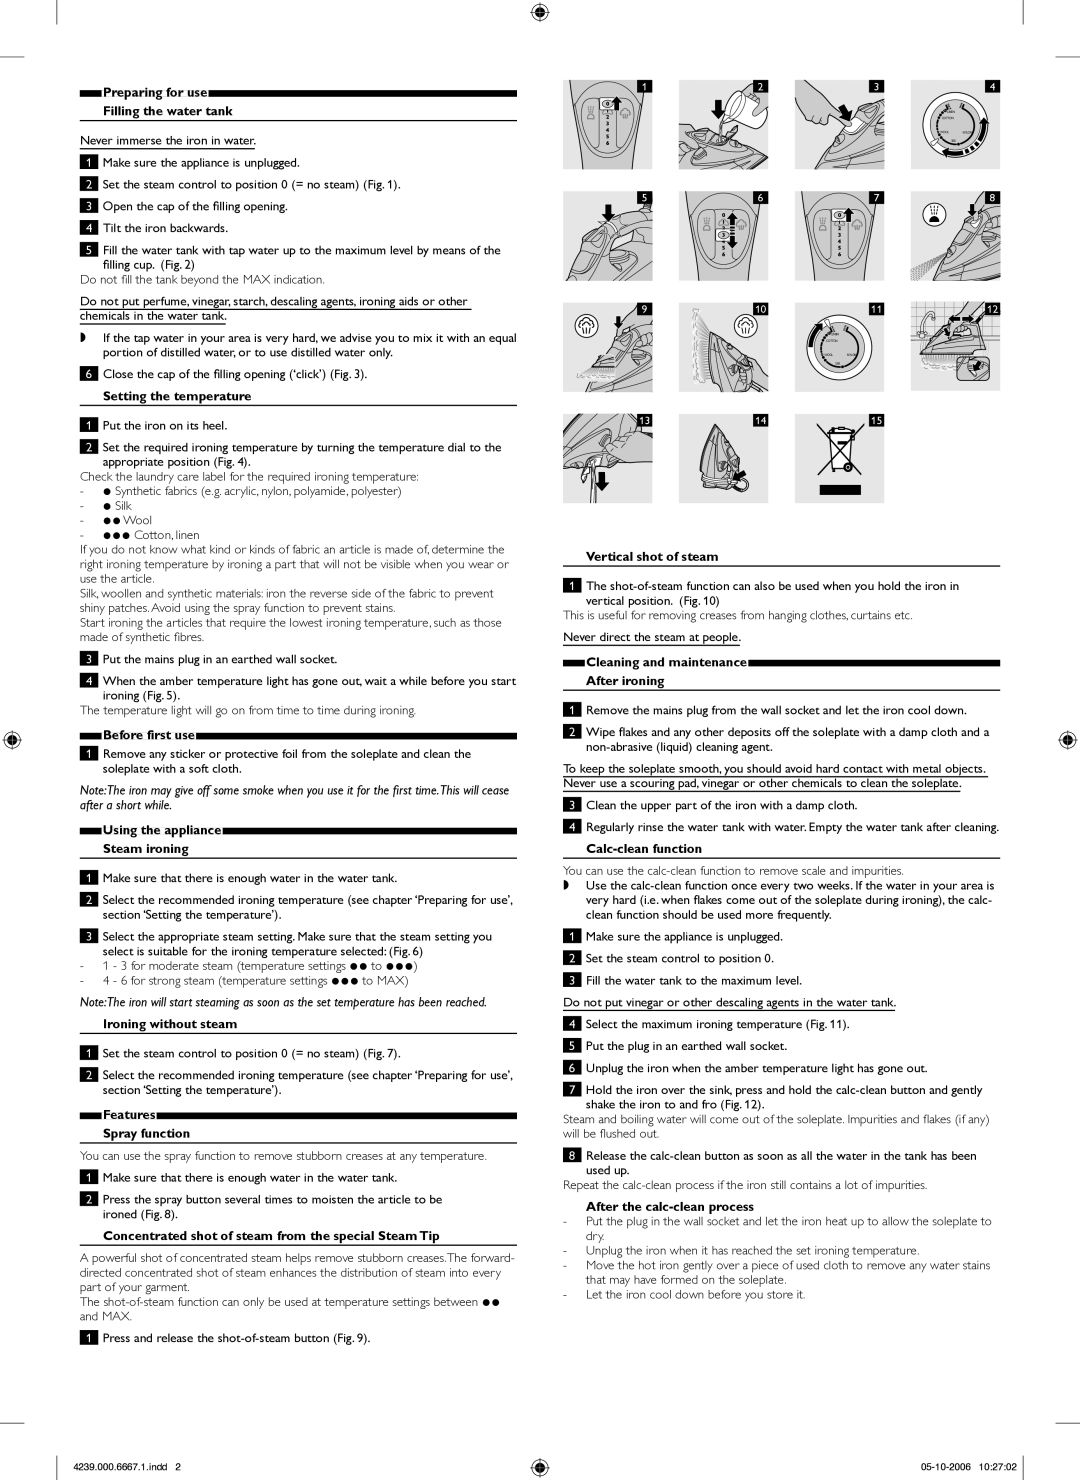
1Make sure the appliance is unplugged.
2Set the steam control to position 0 (= no steam) (Fig. 1).
3Open the cap of the filling opening.
4Tilt the iron backwards.
5Fill the water tank with tap water up to the maximum level by means of the filling cup. (Fig. 2)
Do not fill the tank beyond the MAX indication.
Do not put perfume, vinegar, starch, descaling agents, ironing aids or other chemicals in the water tank.
,If the tap water in your area is very hard, we advise you to mix it with an equal portion of distilled water, or to use distilled water only.
6Close the cap of the filling opening (‘click’) (Fig. 3).
Setting the temperature
1Put the iron on its heel.
2Set the required ironing temperature by turning the temperature dial to the appropriate position (Fig. 4).
Check the laundry care label for the required ironing temperature:
-1 Synthetic fabrics (e.g. acrylic, nylon, polyamide, polyester)
-1 Silk
-2Wool
-3 Cotton, linen
If you do not know what kind or kinds of fabric an article is made of, determine the right ironing temperature by ironing a part that will not be visible when you wear or use the article.
Silk, woollen and synthetic materials: iron the reverse side of the fabric to prevent shiny patches. Avoid using the spray function to prevent stains.
Start ironing the articles that require the lowest ironing temperature, such as those made of synthetic fibres.
3Put the mains plug in an earthed wall socket.
4When the amber temperature light has gone out, wait a while before you start ironing (Fig. 5).
The temperature light will go on from time to time during ironing.
Before first use
1Remove any sticker or protective foil from the soleplate and clean the soleplate with a soft cloth.
Note:The iron may give off some smoke when you use it for the first time.This will cease after a short while.
Using the appliance
Steam ironing
1Make sure that there is enough water in the water tank.
2Select the recommended ironing temperature (see chapter ‘Preparing for use’, section ‘Setting the temperature’).
3Select the appropriate steam setting. Make sure that the steam setting you select is suitable for the ironing temperature selected: (Fig. 6)
-1 - 3 for moderate steam (temperature settings 2 to 3)
-4 - 6 for strong steam (temperature settings 3 to MAX)
Note:The iron will start steaming as soon as the set temperature has been reached.
Ironing without steam
1Set the steam control to position 0 (= no steam) (Fig. 7).
2Select the recommended ironing temperature (see chapter ‘Preparing for use’, section ‘Setting the temperature’).
Features
Spray function
You can use the spray function to remove stubborn creases at any temperature.
1Make sure that there is enough water in the water tank.
2Press the spray button several times to moisten the article to be ironed (Fig. 8).
Concentrated shot of steam from the special Steam Tip
A powerful shot of concentrated steam helps remove stubborn creases.The forward- directed concentrated shot of steam enhances the distribution of steam into every part of your garment.
The
1 Press and release the
1 | 2 | 3 |
| 4 |
|
| M | MI | N |
|
| AX |
| |
|
| LINEN |
|
|
|
| COTTON |
|
|
|
| WOOL |
| NYLON |
|
| SILK |
|
|
5 | 6 |
| 7 | 8 |
9 | 10 |
| 11 | 12 |
| M | MI | N |
|
| AX |
|
| |
| LINEN |
|
|
|
| COTTON |
|
|
|
| WOOL |
| NYLON |
|
| SILK |
|
|
|
13 | 14 |
| 15 |
|
Vertical shot of steam
1The
This is useful for removing creases from hanging clothes, curtains etc.
Never direct the steam at people.
Cleaning and maintenance
After ironing
1Remove the mains plug from the wall socket and let the iron cool down.
2Wipe flakes and any other deposits off the soleplate with a damp cloth and a
To keep the soleplate smooth, you should avoid hard contact with metal objects. Never use a scouring pad, vinegar or other chemicals to clean the soleplate.
3Clean the upper part of the iron with a damp cloth.
4Regularly rinse the water tank with water. Empty the water tank after cleaning.
Calc-clean function
You can use the
,Use the
1Make sure the appliance is unplugged.
2Set the steam control to position 0.
3Fill the water tank to the maximum level.
Do not put vinegar or other descaling agents in the water tank.
4Select the maximum ironing temperature (Fig. 11).
5Put the plug in an earthed wall socket.
6Unplug the iron when the amber temperature light has gone out.
7Hold the iron over the sink, press and hold the
Steam and boiling water will come out of the soleplate. Impurities and flakes (if any) will be flushed out.
8Release the
Repeat the
After the calc-clean process
-Put the plug in the wall socket and let the iron heat up to allow the soleplate to dry.
-Unplug the iron when it has reached the set ironing temperature.
-Move the hot iron gently over a piece of used cloth to remove any water stains that may have formed on the soleplate.
-Let the iron cool down before you store it.
4239.000.6667.1.indd 2