ENGLISH
IMPORTANT SAFEGUARDS
When using electrical appliances, basic safety precautions should always be followed including the following:
Read all instructions before using the appliance.
| | |
1. | Do not touch hot surfaces. Use handles or knobs. Care must be |
| taken to prevent burns which can occur from touching hot parts or |
| spilling hot liquids. |
2. | To protect against electrical shock and injury to persons, do not |
| immerse cord, plug, or appliance in water or other liquid. |
3. | Close supervision is necessary when any appliance is used by or |
| near children. |
4. | Unplug from outlet when not in use and before cleaning. Allow to cool |
| before putting on or taking off parts and before cleaning appliance. |
5. | Do not operate this appliance with a damaged cord or plug, or |
| after the appliance malfunctions or has been damaged in any |
| manner. Return the Coffee Maker to the nearest Authorized |
| Norelco (USA)/Philips (Canada) Service Location for examination, |
| repair or adjustment. |
6. | Use this appliance only for its intended purpose as described in this |
| manual. Do not use accessory attachments not recommended by |
| Philips Electronics North America Corporation/Philips Electronics |
| Ltd., as they may result in fire, electric shock or injury to persons. |
7. | Do not use outdoors. |
8. | Do not let cord hang over edge of table or counter or touch hot |
| surfaces. Operate on a flat surface away from edge of counter to |
| prevent accidental tipping. |
9. | Do not place Coffee Maker on or near a hot gas or electric burner, |
| or in a heated oven. |
10. | This appliance is intended for household use ONLY; it is not for |
| commercial or industrial use. |
11. | Any service to the Coffee Maker should be performed by the |
| nearest Authorized Norelco (USA)/Philips (Canada) Service |
| Location. |
12. | To disconnect Coffee Maker, turn Power Switch to 'OFF', then remove |
| plug from electrical outlet. Remove plug by gripping plug body and |
| pulling it from the outlet. Never yank or twist cord to unplug. |
13. | The carafe is designed for use with this Coffee Maker. It must never |
| be used on a range top or in a microwave oven. |
14. | Do not put hot glass carafe on a cold or wet surface. |
15. | Do not use a cracked carafe or a carafe having a loose or |
| weakened handle. |
16. | Do not clean carafe with steel wool pads, abrasive cleanser or any |
| other material that may scratch. |
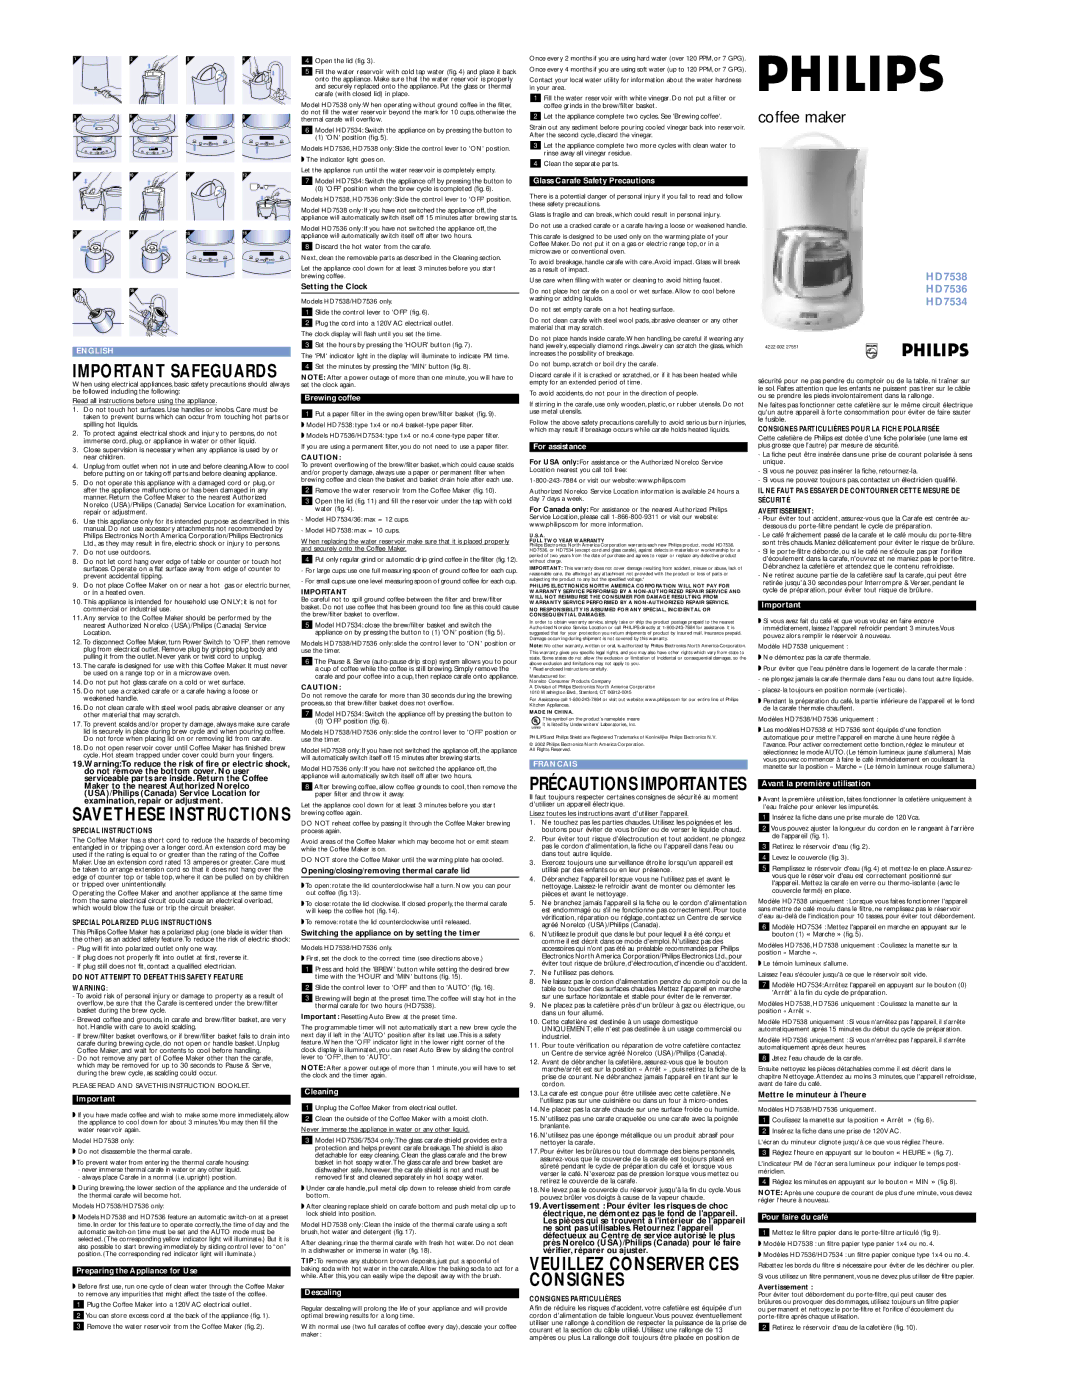
4Open the lid (fig. 3).
5Fill the water reservoir with cold tap water (fig. 4) and place it back onto the appliance. Make sure that the water reservoir is properly and securely replaced onto the appliance. Put the glass or thermal carafe (with closed lid) in place.
Model HD7538 only:When operating without ground coffee in the filter, do not fill the water reservoir beyond the mark for 10 cups, otherwise the thermal carafe will overflow.
6Model HD7534: Switch the appliance on by pressing the button to
(1) 'ON' position (fig. 5).
Models HD7536, HD7538 only: Slide the control lever to 'ON' position. ◗The indicator light goes on.
Let the appliance run until the water reservoir is completely empty.
7Model HD7534: Switch the appliance off by pressing the button to
(0) 'OFF' position when the brew cycle is completed (fig. 6).
Models HD7538, HD7536 only: Slide the control lever to 'OFF' position.
Model HD7538 only: If you have not switched the appliance off, the appliance will automatically switch itself off 15 minutes after brewing starts.
Model HD7536 only: If you have not switched the appliance off, the appliance will automatically switch itself off after two hours.
8Discard the hot water from the carafe.
Next, clean the removable parts as described in the Cleaning section.
Let the appliance cool down for at least 3 minutes before you start brewing coffee.
Setting the Clock
Models HD7538/HD7536 only.
1Slide the control lever to 'OFF' (fig. 6).
2Plug the cord into a 120V AC electrical outlet.
The clock display will flash until you set the time.
3Set the hours by pressing the 'HOUR' button (fig. 7).
The 'PM' indicator light in the display will illuminate to indicate PM time.
4Set the minutes by pressing the 'MIN' button (fig. 8).
NOTE: After a power outage of more than one minute, you will have to set the clock again.
Brewing coffee
1Put a paper filter in the swing open brew/filter basket (fig. 9).
◗Model HD7538: type 1x4 or no.4 basket-type paper filter.
◗Models HD7536/HD7534: type 1x4 or no.4 cone-type paper filter.
If you are using a permanent filter, you do not need to use a paper filter.
CAUTION:
To prevent overflowing of the brew/filter basket, which could cause scalds and/or property damage, always use a paper or permanent filter when brewing coffee and clean the basket and basket drain hole after each use.
2Remove the water reservoir from the Coffee Maker (fig. 10).
3Open the lid (fig. 11) and fill the reservoir under the tap with cold water (fig. 4).
-Model HD7534/36: max = 12 cups.
-Model HD7538: max = 10 cups.
When replacing the water reservoir make sure that it is placed properly and securely onto the Coffee Maker.
4 Put only regular grind or automatic drip grind coffee in the filter (fig. 12).
-For large cups: use one full measuring spoon of ground coffee for each cup.
-For small cups: use one level measuring spoon of ground coffee for each cup.
IMPORTANT
Be careful not to spill ground coffee between the filter and brew/filter basket. Do not use coffee that has been ground too fine as this could cause the brew/filter basket to overflow.
5Model HD7534: close the brew/filter basket and switch the appliance on by pressing the button to (1) 'ON' position (fig. 5).
Models HD7538/HD7536 only: slide the control lever to 'ON' position or use the timer.
6The Pause & Serve (auto-pause drip stop) system allows you to pour a cup of coffee while the coffee is still brewing. Simply remove the carafe and pour coffee into a cup, then replace carafe onto appliance.
CAUTION:
Do not remove the carafe for more than 30 seconds during the brewing process, so that brew/filter basket does not overflow.
7 Model HD7534: Switch the appliance off by pressing the button to |
Once every 2 months if you are using hard water (over 120 PPM, or 7 GPG).
Once every 4 months if you are using soft water (up to 120 PPM, or 7 GPG).
Contact your local water utility for information about the water hardness in your area.
1Fill the water reservoir with white vinegar. Do not put a filter or coffee grinds in the brew/filter basket.
2Let the appliance complete two cycles. See 'Brewing coffee'.
Strain out any sediment before pouring cooled vinegar back into reservoir. After the second cycle, discard the vinegar.
3Let the appliance complete two more cycles with clean water to rinse away all vinegar residue.
4Clean the separate parts.
Glass Carafe Safety Precautions
There is a potential danger of personal injury if you fail to read and follow these safety precautions.
Glass is fragile and can break, which could result in personal injury.
Do not use a cracked carafe or a carafe having a loose or weakened handle.
This carafe is designed to be used only on the warming plate of your Coffee Maker. Do not put it on a gas or electric range top, or in a microwave or conventional oven.
To avoid breakage, handle carafe with care. Avoid impact. Glass will break as a result of impact.
Use care when filling with water or cleaning to avoid hitting faucet.
Do not place hot carafe on a cool or wet surface. Allow to cool before washing or adding liquids.
Do not set empty carafe on a hot heating surface.
Do not clean carafe with steel wool pads, abrasive cleanser or any other material that may scratch.
Do not place hands inside carafe. When handling, be careful if wearing any hand jewelry, especially diamond rings. Jewelry can scratch the glass, which increases the possibility of breakage.
Do not bump, scratch or boil dry the carafe.
Discard carafe if it is cracked or scratched, or if it has been heated while empty for an extended period of time.
To avoid accidents, do not pour in the direction of people.
If stirring in the carafe, use only wooden, plastic, or rubber utensils. Do not use metal utensils.
Follow the above safety precautions carefully to avoid serious burn injuries, which may result if breakage occurs while carafe holds heated liquids.
For assistance
For USA only: For assistance or the Authorized Norelco Service Location nearest you call toll free:
1-800-243-7884 or visit our website: www.philips.com
Authorized Norelco Service Location information is available 24 hours a day 7 days a week.
For Canada only: For assistance or the nearest Authorized Philips Service Location, please call 1-866-800-9311 or visit our website: www.philips.com for more information.
U.S.A.
FULL TWO YEAR WARRANTY
Philips Electronics North America Corporation warrants each new Philips product, model HD7538, HD7536, or HD7534 (except cord and glass carafe), against defects in materials or workmanship for a period of two years from the date of purchase and agrees to repair or replace any defective product without charge.
IMPORTANT: This warranty does not cover damage resulting from accident, misuse or abuse, lack of reasonable care, the affixing of any attachment not provided with the product or loss of parts or subjecting the product to any but the specified voltage.*
PHILIPS ELECTRONICS NORTH AMERICA CORPORATION WILL NOT PAY FOR WARRANTY SERVICE PERFORMED BY A NON-AUTHORIZED REPAIR SERVICE AND WILL NOT REIMBURSE THE CONSUMER FOR DAMAGE RESULTING FROM WARRANTY SERVICE PERFORMED BY A NON-AUTHORIZED REPAIR SERVICE.
NO RESPONSIBILITY IS ASSUMED FOR ANY SPECIAL, INCIDENTAL OR CONSEQUENTIAL DAMAGES.
In order to obtain warranty service, simply take or ship the product postage prepaid to the nearest Authorized Norelco Service Location or call PHILIPS directly at 1-800-243-7884 for assistance. It is suggested that for your protection you return shipments of product by insured mail, insurance prepaid. Damage occurring during shipment is not covered by this warranty.
Note: No other warranty, written or oral, is authorized by Philips Electronics North America Corporation.
This warranty gives you specific legal rights, and you may also have other rights which vary from state to state. Some states do not allow the exclusion or limitation of incidental or consequential damages, so the above exclusion and limitations may not apply to you.
*Read enclosed instructions carefully.
Manufactured for:
Norelco Consumer Products Company
A Division of Philips Electronics North America Corporation 1010 Washington Blvd., Stamford, CT 06912-0015
For Assistance call 1-800-243-7884 or visit out website; www.philips.com for our entire line of Philips Kitchen Appliances.
MADE IN CHINA.
coffee maker
HD7538
HD7536
HD7534
4222 002 27551
sécurité pour ne pas pendre du comptoir ou de la table, ni traîner sur le sol. Faites attention que les enfants ne puissent pas tirer sur le câble ou se prendre les pieds involontairement dans la rallonge.
Ne faites pas fonctionner cette cafetière sur le même circuit électrique qu'un autre appareil à forte consommation pour éviter de faire sauter le fusible.
CONSIGNES PARTICULIÈRES POUR LA FICHE POLARISÉE
Cette cafetière de Philips est dotée d'une fiche polarisée (une lame est plus grosse que l'autre) par mesure de sécurité.
-La fiche peut être insérée dans une prise de courant polarisée à sens unique.
-Si vous ne pouvez pas insérer la fiche, retournez-la.
-Si vous ne pouvez toujours pas, contactez un électricien qualifié.
IL NE FAUT PAS ESSAYER DE CONTOURNER CETTE MESURE DE SÉCURITÉ
AVERTISSEMENT:
- Pour éviter tout accident, assurez-vous que la Carafe est centrée au- dessous du porte-filtre pendant le cycle de préparation.
-Le café fraîchement passé de la carafe et le café moulu du porte-filtre sont très chauds. Maniez délicatement pour éviter le risque de brûlure.
-Si le porte-filtre déborde, ou si le café ne s'écoule pas par l'orifice d'écoulement dans la carafe, n'ouvrez et ne maniez pas le porte-filtre. Débranchez la cafetière et attendez que le contenu refroidisse.
-Ne retirez aucune partie de la cafetière sauf la carafe, qui peut être retirée jusqu'à 30 secondes pour Interrompre & Verser, pendant le cycle de préparation, pour éviter tout risque de brûlure.
Important
◗Si vous avez fait du café et que vous voulez en faire encore immédiatement, laissez l'appareil refroidir pendant 3 minutes.Vous pouvez alors remplir le réservoir à nouveau.
Modèle HD7538 uniquement :
◗Ne démontez pas la carafe thermale.
◗Pour éviter que l'eau pénètre dans le logement de la carafe thermale :
-ne plongez jamais la carafe thermale dans l'eau ou dans tout autre liquide.
-placez-la toujours en position normale (verticale).
◗Pendant la préparation du café, la partie inférieure de l'appareil et le fond de la carafe thermale chauffent.
lid is securely in place during brew cycle and when pouring coffee. |
Do not force when placing lid on or removing lid from carafe. |
18. Do not open reservoir cover until Coffee Maker has finished brew |
cycle. Hot steam trapped under cover could burn your fingers. |
19.Warning:To reduce the risk of fire or electric shock, do not remove the bottom cover. No user serviceable parts are inside. Return the Coffee Maker to the nearest Authorized Norelco (USA)/Philips (Canada) Service Location for examination, repair or adjustment.
SAVETHESE INSTRUCTIONS
SPECIAL INSTRUCTIONS
The Coffee Maker has a short cord to reduce the hazards of becoming entangled in or tripping over a longer cord. An extension cord may be used if the rating is equal to or greater than the rating of the Coffee Maker. Use an extension cord rated 13 amperes or greater. Care must be taken to arrange extension cord so that it does not hang over the edge of counter top or table top, where it can be pulled on by children or tripped over unintentionally.
Operating the Coffee Maker and another appliance at the same time from the same electrical circuit could cause an electrical overload, which would blow the fuse or trip the circuit breaker.
SPECIAL POLARIZED PLUG INSTRUCTIONS
This Philips Coffee Maker has a polarized plug (one blade is wider than the other) as an added safety feature.To reduce the risk of electric shock:
-Plug will fit into polarized outlet only one way.
-If plug does not properly fit into outlet at first, reverse it.
-If plug still does not fit, contact a qualified electrician.
DO NOT ATTEMPTTO DEFEATTHIS SAFETY FEATURE
WARNING:
- To avoid risk of personal injury or damage to property as a result of overflow, be sure that the Carafe is centered under the brew/filter basket during the brew cycle.
-Brewed coffee and grounds, in carafe and brew/filter basket, are very hot. Handle with care to avoid scalding.
-If brew/filter basket overflows, or if brew/filter basket fails to drain into carafe during brewing cycle, do not open or handle basket. Unplug Coffee Maker, and wait for contents to cool before handling.
-Do not remove any part of Coffee Maker other than the carafe, which may be removed for up to 30 seconds to Pause & Serve, during the brew cycle, as scalding could occur.
PLEASE READ AND SAVE THIS INSTRUCTION BOOKLET.
Important
◗If you have made coffee and wish to make some more immediately, allow the appliance to cool down for about 3 minutes.You may then fill the water reservoir again.
Model HD7538 only:
◗Do not disassemble the thermal carafe.
◗To prevent water from entering the thermal carafe housing:
-never immerse thermal carafe in water or any other liquid.
-always place Carafe in a normal (i.e. upright) position.
◗During brewing, the lower section of the appliance and the underside of the thermal carafe will become hot.
Models HD7538/HD7536 only:
◗Models HD7538 and HD7536 feature an automatic switch-on at a preset time. In order for this feature to operate correctly, the time of day and the automatic switch-on time must be set and the AUTO mode must be selected. (The corresponding yellow indicator light will illuminate.) But it is also possible to start brewing immediately by sliding control lever to “on” position. (The corresponding red indicator light will illuminate.)
Preparing the Appliance for Use
◗Before first use, run one cycle of clean water through the Coffee Maker to remove any impurities that might affect the taste of the coffee.
1Plug the Coffee Maker into a 120V AC electrical outlet.
2You can store excess cord at the back of the appliance (fig. 1).
3Remove the water reservoir from the Coffee Maker (fig. 2).
Models HD7538/HD7536 only: slide the control lever to 'OFF' position or use the timer.
Model HD7538 only: If you have not switched the appliance off, the appliance will automatically switch itself off 15 minutes after brewing starts.
Model HD7536 only: If you have not switched the appliance off, the appliance will automatically switch itself off after two hours.
8After brewing coffee, allow coffee grounds to cool, then remove the paper filter and throw it away.
Let the appliance cool down for at least 3 minutes before you start brewing coffee again.
DO NOT reheat coffee by passing it through the Coffee Maker brewing process again.
Avoid areas of the Coffee Maker which may become hot or emit steam while the Coffee Maker is on.
DO NOT store the Coffee Maker until the warming plate has cooled.
Opening/closing/removing thermal carafe lid
◗To open: rotate the lid counterclockwise half a turn. Now you can pour out coffee (fig. 13).
◗To close: rotate the lid clockwise. If closed properly, the thermal carafe will keep the coffee hot (fig. 14).
◗To remove: rotate the lid counterclockwise until released.
Switching the appliance on by setting the timer
Models HD7538/HD7536 only.
◗First, set the clock to the correct time (see directions above.)
1Press and hold the 'BREW' button while setting the desired brew time with the 'HOUR' and 'MIN' buttons (fig. 15).
2Slide the control lever to 'OFF' and then to 'AUTO' (fig. 16).
3Brewing will begin at the preset time.The coffee will stay hot in the thermal carafe for two hours (HD7538).
Important: Resetting Auto Brew at the preset time.
The programmable timer will not automatically start a new brew cycle the next day if left in the 'AUTO' position after its last use.This is a safety feature. When the 'OFF' indicator light in the lower right corner of the clock display is illuminated, you can reset Auto Brew by sliding the control lever to 'OFF', then to 'AUTO'.
NOTE: After a power outage of more than 1 minute, you will have to set the clock and the timer again.
Cleaning
1Unplug the Coffee Maker from electrical outlet.
2Clean the outside of the Coffee Maker with a moist cloth.
Never immerse the appliance in water or any other liquid.
3Model HD7536/7534 only:The glass carafe shield provides extra protection and helps prevent carafe breakage.The shield is also detachable for easy cleaning. Clean the glass carafe and the brew basket in hot soapy water.The glass carafe and brew basket are dishwasher safe, however, the carafe shield is not and must be removed first and cleaned separately in hot soapy water.
◗Under carafe handle, pull metal clip down to release shield from carafe bottom.
◗After cleaning replace shield on carafe bottom and push metal clip up to lock shield into position.
Model HD7538 only: Clean the inside of the thermal carafe using a soft brush, hot water and detergent (fig. 17).
After cleaning, rinse the thermal carafe with fresh hot water. Do not clean in a dishwasher or immerse in water (fig. 18).
TIP: To remove any stubborn brown deposits, just put a spoonful of baking soda with hot water in the carafe. Allow the baking soda to act for a while. After this, you can easily wipe the deposit away with the brush.
Descaling
Regular descaling will prolong the life of your appliance and will provide optimal brewing results for a long time.
With normal use (two full carafes of coffee every day), descale your coffee maker:
PHILIPS and Philips Shield are Registered Trademarks of Koninklijke Philips Electronics N.V.
© 2002 Philips Electronics North America Corporation.
All Rights Reserved.
FRANCAIS
PRÉCAUTIONS IMPORTANTES
Il faut toujours respecter certaines consignes de sécurité au moment d'utiliser un appareil électrique.
Lisez toutes les instructions avant d'utiliser l'appareil.
1.Ne touchez pas les parties chaudes. Utilisez les poignées et les boutons pour éviter de vous brûler ou de verser le liquide chaud.
2.Pour éviter tout risque d'électrocution et tout accident, ne plongez pas le cordon d'alimentation, la fiche ou l'appareil dans l'eau ou dans tout autre liquide.
3.Exercez toujours une surveillance étroite lorsqu'un appareil est utilisé par des enfants ou en leur présence.
4.Débranchez l'appareil lorsque vous ne l'utilisez pas et avant le nettoyage. Laissez-le refroidir avant de monter ou démonter les pièces et avant le nettoyage.
5.Ne branchez jamais l'appareil si la fiche ou le cordon d'alimentation est endommagé ou s'il ne fonctionne pas correctement. Pour toute vérification, réparation ou réglage, contactez un Centre de service agréé Norelco (USA)/Philips (Canada).
6.N'utilisez le produit que dans le but pour lequel il a été conçu et comme il est décrit dans ce mode d'emploi. N'utilisez pas des accessoires qui n'ont pas été au préalable recommandés par Philips Electronics North America Corporation/Philips Electronics Ltd., pour éviter tout risque de brûlure, d'électrocution, d'incendie ou d'accident.
7.Ne l'utilisez pas dehors.
8.Ne laissez pas le cordon d'alimentation pendre du comptoir ou de la table ou toucher des surfaces chaudes. Mettez l'appareil en marche sur une surface horizontale et stable pour éviter de le renverser.
9.Ne placez pas la cafetière près d'un brûleur à gaz ou électrique, ou dans un four allumé.
10.Cette cafetière est destinée à un usage domestique UNIQUEMENT; elle n'est pas destinée à un usage commercial ou industriel.
11.Pour toute vérification ou réparation de votre cafetière contactez un Centre de service agréé Norelco (USA)/Philips (Canada).
12.Avant de débrancher la cafetière, assurez-vous que le bouton marche/arrêt est sur la position « Arrêt » , puis retirez la fiche de la prise de courant. Ne débranchez jamais l'appareil en tirant sur le cordon.
13.La carafe est conçue pour être utilisée avec cette cafetière. Ne l'utilisez pas sur une cuisinière ou dans un four à micro-ondes.
14.Ne placez pas la carafe chaude sur une surface froide ou humide.
15.N'utilisez pas une carafe craquelée ou une carafe avec la poignée branlante.
16.N'utilisez pas une éponge métallique ou un produit abrasif pour nettoyer la carafe.
17.Pour éviter les brûlures ou tout dommage des biens personnels, assurez-vous que le couvercle de la carafe est toujours placé en sûreté pendant le cycle de préparation du café et lorsque vous verser le café. N'exercez pas de pression lorsque vous mettez ou retirez le couvercle de la carafe.
18.Ne levez pas le couvercle du réservoir jusqu'à la fin du cycle.Vous pouvez brûler vos doigts à cause de la vapeur chaude.
19.Avertissement : Pour éviter les risques de choc électrique, ne démontez pas le fond de l'appareil. Les pièces qui se trouvent à l'intérieur de l'appareil ne sont pas utilisables. Retournez l'appareil défectueux au Centre de service autorisé le plus près Norelco (USA)/Philips (Canada) pour le faire vérifier, réparer ou ajuster.
VEUILLEZ CONSERVER CES CONSIGNES
CONSIGNES PARTICULIÈRES
Afin de réduire les risques d'accident, votre cafetière est équipée d'un cordon d'alimentation de faible longueur.Vous pouvez éventuellement utiliser une rallonge à condition de respecter la puissance de la prise de courant et la section du câble utilisé. Utilisez une rallonge de 13 ampères ou plus. La rallonge doit toujours être placée en position de
Les modèles HD7538 et HD7536 sont équipés d'une fonction automatique pour mettre l'appareil en marche à une heure réglée à l'avance. Pour activer correctement cette fonction, réglez le minuteur et sélectionnez le mode AUTO. (Le témoin lumineux jaune s'allumera.) Mais vous pouvez commencer à faire le café immédiatement en coulissant la manette sur la position « Marche » (Le témoin lumineux rouge s'allumera.)
Avant la première utilisation
◗Avant la première utilisation, faites fonctionner la cafetière uniquement à l'eau fraîche pour enlever les impuretés.
1Insérez la fiche dans une prise murale de 120 Vca.
2Vous pouvez ajuster la longueur du cordon en le rangeant à l'arrière de l'appareil (fig. 1).
3Retirez le réservoir d'eau (fig. 2).
4Levez le couvercle (fig. 3).
5Remplissez le réservoir d'eau (fig. 4) et mettez-le en place.Assurez- vous que le réservoir d'eau est correctement positionné sur l'appareil. Mettez la carafe en verre ou thermo-isolante (avec le couvercle fermé) en place.
Modèle HD7538 uniquement : Lorsque vous faites fonctionner l'appareil sans mettre de café moulu dans le filtre, ne remplissez pas le réservoir d'eau au-delà de l'indication pour 10 tasses, pour éviter tout débordement.
6Modèle HD7534 : Mettez l'appareil en marche en appuyant sur le bouton (1) « Marche » (fig. 5).
Modèles HD7536, HD7538 uniquement : Coulissez la manette sur la position « Marche ».
◗Le témoin lumineux s'allume.
Laissez l'eau s'écouler jusqu'à ce que le réservoir soit vide.
7Modèle HD7534:Arrêtez l'appareil en appuyant sur le bouton (0) 'Arrêt' à la fin du cycle de préparation.
Modèles HD7538, HD7536 uniquement : Coulissez la manette sur la position « Arrêt ».
Modèle HD7538 uniquement : Si vous n'arrêtez pas l'appareil, il s'arrête automatiquement après 15 minutes du début du cycle de préparation.
Modèle HD7536 uniquement : Si vous n'arrêtez pas l'appareil, il s'arrête automatiquement après deux heures.
8Jetez l'eau chaude de la carafe.
Ensuite nettoyez les pièces détachables comme il est décrit dans le chapitre Nettoyage. Attendez au moins 3 minutes, que l'appareil refroidisse, avant de faire du café.
Mettre le minuteur à l'heure
Modèles HD7538/HD7536 uniquement.
1Coulissez la manette sur la position « Arrêt » (fig. 6).
2Insérez la fiche dans une prise de 120V AC.
L'écran du minuteur clignote jusqu'à ce que vous régliez l'heure.
3Réglez l'heure en appuyant sur le bouton « HEURE » (fig. 7).
L'indicateur PM de l'écran sera lumineux pour indiquer le temps post- méridien.
4Réglez les minutes en appuyant sur le bouton « MIN » (fig. 8).
NOTE: Après une coupure de courant de plus d'une minute, vous devez régler l'heure à nouveau.
Pour faire du café
1Mettez le filtre papier dans le porte-filtre articulé (fig. 9).
◗Modèle HD7538 : un filtre papier type panier 1x4 ou no. 4.
◗Modèles HD7536/HD7534 : un filtre papier conique type 1x4 ou no. 4.
Rabattez les bords du filtre si nécessaire pour éviter de les déchirer ou plier.
Si vous utilisez un filtre permanent, vous ne devez plus utiliser de filtre papier.
Avertissement :
Pour éviter tout débordement du porte-filtre, qui peut causer des brûlures ou provoquer des dommages, utilisez toujours un filtre papier ou permanent et nettoyez le porte-filtre et l'orifice d'écoulement du porte-filtre après chaque utilisation.
2 Retirez le réservoir d'eau de la cafetière (fig. 10).