1Connect

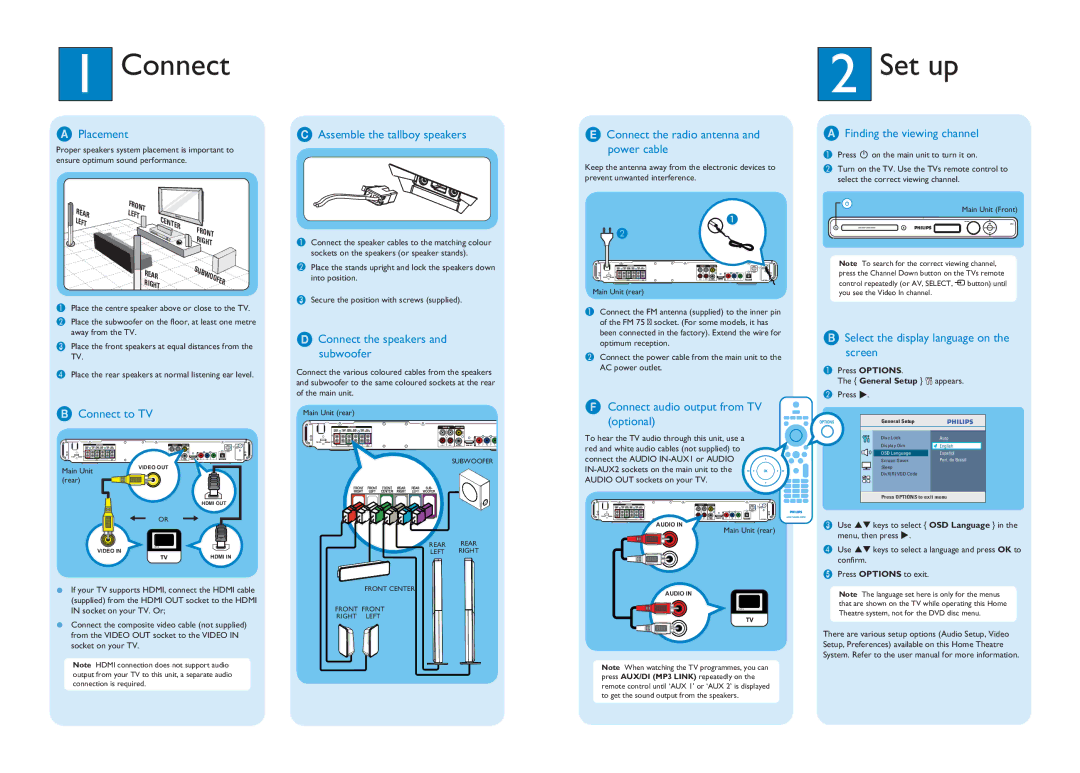
APlacement

Proper speakers system placement is important to ensure optimum sound performance.

CAssemble the tallboy speakers

EConnect the radio antenna and power cable

Keep the antenna away from the electronic devices to prevent unwanted interference.

2Set up

AFinding the viewing channel

APress 2 on the main unit to turn it on.

BTurn on the TV. Use the TVs remote control to select the correct viewing channel.

REAR LEFT

FRONT


LEFT

CENTER


REAR

RIGHT

FRONT

RIGHT

SUBWOOFER

AConnect the speaker cables to the matching colour sockets on the speakers (or speaker stands).

BPlace the stands upright and lock the speakers down into position.

CSecure the position with screws (supplied).

A

B

AUX 2 AUX 1

Main Unit (rear)

Main Unit (Front)

Note To search for the correct viewing channel, press the Channel Down button on the TVs remote control repeatedly (or AV, SELECT, ° button) until you see the Video In channel.

APlace the centre speaker above or close to the TV.

BPlace the subwoofer on the floor, at least one metre away from the TV.

CPlace the front speakers at equal distances from the TV.

DPlace the rear speakers at normal listening ear level.

BConnect to TV


AUX 2

AUX 1


Main Unit

VIDEO OUT


(rear)


HDMI OUT

OR

VIDEO IN

HDMI IN

zIf your TV supports HDMI, connect the HDMI cable (supplied) from the HDMI OUT socket to the HDMI IN socket on your TV. Or;

zConnect the composite video cable (not supplied) from the VIDEO OUT socket to the VIDEO IN socket on your TV.

Note HDMI connection does not support audio output from your TV to this unit, a separate audio connection is required.

DConnect the speakers and subwoofer

Connect the various coloured cables from the speakers and subwoofer to the same coloured sockets at the rear of the main unit.

Main Unit (rear)


AUX 2

AUX 1


SUBWOOFER

REAR REAR

LEFT RIGHT

FRONT CENTER

FRONT FRONT

RIGHT LEFT

AConnect the FM antenna (supplied) to the inner pin of the FM 75 ￿ socket. (For some models, it has been connected in the factory). Extend the wire for optimum reception.

BConnect the power cable from the main unit to the AC power outlet.

F Connect audio output from TV (optional)

To hear the TV audio through this unit, use a red and white audio cables (not supplied) to connect the AUDIO IN-AUX1 or AUDIO IN-AUX2 sockets on the main unit to the AUDIO OUT sockets on your TV.

AUX 2 AUX 1

AUDIO IN

Main Unit (rear)

AUDIO IN

Note When watching the TV programmes, you can press AUX/DI (MP3 LINK) repeatedly on the remote control until ‘AUX 1’ or ‘AUX 2’ is displayed to get the sound output from the speakers.

BSelect the display language on the screen

APress OPTIONS.

The { General Setup } appears.

B Press .

General Setup


Disc Lock

Auto


Display Dim

English


OSD Language

Español


Screen Saver

Port. do Brasil


Sleep


DivX(R) VOD Code


Press OPTIONS to exit menu

C Use

keys to select { OSD Language } in the

menu, then press .

D Use

keys to select a language and press OK to

confirm.


EPress OPTIONS to exit.

Note The language set here is only for the menus that are shown on the TV while operating this Home Theatre system, not for the DVD disc menu.

There are various setup options (Audio Setup, Video Setup, Preferences) available on this Home Theatre System. Refer to the user manual for more information.

Page 2
Image 2
Philips HTS3566D user manual Connect, Set up

HTS3566D specifications

The Philips HTS3566D is a home theater system designed to elevate your audio and video experience in the comfort of your own home. Known for its impressive sound quality and cutting-edge technologies, this model is an ideal choice for any entertainment enthusiast.

One of the standout features of the HTS3566D is its 5.1-channel surround sound system. This setup includes front left and right speakers, a center speaker, rear surround speakers, and a subwoofer, creating an immersive audio experience that draws you into movies or music as if you were experiencing them live. The sound output is powerful and dynamic, ensuring that every dialogue, sound effect, and musical note is crystal clear.

The system supports multiple audio formats, including Dolby Digital, enhancing the overall audio quality. This is particularly beneficial for watching movies, as it allows you to enjoy the rich sound landscape intended by the filmmakers. The integrated subwoofer adds depth to the sound, making action scenes and music more impactful.

Video performance is also a key highlight of the HTS3566D. It is equipped with a DVD player that supports various formats, including DVD, CD, and VCD, ensuring versatility in playback options. Additionally, the HDMI output allows for high-definition video transmission to your television, preserving the clarity and color vibrancy of your favorite movies and shows.

Another convenient feature is the USB port, which enables playback from external devices. You can easily connect a USB drive to access your favorite multimedia files, including videos, music, and photos, right from your home theater system. It also supports MP3, WMA, and JPEG formats, providing ample options for entertainment.

The HTS3566D comes with an intuitive remote control that simplifies navigation through various settings and media sources. This user-friendly design ensures that adjusting volume levels, changing tracks, or switching between inputs can be done effortlessly.

In terms of design, the Philips HTS3566D boasts a sleek and modern aesthetic that can complement any living space. Its compact form factor makes it easy to integrate into your home setup without taking up excessive space.

Overall, the Philips HTS3566D is a powerful home theater system that combines superior audio and video technologies. It offers an all-in-one solution for your multimedia needs, ensuring that you can enjoy your favorite content to the fullest. Whether you’re hosting movie nights, listening to music, or enjoying a gaming session, the HTS3566D stands ready to enhance your home entertainment experience with reliable performance and stunning quality.