Installation

English:

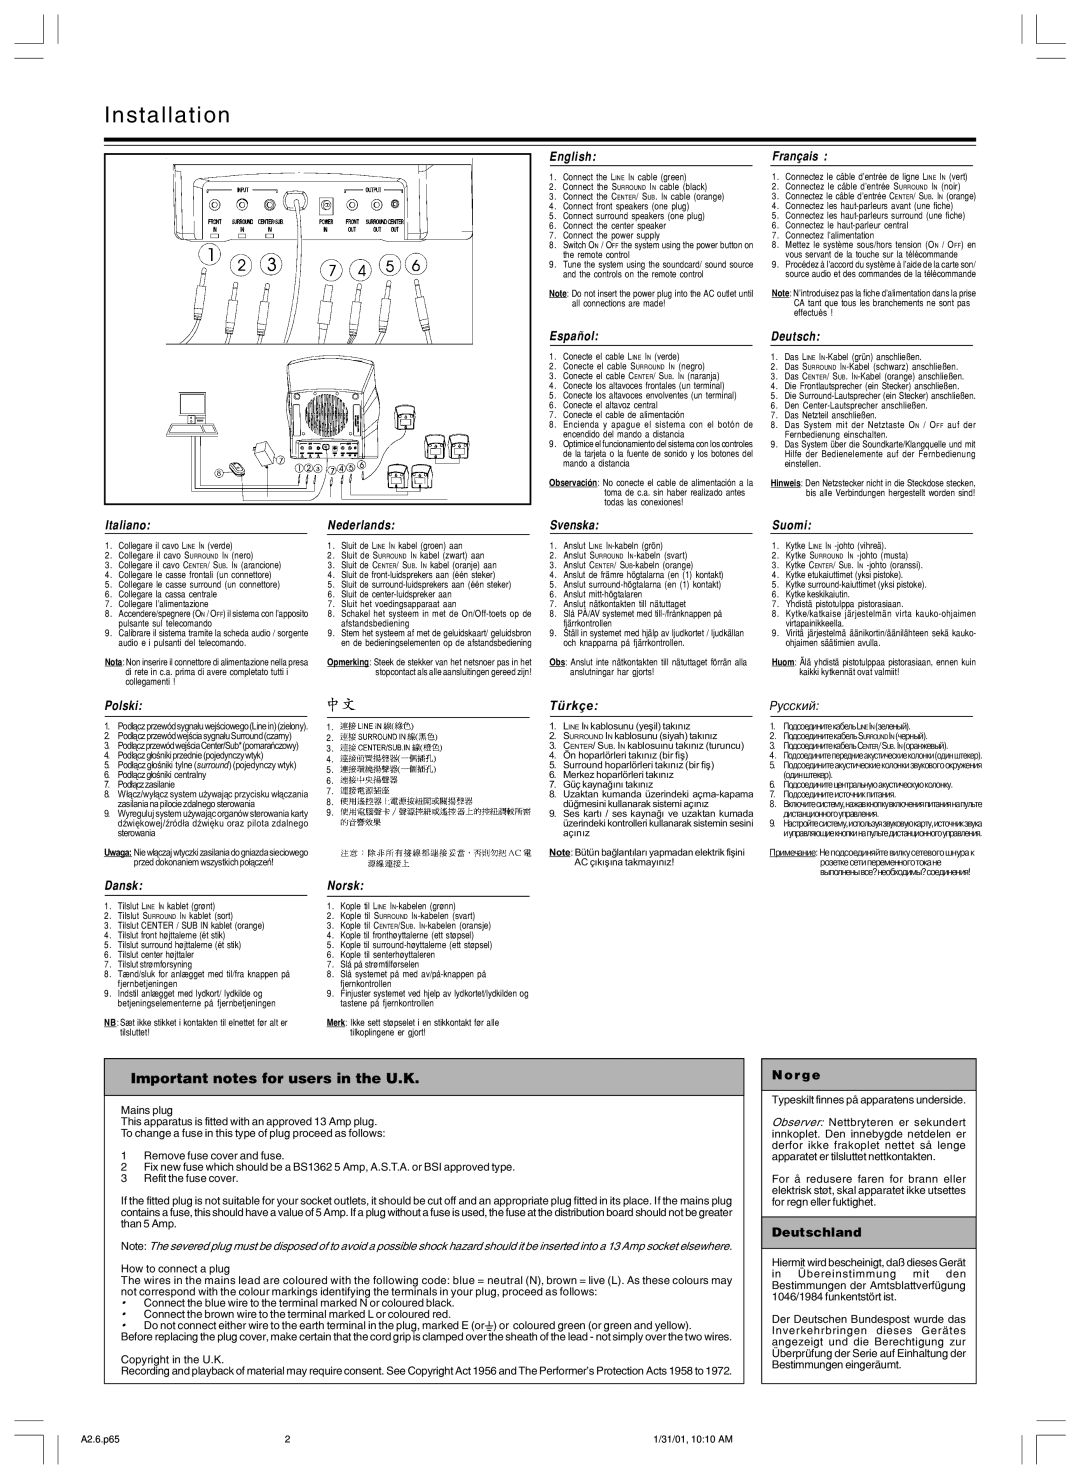
1. Connect the LINE IN cable (green)

2. Connect the SURROUND IN cable (black)

3. Connect the CENTER/ SUB. IN cable (orange)

4. Connect front speakers (one plug)

5. Connect surround speakers (one plug)

6. Connect the center speaker

7. Connect the power supply

8. Switch ON / OFF the system using the power button on the remote control

9. Tune the system using the soundcard/ sound source and the controls on the remote control

Note: Do not insert the power plug into the AC outlet until all connections are made!

Español:

1. Conecte el cable LINE IN (verde)

2. Conecte el cable SURROUND IN (negro)

3. Conecte el cable CENTER/ SUB. IN (naranja)

4. Conecte los altavoces frontales (un terminal)

5. Conecte los altavoces envolventes (un terminal)

6. Conecte el altavoz central

7. Conecte el cable de alimentación

8. Encienda y apague el sistema con el botón de encendido del mando a distancia

9. Optimice el funcionamiento del sistema con los controles de la tarjeta o la fuente de sonido y los botones del mando a distancia

Observación: No conecte el cable de alimentación a la toma de c.a. sin haber realizado antes todas las conexiones!

Italiano:


Nederlands:


Svenska:

1.

Collegare il cavo LINE IN (verde)

1.

Sluit de LINE IN kabel (groen) aan

1.

Anslut LINE IN-kabeln (grön)

2.

Collegare il cavo SURROUND IN (nero)

2.

Sluit de SURROUND IN kabel (zwart) aan

2.

Anslut SURROUND IN-kabeln (svart)

3.

Collegare il cavo CENTER/ SUB. IN (arancione)

3.

Sluit de CENTER/ SUB. IN kabel (oranje) aan

3.

Anslut CENTER/ SUB-kabeln (orange)

4.

Collegare le casse frontali (un connettore)

4.

Sluit de front-luidsprekers aan (één steker)

4.

Anslut de främre högtalarna (en (1) kontakt)

5.

Collegare le casse surround (un connettore)

5.

Sluit de surround-luidsprekers aan (één steker)

5.

Anslut surround-högtalarna (en (1) kontakt)

6.

Collegare la cassa centrale

6.

Sluit de center-luidspreker aan

6.

Anslut mitt-högtalaren

7.

Collegare l’alimentazione

7.

Sluit het voedingsapparaat aan

7.

Anslut nätkontakten till nätuttaget

8.

Accendere/spegnere (ON / OFF) il sistema con l’apposito

8.

Schakel het systeem in met de On/Off-toets op de

8.

Slå PÅ/AV systemet med till-/frånknappen


pulsante sul telecomando


afstandsbediening


fjärrkontrollen

9.

Calibrare il sistema tramite la scheda audio / sorgente

9.

Stem het systeem af met de geluidskaart/ geluidsbron

9.

Ställ in systemet med hjälp av ljudkortet / ljudkällan


audio e i pulsanti del telecomando.


en de bedieningselementen op de afstandsbediening


och knapparna på fjärrkontrollen.

Nota: Non inserire il connettore di alimentazione nella presa

Opmerking: Steek de stekker van het netsnoer pas in het

Obs: Anslut inte nätkontakten till nätuttaget förrän alla

di rete in c.a. prima di avere completato tutti i

stopcontact als alle aansluitingen gereed zijn!

anslutningar har gjorts!

collegamenti !


Français :

1.Connectez le câble d’entrée de ligne LINE IN (vert)

2.Connectez le câble d’entrée SURROUND IN (noir)

3.Connectez le câble d’entrée CENTER/ SUB. IN (orange)

4.Connectez les haut-parleurs avant (une fiche)

5.Connectez les haut-parleurs surround (une fiche)

6.Connectez le haut-parleur central

7.Connectez l’alimentation

8.Mettez le système sous/hors tension (ON / OFF) en vous servant de la touche sur la télécommande

9.Procédez à l’accord du système à l’aide de la carte son/ source audio et des commandes de la télécommande

Note: N’introduisez pas la fiche d’alimentation dans la prise CA tant que tous les branchements ne sont pas effectués !

Deutsch:

1.Das LINE IN-Kabel (grün) anschließen.

2.Das SURROUND IN-Kabel (schwarz) anschließen.

3.Das CENTER/ SUB. IN-Kabel (orange) anschließen.

4.Die Frontlautsprecher (ein Stecker) anschließen.

5.Die Surround-Lautsprecher (ein Stecker) anschließen.

6.Den Center-Lautsprecher anschließen.

7.Das Netzteil anschließen.

8.Das System mit der Netztaste ON / OFF auf der Fernbedienung einschalten.

9.Das System über die Soundkarte/Klangquelle und mit Hilfe der Bedienelemente auf der Fernbedienung einstellen.

Hinweis: Den Netzstecker nicht in die Steckdose stecken, bis alle Verbindungen hergestellt worden sind!

Suomi:

1.Kytke LINE IN -johto (vihreä).

2.Kytke SURROUND IN -johto (musta)

3.Kytke CENTER/ SUB. IN -johto (oranssi).

4.Kytke etukaiuttimet (yksi pistoke).

5.Kytke surround-kaiuttimet (yksi pistoke).

6.Kytke keskikaiutin.

7.Yhdistä pistotulppa pistorasiaan.

8.Kytke/katkaise järjestelmän virta kauko-ohjaimen virtapainikkeella.

9.Viritä järjestelmä äänikortin/äänilähteen sekä kauko- ohjaimen säätimien avulla.

Huom: Älä yhdistä pistotulppaa pistorasiaan, ennen kuin kaikki kytkennät ovat valmiit!

Polski:

1.Podùàczprzewódsygnaùuwejúciowego(Linein)(zielony).

2.PodùàczprzewódwejúciasygnaùuSurround(czarny)

3.PodùàczprzewódwejúciaCenter/Sub*(pomarañczowy)

4.Podùàczgùoúnikiprzednie(pojedynczywtyk)

5.Podùàcz gùoúniki tylne (surround) (pojedynczy wtyk)

6.Podùàczgùoúniki centralny

7.Podùàczzasilanie

8.Wùàcz/wyùàcz system uýywajàc przycisku wùàczania zasilania na pilocie zdalnego sterowania

9.Wyreguluj system uýywajàc organów sterowania karty dêwiækowej/êródùa dêwiæku oraz pilota zdalnego sterowania

Uwaga: Niewùàczajwtyczkizasilaniadogniazdasieciowego przed dokonaniem wszystkich poùàczeñ!

Dansk:

1.Tilslut LINE IN kablet (grønt)

2.Tilslut SURROUND IN kablet (sort)

3.Tilslut CENTER / SUB IN kablet (orange)

4.Tilslut front højttalerne (ét stik)

5.Tilslut surround højttalerne (ét stik)

6.Tilslut center højttaler

7.Tilslut strømforsyning

8.Tænd/sluk for anlægget med til/fra knappen på fjernbetjeningen

9.Indstil anlægget med lydkort/ lydkilde og betjeningselementerne på fjernbetjeningen

NB: Sæt ikke stikket i kontakten til elnettet før alt er tilsluttet!

1.

2.

3.

4.

5.

6.

7.

8.

9.

!

Norsk:

1.Kople til LINE IN-kabelen (grønn)

2.Kople til SURROUND IN-kabelen (svart)

3.Kople til CENTER/SUB. IN-kabelen (oransje)

4.Kople til fronthøyttalerne (ett støpsel)

5.Kople til surround-høyttalerne (ett støpsel)

6.Kople til senterhøyttaleren

7.Slå på strømtilførselen

8.Slå systemet på med av/på-knappen på fjernkontrollen

9.Finjuster systemet ved hjelp av lydkortet/lydkilden og tastene på fjernkontrollen

Merk: Ikke sett støpselet i en stikkontakt før alle tilkoplingene er gjort!

Türkçe:

Ðóññêèé:


1.

LINE IN kablosunu (yeþil) takýnýz

1.

ÏîäñîåäèíèòåêàáåëüLINEIN(çåëåíûé).

2.

SURROUND IN kablosunu (siyah) takýnýz

2.

ÏîäñîåäèíèòåêàáåëüSURROUNDIN(÷åðíûé).

3.

CENTER/ SUB. IN kablosuýnu takýnýz (turuncu)

3.

ÏîäñîåäèíèòåêàáåëüCENTER/SUB.IN(îðàíæåâûé).

4.

Ön hoparlörleri takýnýz (bir fiþ)

4.

Ïîäñîåäèíèòåïåðåäíèåàêóñòè÷åñêèåêîëîíêè(îäèíøòåêåð).

5.

Surround hoparlörleri takýnýz (bir fiþ)

5.

Ïîäñîåäèíèòåàêóñòè÷åñêèåêîëîíêèçâóêîâîãîîêðóæåíèÿ

6.

Merkez hoparlörleri takýnýz


(îäèíøòåêåð).


7.

Güç kaynaðýný takýnýz

6.

Ïîäñîåäèíèòåöåíòðàëüíóþàêóñòè÷åñêóþêîëîíêó.

8.

Uzaktan kumanda üzerindeki açma-kapama

7.

Ïîäñîåäèíèòåèñòî÷íèêïèòàíèÿ.


düðmesini kullanarak sistemi açýnýz

8.

Âêëþ÷èòåñèñòåìó,íàæàâêíîïêóâêëþ÷åíèÿïèòàíèÿíàïóëüòå

9.

Ses kartý / ses kaynaðý ve uzaktan kumada


äèñòàíöèîííîãîóïðàâëåíèÿ.


üzerindeki kontrolleri kullanarak sistemin sesini

9.

Íàñòðîéòåñèñòåìó,èñïîëüçóÿçâóêîâóþêàðòó,èñòî÷íèêçâóêà


açýnýz


èóïðàâëÿþùèåêíîïêèíàïóëüòåäèñòàíöèîííîãîóïðàâëåíè￿ÿ.

Note: Bütün baðlantýlarý yapmadan elektrik fiþini

Ïðèìå÷àíèå:Íåïîäñîåäèíÿéòåâèëêóñåòåâîãîøíóðàê


AC çýkýþýna takmayýnýz!


ðîçåòêåñåòèïåðåìåííîãîòîêàíå


âûïîëíåíûâñå?íåîáõîäèìû?ñîåäèíåíèÿ!

Important notes for users in the U.K.

Mains plug

This apparatus is fitted with an approved 13 Amp plug.

To change a fuse in this type of plug proceed as follows:

1Remove fuse cover and fuse.

2Fix new fuse which should be a BS1362 5 Amp, A.S.T.A. or BSI approved type.

3 Refit the fuse cover.

If the fitted plug is not suitable for your socket outlets, it should be cut off and an appropriate plug fitted in its place. If the mains plug contains a fuse, this should have a value of 5 Amp. If a plug without a fuse is used, the fuse at the distribution board should not be greater than 5 Amp.

Note: The severed plug must be disposed of to avoid a possible shock hazard should it be inserted into a 13 Amp socket elsewhere.

How to connect a plug

The wires in the mains lead are coloured with the following code: blue = neutral (N), brown = live (L). As these colours may not correspond with the colour markings identifying the terminals in your plug, proceed as follows:

Connect the blue wire to the terminal marked N or coloured black.

Connect the brown wire to the terminal marked L or coloured red.

Do not connect either wire to the earth terminal in the plug, marked E (or) or coloured green (or green and yellow).

Before replacing the plug cover, make certain that the cord grip is clamped over the sheath of the lead - not simply over the two wires.

Copyright in the U.K.

Recording and playback of material may require consent. See Copyright Act 1956 and The Performer's Protection Acts 1958 to 1972.

Norge

Typeskilt finnes på apparatens underside.

Observer: Nettbryteren er sekundert innkoplet. Den innebygde netdelen er derfor ikke frakoplet nettet så lenge apparatet er tilsluttet nettkontakten.

For å redusere faren for brann eller elektrisk støt, skal apparatet ikke utsettes for regn eller fuktighet.

Deutschland

Hiermit wird bescheinigt, daß dieses Gerät in Übereinstimmung mit den Bestimmungen der Amtsblattverfügung 1046/1984 funkentstört ist.

Der Deutschen Bundespost wurde das Inverkehrbringen dieses Gerätes angezeigt und die Berechtigung zur Überprüfung der Serie auf Einhaltung der Bestimmungen eingeräumt.

A2.6.p65

2

1/31/01, 10:10 AM

Page 2
Image 2
Philips MMS206 English, Español, Italiano Nederlands Svenska, Français, Deutsch, Suomi, Dansk, Norsk, Türkçe Ðóññêèé

MMS206 specifications

The Philips MMS206 is a versatile multimedia speaker system designed to enhance your audio experience, making it an ideal choice for music lovers, gamers, and anyone who appreciates quality sound. With its sleek design and user-friendly features, the MMS206 integrates seamlessly into any home environment, providing a balance of aesthetics and functionality.

One of the main features of the Philips MMS206 is its powerful output, delivering remarkable sound clarity and depth. The speaker system includes a subwoofer, which adds rich bass that is perfect for music genres like hip-hop, electronic dance music, and action-packed gaming. This capability enables users to feel the music more deeply, enhancing their overall listening experience.

The MMS206 is designed with advanced audio technologies, including dynamic bass enhancement, which optimizes the sound output for a rich, immersive experience. This feature is particularly beneficial for users who enjoy watching movies or playing video games, as it brings every scene to life with impressive sound effects and resonating bass.

Another notable characteristic of the MMS206 is its compatibility with a wide range of audio devices. It features both wired and wireless connectivity options, allowing users to connect their smartphones, tablets, and computers effortlessly. The inclusion of USB and auxiliary input ports adds further versatility, making it easy to plug in external devices and enjoy music without hassle.

The user-friendly interface of the MMS206 includes convenient controls for adjusting volume and bass levels, ensuring that users can easily tailor the sound to their preferences. This adaptability makes it suitable for various audio environments, whether you’re throwing a party, relaxing at home, or working on a project.

Furthermore, the sleek and modern design of the Philips MMS206 not only complements the aesthetic of any room but also features durable materials that ensure longevity. Its compact size makes it easy to place in different locations, whether on a desktop or a living room shelf.

Overall, the Philips MMS206 stands out as a reliable speaker system for anyone seeking quality sound and excellent features. With its powerful performance, advanced audio technologies, and versatile connectivity options, the MMS206 is an outstanding choice for enhancing your audio enjoyment.