Clock Radio | AJ100 |
User manual
1 |
| English |
1 |
| |
| SUPPLIED ACCESSORIES | |
|
| |
|
| – 1 X certified AC 7.5V adapter |
|
| (Input: |
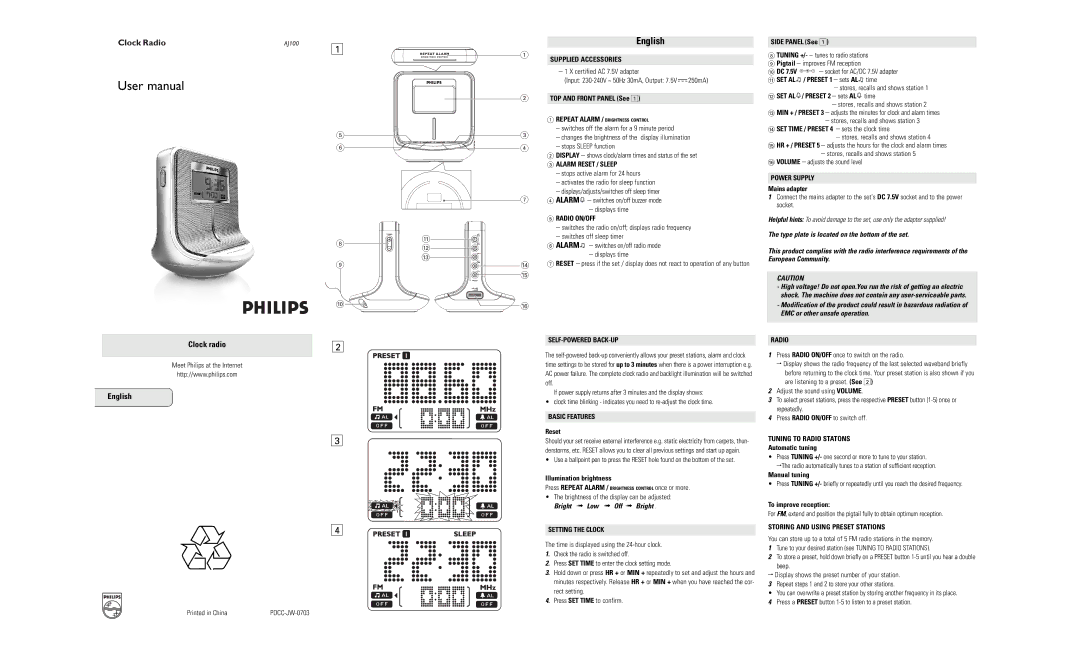
| 2 | TOP AND FRONT PANEL (See 1) |
|
| 1 REPEAT ALARM / BRIGHTNESS CONTROL |
5 | 3 | – switches off the alarm for a 9 minute period |
– changes the brightness of the display illumination | ||
6 | 4 | – stops SLEEP function |
|
| 2 DISPLAY – shows clock/alarm times and status of the set |
|
| 3 ALARM RESET / SLEEP |
|
| – stops active alarm for 24 hours |
|
| – activates the radio for sleep function |
|
| – displays/adjusts/switches off sleep timer |
| 7 | 4 ALARM – switches on/off buzzer mode |
|
| – displays time |
SIDE PANEL (See 1)
8TUNING +/- – tunes to radio stations
9 Pigtail – improves FM reception
0 DC 7.5V ![]()
![]()
![]()
![]() – socket for AC/DC 7.5V adapter
– socket for AC/DC 7.5V adapter
! SET AL![]() / PRESET 1 – sets AL
/ PRESET 1 – sets AL![]() time
time
–stores, recalls and shows station 1
@ SET AL  / PRESET 2 – sets AL
  time
time
–stores, recalls and shows station 2
# MIN + / PRESET 3 – adjusts the minutes for clock and alarm times
–stores, recalls and shows station 3
$ SET TIME / PRESET 4 – sets the clock time
–stores, recalls and shows station 4
%HR + / PRESET 5 – adjusts the hours for the clock and alarm times
–stores, recalls and shows station 5
^VOLUME – adjusts the sound level
POWER SUPPLY
Mains adapter
1Connect the mains adapter to the set's DC 7.5V socket and to the power socket.
Clock radio
Meet Philips at the Internet
http://www.philips.com
English
Printed in China |
8 | ! | |
@ | ||
| ||
9 | # | |
|
0
2
3
4
5RADIO ON/OFF
– switches the radio on/off; displays radio frequency
– switches off sleep timer
6 ALARM![]() – switches on/off radio mode
– switches on/off radio mode
– displays time
$ 7 RESET – press if the set / display does not react to operation of any button
%
![]() ^
^
SELF-POWERED BACK-UP
The
If power supply returns after 3 minutes and the display shows:
• clock time blinking - indicates you need to
BASIC FEATURES
Reset
Should your set receive external interference e.g. static electricity from carpets, thun- derstorms, etc. RESET allows you to clear all previous settings and start up again.
• Use a ballpoint pen to press the RESET hole found on the bottom of the set.
Illumination brightness
Press REPEAT ALARM / BRIGHTNESS CONTROL once or more.
• The brightness of the display can be adjusted: Bright ➟ Low ➟ Off ➟ Bright .
SETTING THE CLOCK
The time is displayed using the
1.Check the radio is switched off.
2.Press SET TIME to enter the clock setting mode.
3.Hold down or press HR + or MIN + repeatedly to set and adjust the hours and minutes respectively. Release HR + or MIN + when you have reached the cor- rect setting.
4.Press SET TIME to confirm.
Helpful hints: To avoid damage to the set, use only the adapter supplied!
The type plate is located on the bottom of the set.
This product complies with the radio interference requirements of the European Community.
CAUTION
-High voltage! Do not open.You run the risk of getting an electric shock. The machine does not contain any
-Modification of the product could result in hazardous radiation of EMC or other unsafe operation.
RADIO
1Press RADIO ON/OFF once to switch on the radio.
™Display shows the radio frequency of the last selected waveband briefly before returning to the clock time. Your preset station is also shown if you are listening to a preset. (See 2)
2Adjust the sound using VOLUME.
3To select preset stations, press the respective PRESET button
4Press RADIO ON/OFF to switch off.
TUNING TO RADIO STATONS
Automatic tuning
•Press TUNING +/- one second or more to tune to your station.
™The radio automatically tunes to a station of sufficient reception.
Manual tuning
• Press TUNING +/- briefly or repeatedly until you reach the desired frequency.
To improve reception:
For FM, extend and position the pigtail fully to obtain optimum reception.
STORING AND USING PRESET STATIONS
You can store up to a total of 5 FM radio stations in the memory.
1Tune to your desired station (see TUNING TO RADIO STATIONS).
2To store a preset, hold down briefly on a PRESET button
™Display shows the preset number of your station. 3 Repeat steps 1 and 2 to store your other stations.
• You can overwrite a preset station by storing another frequency in its place. 4 Press a PRESET button