RMX™ 4000

Installation Quick Start Guide for

RMX 4000

Basic Setup

Before installing the RMX 4000 and performing the Basic Setup, please read the General Safety Precautions described in the Polycom RMX 4000 Hardware Guide.

For a detailed description of Unpacking and Rack mounting instructions, and connecting a DC system, see the Polycom RMX 4000 Hardware Guide.

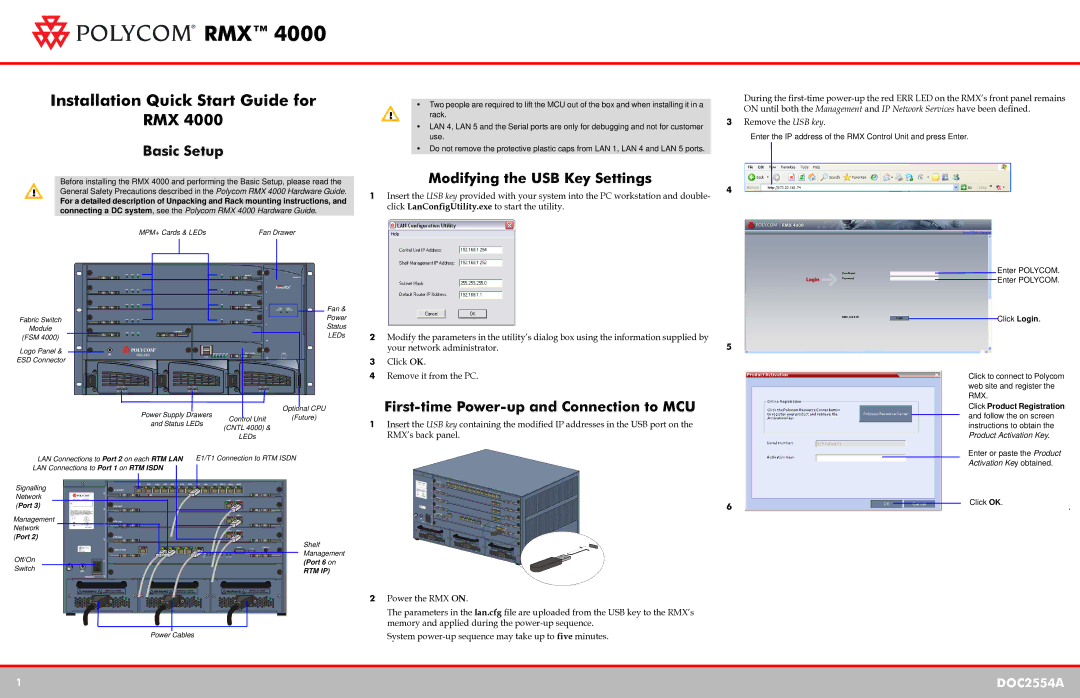
MPM+ Cards & LEDs

Fan Drawer

Two people are required to lift the MCU out of the box and when installing it in a rack.

LAN 4, LAN 5 and the Serial ports are only for debugging and not for customer use.

Do not remove the protective plastic caps from LAN 1, LAN 4 and LAN 5 ports.

Modifying the USB Key Settings

1Insert the USB key provided with your system into the PC workstation and double- click LanConfigUtility.exe to start the utility.

During the first-time power-up the red ERR LED on the RMX’s front panel remains ON until both the Management and IP Network Services have been defined.

3Remove the USB key.

Enter the IP address of the RMX Control Unit and press Enter.

4


Fan &


Fabric Switch


Power


Module


Status

(FSM 4000)


LEDs

Logo Panel &


ESD Connector


Power Supply Drawers


Optional CPU

Control Unit

(Future)

and Status LEDs

(CNTL 4000) &


LEDs


2Modify the parameters in the utility’s dialog box using the information supplied by your network administrator.

3Click OK.

4Remove it from the PC.

First-time Power-up and Connection to MCU

1Insert the USB key containing the modified IP addresses in the USB port on the RMX’s back panel.

5

Enter POLYCOM.

Enter POLYCOM.

Click Login.

Click to connect to Polycom web site and register the RMX.

Click Product Registration and follow the on screen instructions to obtain the Product Activation Key.

LAN Connections to Port 2 on each RTM LAN E1/T1 Connection to RTM ISDN LAN Connections to Port 1 on RTM ISDN

Signalling

Network (Port 3)

Management Network (Port 2)

Off/On

Switch

Shelf Management (Port 6 on

RTM IP)

6

Enter or paste the Product Activation Key obtained.

Click OK.

.


Power Cables

2Power the RMX ON.

The parameters in the lan.cfg file are uploaded from the USB key to the RMX’s memory and applied during the power-up sequence.

System power-up sequence may take up to five minutes.

1

DOC2554A


Page 1
Image 1
Polycom DOC2554A quick start Basic Setup, Modifying the USB Key Settings, First-time Power-up and Connection to MCU

DOC2554A specifications

The Polycom DOC2554A is a versatile and powerful communication device designed primarily for enhancing collaboration in professional environments. As a prominent member of Polycom's advanced conferencing solutions, the DOC2554A embodies a range of features that facilitate seamless communication for teams, irrespective of their location.

One of the notable characteristics of the DOC2554A is its high-definition audio and video output. This device utilizes Polycom's renowned HD Voice technology, which ensures crystal-clear audio quality during calls. Participants can experience natural conversations without the disruptive background noise that often plagues traditional phone systems. The incorporation of high-definition video capabilities further enriches the communication experience, enabling users to engage in vibrant visual interactions.

In terms of design, the Polycom DOC2554A features a user-friendly interface that promotes accessibility for all participants, regardless of their tech-savviness. The intuitive touch-screen display allows users to easily navigate menus, manage calls, and engage with additional features. The device is also equipped with programmable shortcut keys, giving users quick access to their most frequently used functions.

Another significant feature is the device's compatibility with various conferencing platforms. The DOC2554A seamlessly integrates with industry-leading video conferencing systems, allowing users to connect with external partners and clients effortlessly. This interoperability enhances collaboration by enabling cross-platform communication without any technical hurdles.

Polycom has also prioritized security in the design of the DOC2554A. The device supports robust encryption protocols, ensuring that sensitive conversations remain confidential. This feature is crucial for organizations dealing with proprietary information or sensitive client data.

Furthermore, the DOC2554A is designed for scalability. It can accommodate various team sizes, making it suitable for everything from small meetings to large conferences. The device can also be customized with additional accessories, such as external microphones and speakers, to further enhance the audio experience.

In summary, the Polycom DOC2554A brings forth a host of innovative features, including high-definition audio and video, user-friendly operation, extensive compatibility, advanced security protocols, and scalability. These characteristics position the DOC2554A as an invaluable tool for modern organizations seeking to enhance their communication and collaboration capabilities in an increasingly connected world.