MODELS WITH
•Remove drive cover and belt keeper.
•Remove belt from gearcase pulley.
•Turn lawn mower on its side. See engine manual for proper direction of turning over the engine.
•Remove blade and blade adapter.
•Remove belt from pulley of blade adapter.
•Install new belt by reversing above steps.
NOTE: Always use factory approved belt to assure fit and long life.
REAR WHEEL DRIVE MODELS:
MODELS WITH IDLER ASSEMBLY:
•Disconnect spark plug wire from spark plug and place wire where it cannot come in contact with plug.
•Remove screws retaining drive cover (not shown); and remove drive cover from lawn mower housing.
•Remove drive cable from anchor, then detach it and return spring (if equipped) from idler arm assembly.
•Remove idler arm assembly from hous- ing by removing hex nut; then remove drive belt from drive pulley, belt keepers and idler arm assembly.
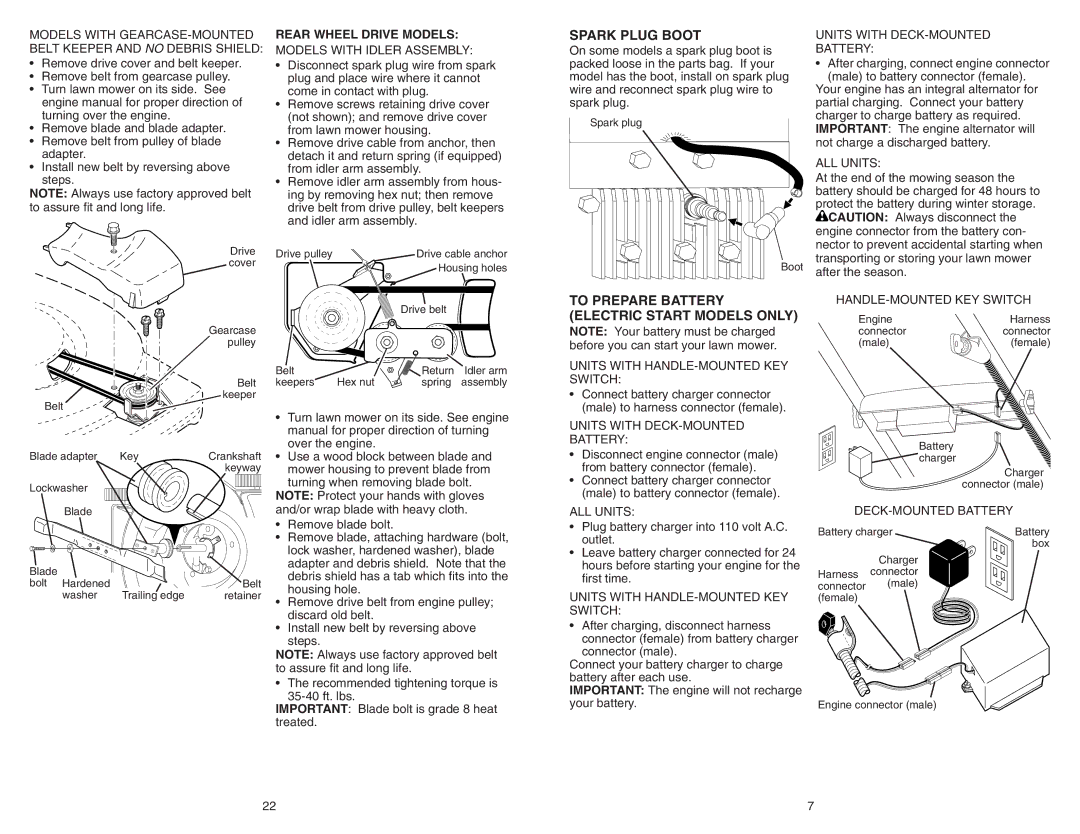
SPARK PLUG BOOT
On some models a spark plug boot is packed loose in the parts bag. If your model has the boot, install on spark plug wire and reconnect spark plug wire to spark plug.
Spark plug
UNITS WITH DECK-MOUNTED
BATTERY:
•After charging, connect engine connector (male) to battery connector (female).
Your engine has an integral alternator for partial charging. Connect your battery charger to charge battery as required. IMPORTANT: The engine alternator will not charge a discharged battery.
ALL UNITS:
At the end of the mowing season the battery should be charged for 48 hours to protect the battery during winter storage.
![]() CAUTION: Always disconnect the engine connector from the battery con- nector to prevent accidental starting when
CAUTION: Always disconnect the engine connector from the battery con- nector to prevent accidental starting when
Drive cover
Gearcase pulley
Belt
keeper
Belt
Blade adapter | Key | Crankshaft |
|
| keyway |
Lockwasher |
|
|
Blade |
|
|
Blade |
|
|
bolt Hardened |
| Belt |
washer | Trailing edge | retainer |
Drive pulley | Drive cable anchor |
| Housing holes |
Drive belt
Belt | Hex nut | Return | Idler arm |
keepers | spring | assembly |
•Turn lawn mower on its side. See engine manual for proper direction of turning over the engine.
•Use a wood block between blade and mower housing to prevent blade from turning when removing blade bolt.
NOTE: Protect your hands with gloves and/or wrap blade with heavy cloth.
•Remove blade bolt.
•Remove blade, attaching hardware (bolt, lock washer, hardened washer), blade adapter and debris shield. Note that the debris shield has a tab which fits into the housing hole.
•Remove drive belt from engine pulley; discard old belt.
•Install new belt by reversing above steps.
NOTE: Always use factory approved belt to assure fit and long life.
•The recommended tightening torque is
IMPORTANT: Blade bolt is grade 8 heat treated.
Boot
TO PREPARE BATTERY (ELECTRIC START MODELS ONLY)
NOTE: Your battery must be charged before you can start your lawn mower.
UNITS WITH
•Connect battery charger connector (male) to harness connector (female).
UNITS WITH
BATTERY:
•Disconnect engine connector (male) from battery connector (female).
•Connect battery charger connector (male) to battery connector (female).
ALL UNITS:
•Plug battery charger into 110 volt A.C. outlet.
•Leave battery charger connected for 24 hours before starting your engine for the first time.
UNITS WITH
•After charging, disconnect harness connector (female) from battery charger connector (male).
Connect your battery charger to charge battery after each use.
IMPORTANT: The engine will not recharge your battery.
transporting or storing your lawn mower after the season.
Engine | Harness |
connector | connector |
(male) | (female) |
|
| Battery |
|
| charger |
|
| Charger |
|
| connector (male) |
Battery charger | Battery | |
|
| box |
| Charger |
|
Harness | connector |
|
connector | (male) |
|
(female)
Engine connector (male)
22 | 7 |