ASSEMBLY

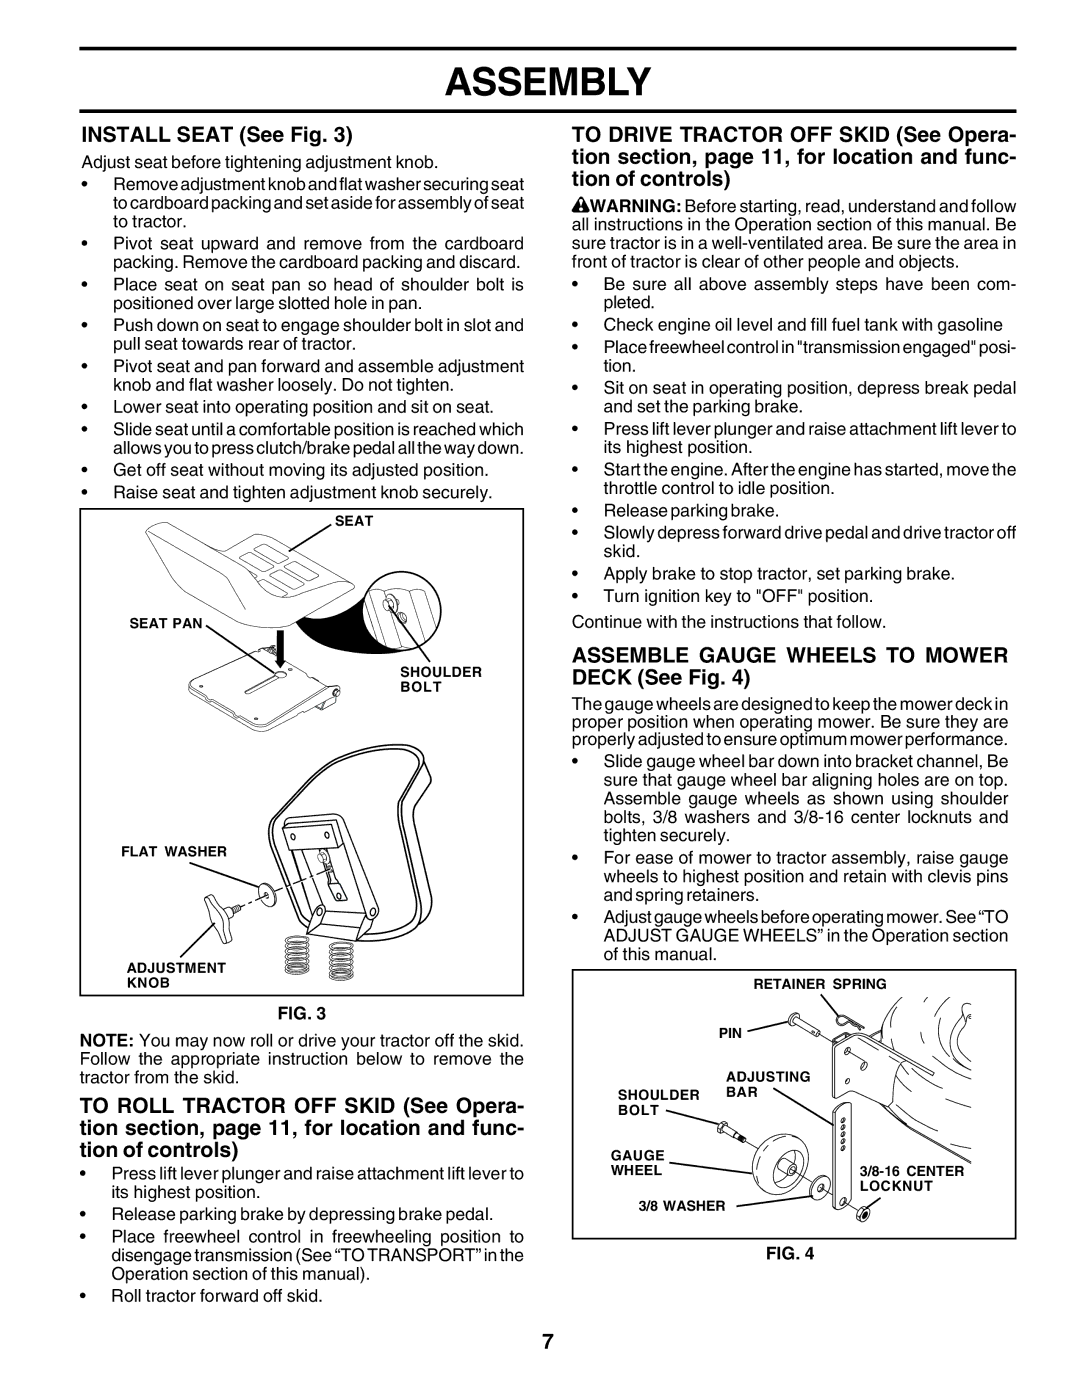
INSTALL SEAT (See Fig. 3)

Adjust seat before tightening adjustment knob.

Remove adjustment knob and flat washer securing seat to cardboard packing and set aside for assembly of seat to tractor.

Pivot seat upward and remove from the cardboard packing. Remove the cardboard packing and discard.

Place seat on seat pan so head of shoulder bolt is positioned over large slotted hole in pan.

Push down on seat to engage shoulder bolt in slot and pull seat towards rear of tractor.

Pivot seat and pan forward and assemble adjustment knob and flat washer loosely. Do not tighten.

Lower seat into operating position and sit on seat.

Slide seat until a comfortable position is reached which allows you to press clutch/brake pedal all the way down.

Get off seat without moving its adjusted position.

Raise seat and tighten adjustment knob securely.

SEAT

SEAT PAN

SHOULDER

BOLT

FLAT WASHER

ADJUSTMENT

KNOB

FIG. 3

NOTE: You may now roll or drive your tractor off the skid. Follow the appropriate instruction below to remove the tractor from the skid.

TO ROLL TRACTOR OFF SKID (See Opera- tion section, page 11, for location and func- tion of controls)

Press lift lever plunger and raise attachment lift lever to its highest position.

Release parking brake by depressing brake pedal.

Place freewheel control in freewheeling position to disengage transmission (See “TO TRANSPORT” in the Operation section of this manual).

Roll tractor forward off skid.

TO DRIVE TRACTOR OFF SKID (See Opera- tion section, page 11, for location and func- tion of controls)

WARNING: Before starting, read, understand and follow all instructions in the Operation section of this manual. Be sure tractor is in a well-ventilated area. Be sure the area in front of tractor is clear of other people and objects.

Be sure all above assembly steps have been com- pleted.

Check engine oil level and fill fuel tank with gasoline

Place freewheel control in "transmission engaged" posi- tion.

Sit on seat in operating position, depress break pedal and set the parking brake.

Press lift lever plunger and raise attachment lift lever to its highest position.

Start the engine. After the engine has started, move the throttle control to idle position.

Release parking brake.

Slowly depress forward drive pedal and drive tractor off skid.

Apply brake to stop tractor, set parking brake.

Turn ignition key to "OFF" position.

Continue with the instructions that follow.

ASSEMBLE GAUGE WHEELS TO MOWER DECK (See Fig. 4)

The gauge wheels are designed to keep the mower deck in proper position when operating mower. Be sure they are properly adjusted to ensure optimum mower performance.

Slide gauge wheel bar down into bracket channel, Be sure that gauge wheel bar aligning holes are on top. Assemble gauge wheels as shown using shoulder bolts, 3/8 washers and 3/8-16 center locknuts and tighten securely.

For ease of mower to tractor assembly, raise gauge wheels to highest position and retain with clevis pins and spring retainers.

Adjust gauge wheels before operating mower. See “TO ADJUST GAUGE WHEELS” in the Operation section of this manual.

RETAINER SPRING

PIN

ADJUSTING

SHOULDER BAR

BOLT

GAUGE

WHEEL 3/8-16 CENTER LOCKNUT

3/8 WASHER

FIG. 4

7

Page 7
Image 7
Poulan PR25PH48STB owner manual Install Seat See Fig, Assemble Gauge Wheels to Mower Deck See Fig

PR25PH48STB specifications

The Poulan PR25PH48STB is a versatile and powerful tool designed to tackle various yard maintenance tasks with ease. Ideal for both homeowners and professional landscapers, this string trimmer combines user-friendly features and advanced technology to ensure efficient performance.

Equipped with a robust 25cc 2-stroke engine, the PR25PH48STB delivers ample power for clearing through tough grasses and weeds. This lightweight engine contributes to the overall maneuverability of the trimmer, allowing users to navigate around obstacles without fatigue during extended use. The high-performance engine is not only powerful but also designed to be fuel-efficient, helping users to save on fuel costs while minimizing their environmental impact.

One of the standout features of the Poulan PR25PH48STB is its pivoting head, which allows for easy transitions between trimming and edging tasks. This unique feature facilitates a smooth operation, making it simple to achieve a clean and professional finish around gardens, driveways, and patios. Additionally, the adjustable handle provides comfort and control, enabling users to change their grip position to suit their height and working style.

The dual-line capability of the PR25PH48STB enhances its cutting efficiency. By using two lines simultaneously, the trimmer can cover a larger area and reduce the time required to complete the job. The Easy Reload string head makes it simple to replace the cutting line, minimizing downtime and keeping users focused on the task at hand.

The trimmer also incorporates anti-vibration technology, which significantly reduces fatigue during prolonged use. This makes it an excellent choice for those who need to tackle large areas or complete challenging tasks without experiencing discomfort. Additionally, the lightweight design contributes to the ease of use and overall user experience.

For enhanced convenience, the PR25PH48STB features a straight shaft design, which provides better reach under bushes and around trees, ensuring gardeners can maintain their yards more effectively. This design also reduces the chance of the user having to bend or strain their back while working.

Overall, the Poulan PR25PH48STB stands out as a reliable and efficient trimmer that combines power, versatility, and user-friendly features. With its advanced technologies and robust design, it’s an ideal solution for anyone looking to maintain a pristine outdoor space effortlessly.