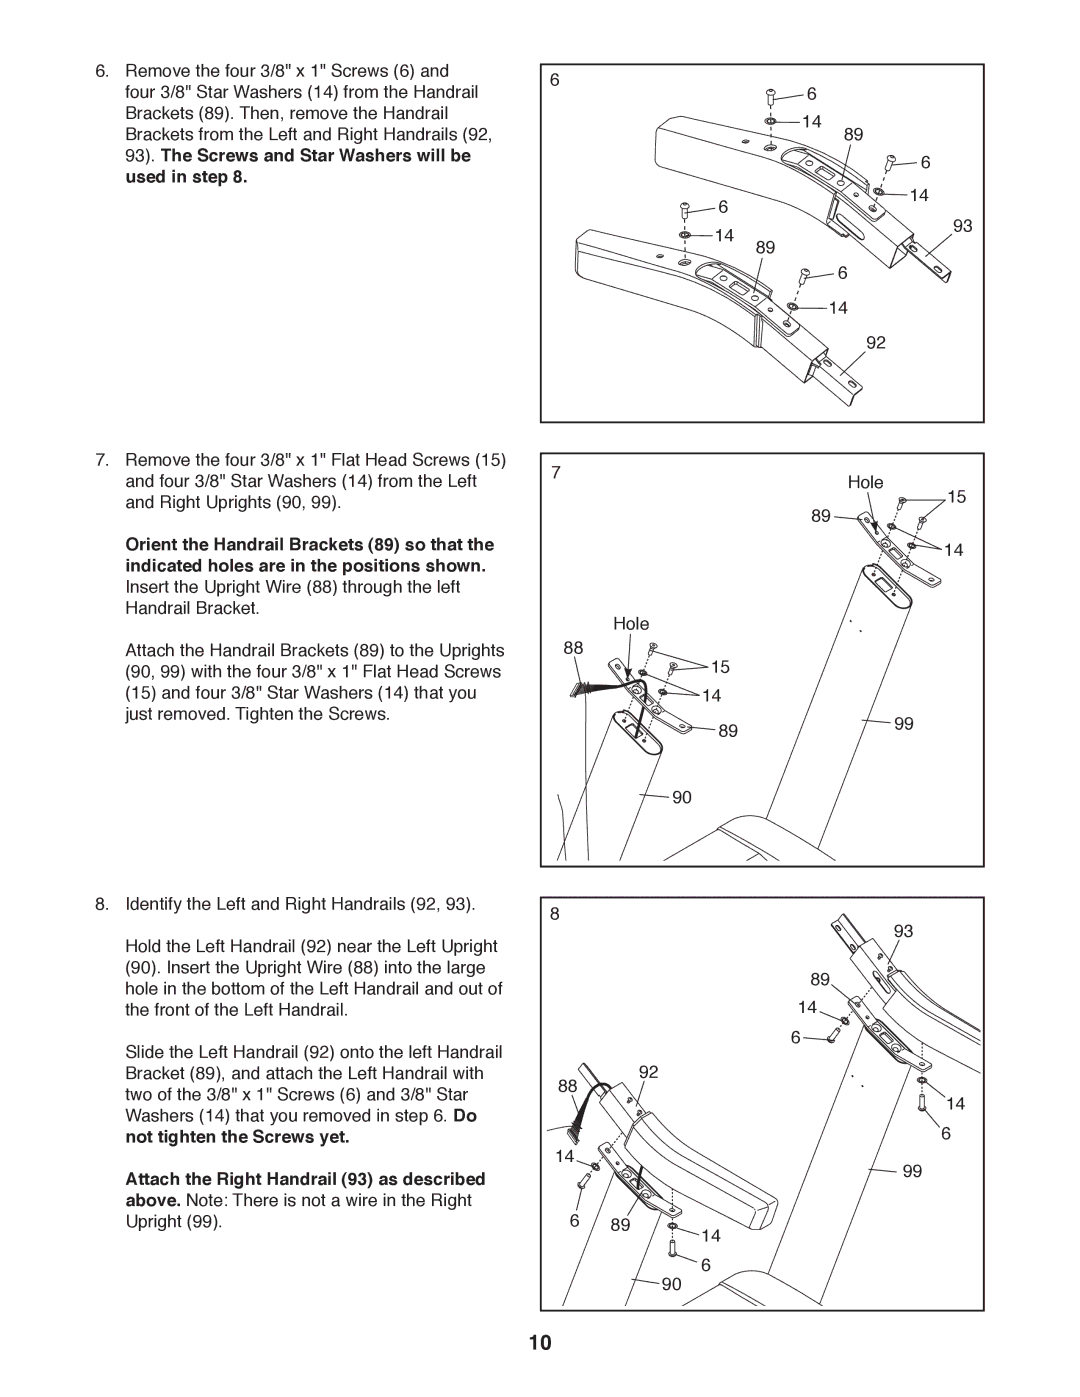
6. Remove the four 3/8" x 1" Screws (6) and | 6 |
|
|
|
|
|
four 3/8" Star Washers (14) from the Handrail |
|
| 6 |
|
| |
|
|
|
|
| ||
Brackets (89). Then, remove the Handrail |
|
|
| 14 |
|
|
Brackets from the Left and Right Handrails (92, |
|
|
| 89 |
| |
|
|
|
| 6 | ||
93). The Screws and Star Washers will be |
|
|
|
|
| |
used in step 8. |
|
|
|
|
| 14 |
|
|
| 6 |
|
| |
|
|
|
|
| 93 | |
|
|
| 14 | 89 |
| |
|
|
|
|
| ||
|
|
|
| 6 |
| |
|
|
|
|
|
| |
|
|
|
| 14 |
| |
|
|
|
|
| 92 |
|
7. Remove the four 3/8" x 1" Flat Head Screws (15) | 7 |
|
|
|
|
|
and four 3/8" Star Washers (14) from the Left |
|
|
| Hole | 15 | |
and Right Uprights (90, 99). |
|
|
| 89 |
| |
|
|
|
|
|
| |
Orient the Handrail Brackets (89) so that the |
|
|
|
|
| 14 |
indicated holes are in the positions shown. |
|
|
|
|
|
|
Insert the Upright Wire (88) through the left |
|
|
|
|
|
|
Handrail Bracket. |
| Hole |
|
|
|
|
Attach the Handrail Brackets (89) to the Uprights | 88 |
|
|
|
| |
| 15 |
|
|
| ||
(90, 99) with the four 3/8" x 1" Flat Head Screws |
|
|
|
|
| |
(15) and four 3/8" Star Washers (14) that you |
|
| 14 |
|
|
|
just removed. Tighten the Screws. |
|
| 89 |
|
| 99 |
|
|
|
|
| ||
|
|
|
|
|
| |
|
|
| 90 |
|
|
|
8. Identify the Left and Right Handrails (92, 93). | 8 |
|
|
|
| 93 |
|
|
|
|
| ||
Hold the Left Handrail (92) near the Left Upright |
|
|
|
|
| |
|
|
|
|
|
| |
(90). Insert the Upright Wire (88) into the large |
|
|
| 89 |
|
|
hole in the bottom of the Left Handrail and out of |
|
|
|
|
| |
|
|
| 14 |
|
| |
the front of the Left Handrail. |
|
|
|
|
| |
Slide the Left Handrail (92) onto the left Handrail |
|
|
| 6 |
|
|
| 92 |
|
|
|
| |
Bracket (89), and attach the Left Handrail with | 88 |
|
|
|
| |
two of the 3/8" x 1" Screws (6) and 3/8" Star |
|
|
|
| 14 | |
Washers (14) that you removed in step 6. Do |
|
|
|
|
| |
|
|
|
|
| 6 | |
not tighten the Screws yet. | 14 |
|
|
|
| |
Attach the Right Handrail (93) as described |
|
|
|
| 99 | |
|
|
|
|
| ||
above. Note: There is not a wire in the Right | 6 | 89 |
|
|
|
|
Upright (99). | 14 |
|
|
| ||
|
|
|
|
|
| |
|
|
| 6 |
|
|
|
|
|
| 90 |
|
|
|
| 10 |
|
|
|
|
|
