Support and Wire the Loudspeaker System

Important: Loudspeakers can potentially generate substantial vibration. In addition to ensuring all hardware is properly installed and secure, you must use the Seismic Support Bracket on the loudspeaker to secure the loudspeaker to an appropriate structural support. This minimizes the chance of the loudspeaker falling from the ceiling in the event the primary mount fails. Any cable or wire used as a secondary support line must be strong enough to support ten times the weight of the loudspeaker system. Do not use rope, string, twine or other textile-based line in the Seismic Support system as it is easily cut or burned. The Seismic Support attachment point and any fasteners used on the building’s structure must also be strong enough to support ten times the weight of the loudspeaker.

1.Using an appropriate fastener, attach the seismic support cable to a structural support of the building such as a beam.

2.Attach the loose end of the cable to the Seismic Support bracket on the loudspeaker system so that it is supported slightly below the ceiling. (This should allow enough room to install the loudspeaker wiring as described in the following steps.)

3.Use a #1 Phillips head screwdriver to loosen the Pivoting Connection Cover Retaining Screw (Figure 1), item c and swing the cover open.

4.Install a Wire Clamp Fitting into the cover plate hole (Figure 1), item d.

5.Feed the facility’s loudspeaker signal wiring through the cover plate hole with Wire Clamp Fitting making sure there is enough wire to strip, tin, and install the connector. Do not secure the Wire Clamp Fitting at this time.

6.Strip the ends of the wires to approximately 0.4" (10 mm). Tin the ends of the wires.

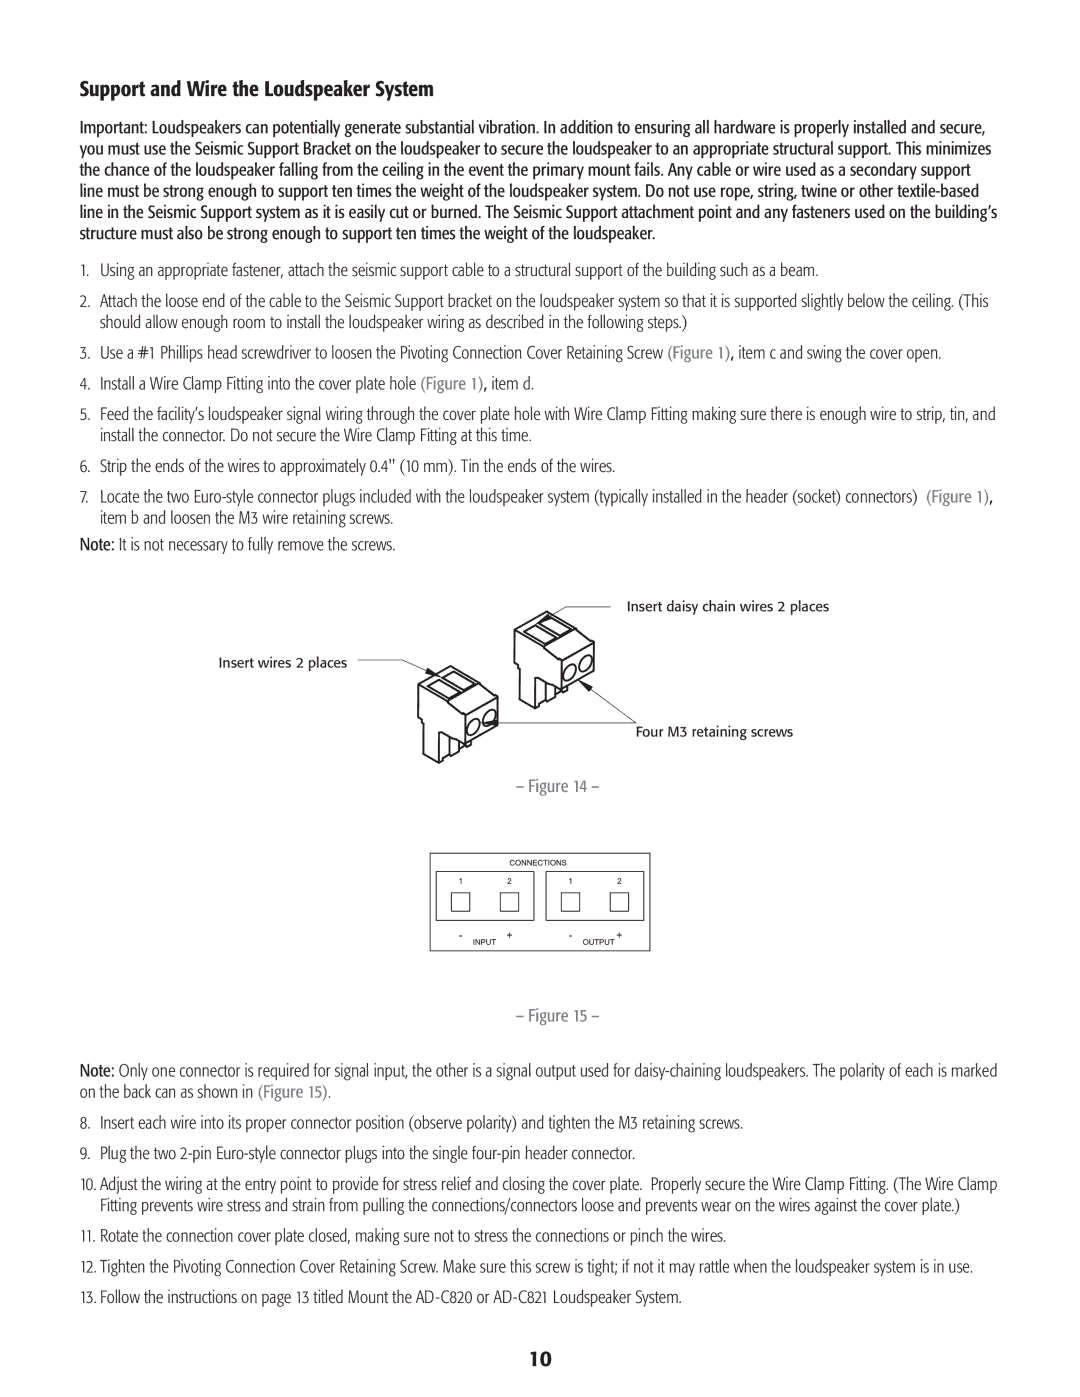
7.Locate the two Euro-style connector plugs included with the loudspeaker system (typically installed in the header (socket) connectors) (Figure 1), item b and loosen the M3 wire retaining screws.

Note: It is not necessary to fully remove the screws.

Insert daisy chain wires 2 places

Insert wires 2 places

Four M3 retaining screws

– Figure 14 –

– Figure 15 –

Note: Only one connector is required for signal input, the other is a signal output used for daisy-chaining loudspeakers. The polarity of each is marked on the back can as shown in (Figure 15).

8.Insert each wire into its proper connector position (observe polarity) and tighten the M3 retaining screws.

9.Plug the two 2-pin Euro-style connector plugs into the single four-pin header connector.

10.Adjust the wiring at the entry point to provide for stress relief and closing the cover plate. Properly secure the Wire Clamp Fitting. (The Wire Clamp Fitting prevents wire stress and strain from pulling the connections/connectors loose and prevents wear on the wires against the cover plate.)

11.Rotate the connection cover plate closed, making sure not to stress the connections or pinch the wires.

12.Tighten the Pivoting Connection Cover Retaining Screw. Make sure this screw is tight; if not it may rattle when the loudspeaker system is in use.

13.Follow the instructions on page 13 titled Mount the AD-C820 or AD-C821 Loudspeaker System.

10

Page 11
Image 11
QSC Audio AD-C1200, AD-C821, AD-C820 user manual Support and Wire the Loudspeaker System

AD-C1200, AD-C821, AD-C820 specifications

QSC Audio has established itself as a leader in professional audio solutions, and the AD-C820, AD-C821, and AD-C1200 speakers are prime examples of the company's innovative engineering and commitment to quality. These models are designed specifically for high-performance commercial sound applications, such as restaurants, retail spaces, and corporate environments.

The AD-C820 and AD-C821 are part of QSC's AcousticDesign Series, featuring a compact, sleek design that blends seamlessly into any architectural environment. Both models utilize QSC's proprietary Directivity Matched Waveguide technology. This ensures consistent coverage across the listening area, reducing the possibility of dead spots and enhancing audio clarity. The AD-C820 is an 8-inch two-way speaker, while the AD-C821 is a more powerful 8-inch loudspeaker that includes a coaxial design, offering an exceptional audio experience with a wider frequency response and improved tonal balance.

Both speakers are equipped with a unique DMT (Directivity Matched Transition) system, which provides seamless transition between high and low frequencies, significantly improving sound quality during a range of applications. Furthermore, the AD-C821 features a dedicated high-frequency driver that allows for extended high-frequency performance, making it suitable for environments that require more detailed sound reproduction.

On the other hand, the AD-C1200 is a powerful 12-inch ceiling loudspeaker that is perfect for larger spaces. It incorporates a high-output woofer, providing warm and rich bass response. With QSC's specially designed high-frequency driver, the AD-C1200 delivers a clear and detailed audio experience, ensuring that voices and instruments are rendered with precision.

All three models feature an innovative Waveguide design that enhances coverage patterns, ensuring a uniform sound experience regardless of the listener's location. Additionally, these loudspeakers come with a robust enclosure that minimizes ambient noise interference, further enhancing audio fidelity. The integration of rugged components ensures long-lasting performance under various conditions, making them ideal for diverse commercial applications.

In summary, the QSC Audio AD-C820, AD-C821, and AD-C1200 speakers offer a blend of advanced technology, exceptional sound quality, and practical design. Their versatility makes them an excellent choice for anyone looking to achieve high-quality audio in commercial environments, making QSC a trusted name in the professional audio industry.