Quick Reference Sheet | Applicable models: |
Quick Reference Sheet
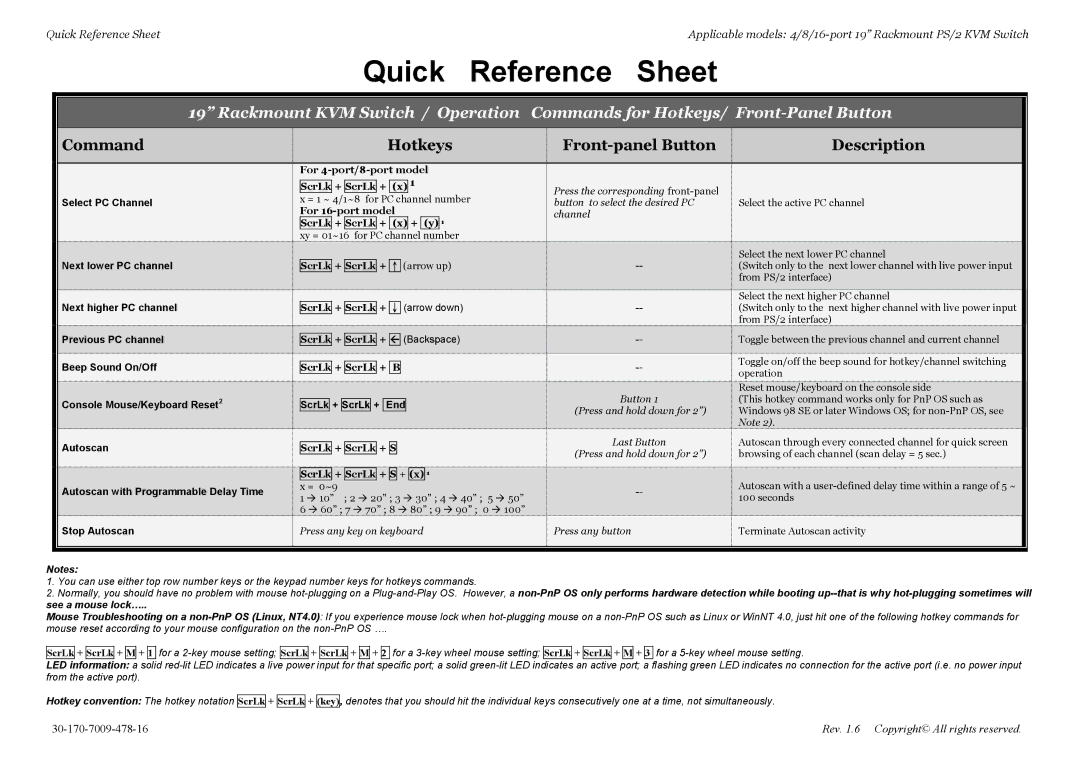
19” Rackmount KVM Switch / Operation Commands for Hotkeys/
|
|
|
|
|
|
Command | Hotkeys |
|
|
| Description |
|
|
|
|
|
|
| For |
| |||||||
|
| + |
| + |
| 1 |
|
|
|
| ScrLk | ScrLk | (x) |
| |||||
Select PC Channel | x = 1 ~ 4/1~8 for PC channel number |
| |||||||
| For |
| |||||||
| ScrLk | + | ScrLk | + | (x) | + | (y) | 1 |
|
| xy = 01~16 for PC channel number |
| |||||||
Press the corresponding
|
|
|
|
|
|
|
|
|
|
|
|
|
|
|
|
|
|
|
|
|
|
|
|
|
|
| Next lower PC channel |
|
|
|
| + |
|
| + ↑ (arrow up) |
|
|
|
|
|
|
| Select the next lower PC channel | ||||||
|
|
|
| ScrLk | ScrLk |
|
|
|
|
|
| (Switch only to the next lower channel with live power input | ||||||||||||
|
|
|
|
|
|
|
|
|
|
|
|
|
|
|
|
|
|
|
|
|
|
|
| from PS/2 interface) |
|
|
|
|
|
|
|
|
|
|
|
|
|
|
|
|
|
|
|
|
|
|
|
|
|
|
| Next higher PC channel |
|
|
|
|
|
|
|
|
|
|
|
|
|
|
|
|
|
|
|
|
| Select the next higher PC channel |
|
|
|
| ScrLk | + | ScrLk | + ↓ (arrow down) |
|
|
|
|
|
| (Switch only to the next higher channel with live power input | ||||||||||
|
|
|
|
|
|
|
|
|
|
|
|
|
|
|
|
|
|
|
|
|
|
|
| from PS/2 interface) |
|
| Previous PC channel |
|
|
|
|
|
|
|
|
|
|
|
|
|
|
|
|
|
|
| |||
|
|
|
| ScrLk | + | ScrLk | + Å (Backspace) |
|
|
|
|
|
| Toggle between the previous channel and current channel | ||||||||||
|
|
|
|
|
|
|
|
|
|
|
|
|
|
|
|
|
|
|
|
|
|
|
|
|
|
| Beep Sound On/Off |
|
|
|
|
|
|
|
|
|
|
|
|
|
|
|
|
|
|
|
|
| Toggle on/off the beep sound for hotkey/channel switching |
|
|
|
| ScrLk | + | ScrLk | + B |
|
|
|
|
|
| |||||||||||
|
|
|
|
|
|
|
|
|
| operation | ||||||||||||||
|
|
|
|
|
|
|
|
|
|
|
|
|
|
|
|
|
|
|
|
|
|
|
| |
|
|
|
|
|
|
|
|
|
|
|
|
|
|
|
|
|
|
|
| Button 1 |
|
|
| Reset mouse/keyboard on the console side |
|
| Console Mouse/Keyboard Reset2 |
|
|
| + |
| + |
|
|
|
|
|
|
|
|
|
|
|
| (This hotkey command works only for PnP OS such as | |||
|
|
|
| ScrLk | ScrLk | End |
|
|
|
|
|
|
|
| ||||||||||
|
|
|
|
|
|
|
|
|
|
|
|
|
|
|
|
|
|
|
| (Press and hold down for 2”) |
|
|
| Windows 98 SE or later Windows OS; for |
|
|
|
|
|
|
|
|
|
|
|
|
|
|
|
|
|
|
|
|
|
|
|
| Note 2). |
|
|
|
|
|
|
|
|
|
|
|
|
|
|
|
|
|
|
|
| Last Button |
|
|
|
|
|
| Autoscan |
|
|
|
|
|
|
|
|
|
|
|
|
|
|
|
|
|
|
| Autoscan through every connected channel for quick screen | ||
|
|
|
| ScrLk | + | ScrLk | + S |
|
|
|
|
| ||||||||||||
|
|
|
|
|
|
| (Press and hold down for 2”) |
|
|
| browsing of each channel (scan delay = 5 sec.) | |||||||||||||
|
|
|
|
|
|
|
|
|
|
|
|
|
|
|
|
|
|
|
|
|
|
| ||
|
|
|
|
|
|
|
|
|
|
|
|
|
|
|
|
|
|
|
|
|
|
|
|
|
|
|
|
|
| ScrLk | + | ScrLk | + | S | + | (x) | 1 |
|
|
|
|
|
|
|
| ||||
|
| Autoscan with Programmable Delay Time |
|
| x = 0~9 |
|
|
|
|
|
| Autoscan with a | ||||||||||||
|
|
|
| 1 Æ 10” ; 2 Æ 20” ; 3 Æ 30” ; 4 Æ 40” ; 5 | Æ 50” |
|
|
|
|
| 100 seconds | |||||||||||||
|
|
|
|
|
|
|
|
|
|
| ||||||||||||||
|
|
|
|
| 6 Æ 60” ; 7 Æ 70” ; 8 Æ 80” ; 9 Æ 90” ; 0 Æ 100” |
|
|
|
|
|
|
| ||||||||||||
|
|
|
|
|
|
|
|
| ||||||||||||||||
|
| Stop Autoscan |
|
| Press any key on keyboard |
|
|
| Press any button |
|
|
|
| |||||||||||
|
|
|
|
|
|
| Terminate Autoscan activity | |||||||||||||||||
|
|
|
|
|
|
|
|
|
|
|
|
|
|
|
|
|
|
|
|
|
|
|
|
|
Notes:
1.You can use either top row number keys or the keypad number keys for hotkeys commands.
2.Normally, you should have no problem with mouse
Mouse Troubleshooting on a
ScrLk + ScrLk + M + 1 for a
LED information: a solid
Hotkey convention: The hotkey notation
ScrLk + ScrLk + (key), denotes that you should hit the individual keys consecutively one at a time, not simultaneously.
Rev. 1.6 Copyright© All rights reserved. |