2.5” TFT LCD TV

16-3011

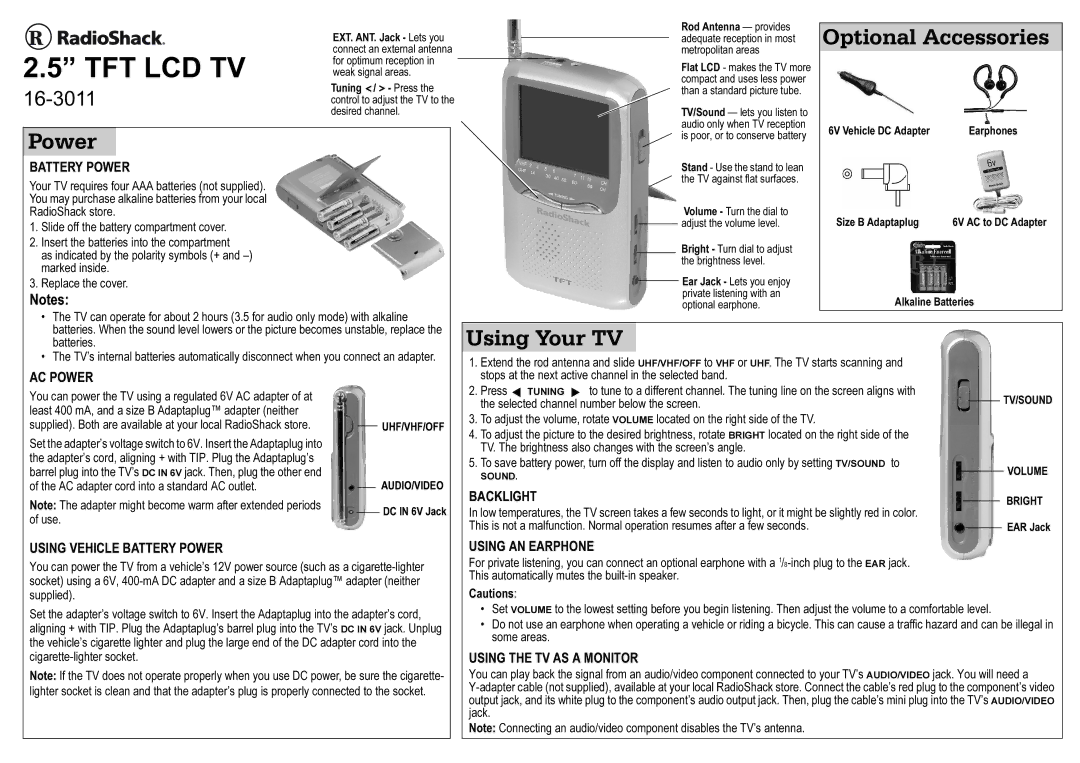
EXT. ANT. Jack - Lets you connect an external antenna for optimum reception in weak signal areas.

Tuning Ý /Þ - Press the control to adjust the TV to the desired channel.

Rod Antenna — provides adequate reception in most metropolitan areas

Flat LCD - makes the TV more compact and uses less power than a standard picture tube.

TV/Sound — lets you listen to audio only when TV reception

Optional Accessories

Power

BATTERY POWER

Your TV requires four AAA batteries (not supplied). You may purchase alkaline batteries from your local RadioShack store.

1.Slide off the battery compartment cover.

2.Insert the batteries into the compartment

as indicated by the polarity symbols (+ and –) marked inside.

3.Replace the cover.

Notes:

is poor, or to conserve battery

Stand - Use the stand to lean the TV against flat surfaces.

Volume - Turn the dial to adjust the volume level.

Bright - Turn dial to adjust the brightness level.

Ear Jack - Lets you enjoy private listening with an optional earphone.

6V Vehicle DC Adapter

Earphones

Size B Adaptaplug

6V AC to DC Adapter

Alkaline Batteries

The TV can operate for about 2 hours (3.5 for audio only mode) with alkaline batteries. When the sound level lowers or the picture becomes unstable, replace the batteries.

The TV’s internal batteries automatically disconnect when you connect an adapter.

Using Your TV

1. Extend the rod antenna and slide UHF/VHF/OFF to VHF or UHF. The TV starts scanning and

AC POWER

You can power the TV using a regulated 6V AC adapter of at least 400 mA, and a size B Adaptaplug™ adapter (neither supplied). Both are available at your local RadioShack store.

Set the adapter’s voltage switch to 6V. Insert the Adaptaplug into the adapter’s cord, aligning + with TIP. Plug the Adaptaplug’s barrel plug into the TV’s DC IN 6V jack. Then, plug the other end of the AC adapter cord into a standard AC outlet.

Note: The adapter might become warm after extended periods of use.

UHF/VHF/OFF

AUDIO/VIDEO

DC IN 6V Jack

stops at the next active channel in the selected band.

2.

Press

TUNING

to tune to a different channel. The tuning line on the screen aligns with


TV/SOUND


the selected channel number below the screen.


3.

To adjust the volume, rotate VOLUME located on the right side of the TV.


4.

To adjust the picture to the desired brightness, rotate BRIGHT located on the right side of the


TV. The brightness also changes with the screen’s angle.


5.

To save battery power, turn off the display and listen to audio only by setting TV/SOUND to


VOLUME


SOUND.


BACKLIGHT


BRIGHT

In low temperatures, the TV screen takes a few seconds to light, or it might be slightly red in color.


This is not a malfunction. Normal operation resumes after a few seconds.


EAR Jack


USING VEHICLE BATTERY POWER

You can power the TV from a vehicle’s 12V power source (such as a cigarette-lighter socket) using a 6V, 400-mA DC adapter and a size B Adaptaplug™ adapter (neither supplied).

Set the adapter’s voltage switch to 6V. Insert the Adaptaplug into the adapter’s cord, aligning + with TIP. Plug the Adaptaplug’s barrel plug into the TV’s DC IN 6V jack. Unplug the vehicle’s cigarette lighter and plug the large end of the DC adapter cord into the cigarette-lighter socket.

Note: If the TV does not operate properly when you use DC power, be sure the cigarette- lighter socket is clean and that the adapter’s plug is properly connected to the socket.

USING AN EARPHONE

For private listening, you can connect an optional earphone with a 1/8-inch plug to the EAR jack.

This automatically mutes the built-in speaker.

Cautions:

Set VOLUME to the lowest setting before you begin listening. Then adjust the volume to a comfortable level.

Do not use an earphone when operating a vehicle or riding a bicycle. This can cause a traffic hazard and can be illegal in some areas.

USING THE TV AS A MONITOR

You can play back the signal from an audio/video component connected to your TV’s AUDIO/VIDEO jack. You will need a Y-adapter cable (not supplied), available at your local RadioShack store. Connect the cable’s red plug to the component’s video output jack, and its white plug to the component’s audio output jack. Then, plug the cable’s mini plug into the TV’s AUDIO/VIDEO jack.

Note: Connecting an audio/video component disables the TV’s antenna.

Page 1
Image 1
Radio Shack 16-3011 manual Optional Accessories Power, Using Your TV

16-3011 specifications

The Radio Shack 16-3011 is a versatile and compact multi-function device that has garnered attention for its practicality and range of features. With its roots in the well-established Radio Shack brand, known for its legacy of electronics and tech innovation, the 16-3011 model exemplifies functionality designed for both amateurs and professionals alike.

One of the standout features of the Radio Shack 16-3011 is its user-friendly interface. Designed with simplicity in mind, it boasts an intuitive layout that allows users to quickly navigate through various functions. The device often incorporates a clear LCD display, making it easy to read measurements and settings even in low-light environments.

In terms of technology, the 16-3011 is equipped with a range of measurement capabilities that cater to different needs. It typically includes options for measuring voltage, current, resistance, and even capacitance. This array of functionalities makes it a valuable tool for electronics hobbyists, engineers, and anyone working with circuits.

The device often supports both AC and DC measurements, enhancing its versatility for various applications. Additionally, some versions of the 16-3011 may offer features like data hold, auto-ranging, and even continuity testing, making it a comprehensive tool for troubleshooting and diagnostics.

Another noteworthy characteristic is its portability. The Radio Shack 16-3011 is designed to be lightweight and compact, allowing users to easily carry it in a toolbox or a backpack, making it ideal for fieldwork or on-the-go projects. Furthermore, battery-operated, this device ensures that users can rely on it in environments where power sources are limited.

Durability is also a key aspect of the 16-3011. Built with robust materials, it is designed to withstand the rigors of frequent use while maintaining performance and accuracy. The ergonomic design often includes protective casing to shield it from accidental drops or bumps.

In summary, the Radio Shack 16-3011 is a highly functional multi-meter that combines user-friendly features with advanced measurement capabilities. Its blend of portability, versatility, and durability makes it an essential tool for anyone involved in electronics, ensuring that users can conduct accurate measurements whenever the need arises. The reputation of Radio Shack for quality continues with this model, serving both novice enthusiasts and seasoned professionals effectively.