|
|
|
|
|
|
|
|
|
|
|
|
|
|
|
|
|
|
|
|
|
|
|
|
|
|
|
|
|
|
|
|
|
|
|
|
|
|
|
|
|
|
|
|
|
|
|
|
|
|
|
|
|
|
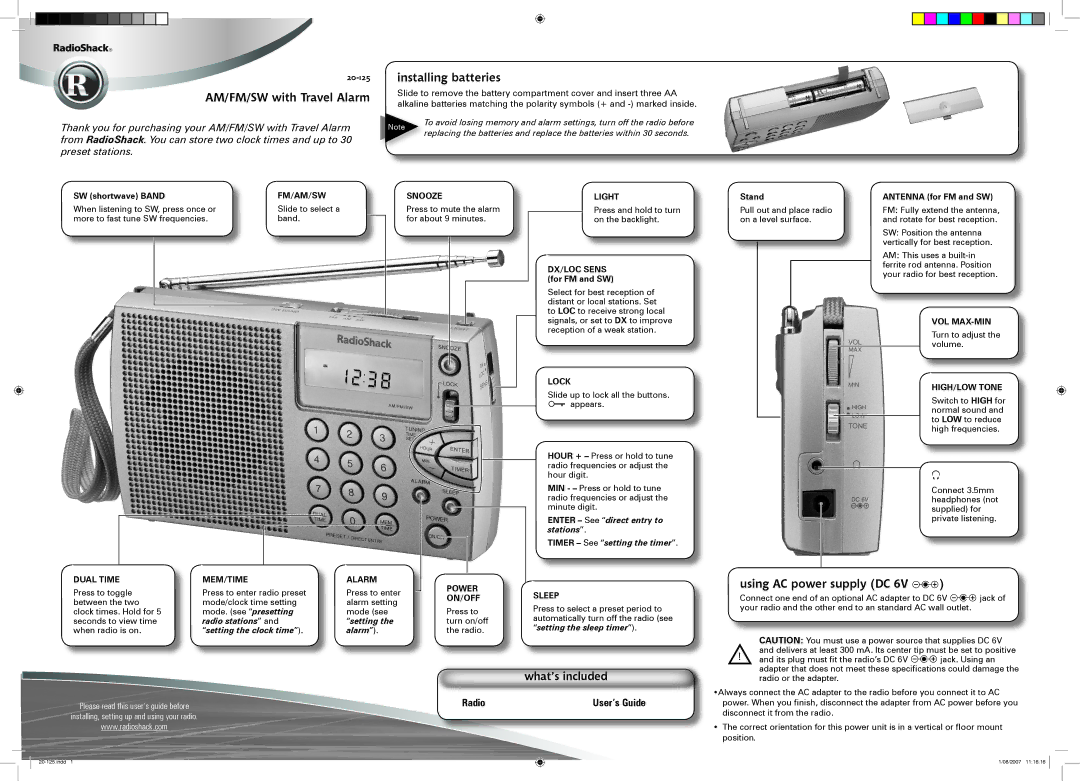
| installing batteries |
|
|
|
|
|
|
|
|
|
|
| ||||||||||||||
AM/FM/SW with Travel Alarm
Thank you for purchasing your AM/FM/SW with Travel Alarm from RadioShack. You can store two clock times and up to 30 preset stations.
SW (shortwave) BAND | FM/AM/SW |
Slide to remove the battery compartment cover and insert three AA alkaline batteries matching the polarity symbols (+ and
Note | To avoid losing memory and alarm settings, turn off the radio before | |
replacing the batteries and replace the batteries within 30 seconds. | ||
| ||
|
|
SNOOZE | LIGHT |
Stand | ANTENNA (for FM and SW) |
When listening to SW, press once or | Slide to select a | Press to mute the alarm |
| |||||||||||
more to fast tune SW frequencies. | band. |
| for about 9 minutes. |
| ||||||||||
|
| |||||||||||||
|
|
|
|
|
|
|
|
|
|
|
|
|
|
|
|
|
|
|
|
|
|
|
|
|
|
|
|
|
|
|
|
|
|
|
|
|
|
|
|
|
|
|
|
|
|
|
|
|
|
|
|
|
|
|
|
|
|
|
|
|
|
|
|
|
|
|
|
|
|
|
|
|
|
|
|
|
|
|
|
|
|
|
|
|
|
|
|
|
|
|
|
|
|
|
|
|
|
|
|
|
|
|
|
|
|
|
|
|
|
|
|
|
|
|
|
|
|
|
|
|
|
|
|
|
|
|
|
|
|
|
|
|
|
|
|
|
|
|
|
|
|
|
|
|
|
|
|
|
|
|
|
|
|
|
|
|
|
|
|
|
|
|
|
|
|
|
|
|
|
|
|
|
|
|
|
|
|
|
|
Press and hold to turn on the backlight.
DX/LOC SENS (for FM and SW)
Select for best reception of distant or local stations. Set to LOC to receive strong local signals, or set to DX to improve reception of a weak station.
LOCK
Slide up to lock all the buttons. ![]() appears.
appears.
HOUR + – Press or hold to tune radio frequencies or adjust the hour digit.
MIN - – Press or hold to tune radio frequencies or adjust the minute digit.
ENTER – See “direct entry to stations”.
TIMER – See “setting the timer”.
Pull out and place radio | FM: Fully extend the antenna, | |
on a level surface. | and rotate for best reception. | |
|
| SW: Position the antenna |
|
| vertically for best reception. |
|
| AM: This uses a |
|
| ferrite rod antenna. Position |
|
| your radio for best reception. |
|
|
|
VOL
Turn to adjust the volume.
HIGH/LOW TONE
Switch to HIGH for normal sound and to LOW to reduce high frequencies.
*
Connect 3.5mm headphones (not supplied) for private listening.
DUAL TIME
Press to toggle between the two clock times. Hold for 5 seconds to view time when radio is on.
Please read this user’s guide before
installing, setting up and using your radio.
www.radioshack.com
MEM/TIME | ALARM |
Press to enter radio preset | Press to enter |
mode/clock time setting | alarm setting |
mode. (see “presetting | mode (see |
radio stations” and | “setting the |
“setting the clock time”). | alarm”). |
|
|
POWER ON/OFF
Press to turn on/off the radio.
Radio
SLEEP
Press to select a preset period to automatically turn off the radio (see “setting the sleep timer”).
what’s included
User’s Guide
using AC power supply (DC 6V 

 )
)
Connect one end of an optional AC adapter to DC 6V ![]()
![]()
![]() jack of your radio and the other end to an standard AC wall outlet.
jack of your radio and the other end to an standard AC wall outlet.
CAUTION: You must use a power source that supplies DC 6V and delivers at least 300 mA. Its center tip must be set to positive
! and its plug must fit the radio’s DC 6V ![]()
![]()
![]() jack. Using an adapter that does not meet these specifications could damage the radio or the adapter.
jack. Using an adapter that does not meet these specifications could damage the radio or the adapter.
•Always connect the AC adapter to the radio before you connect it to AC
power. When you finish, disconnect the adapter from AC power before you
disconnect it from the radio.
•The correct orientation for this power unit is in a vertical or floor mount position.
1/08/2007 11:16:16