W i r e l e s s · K e y - L o c k
D O O R / W I N D O W A L A R M
Thank you for purchasing your Door/Window Alarm from RadioShack. Please read this user’s
guide before installing, setting up and using your new door/window alarm.
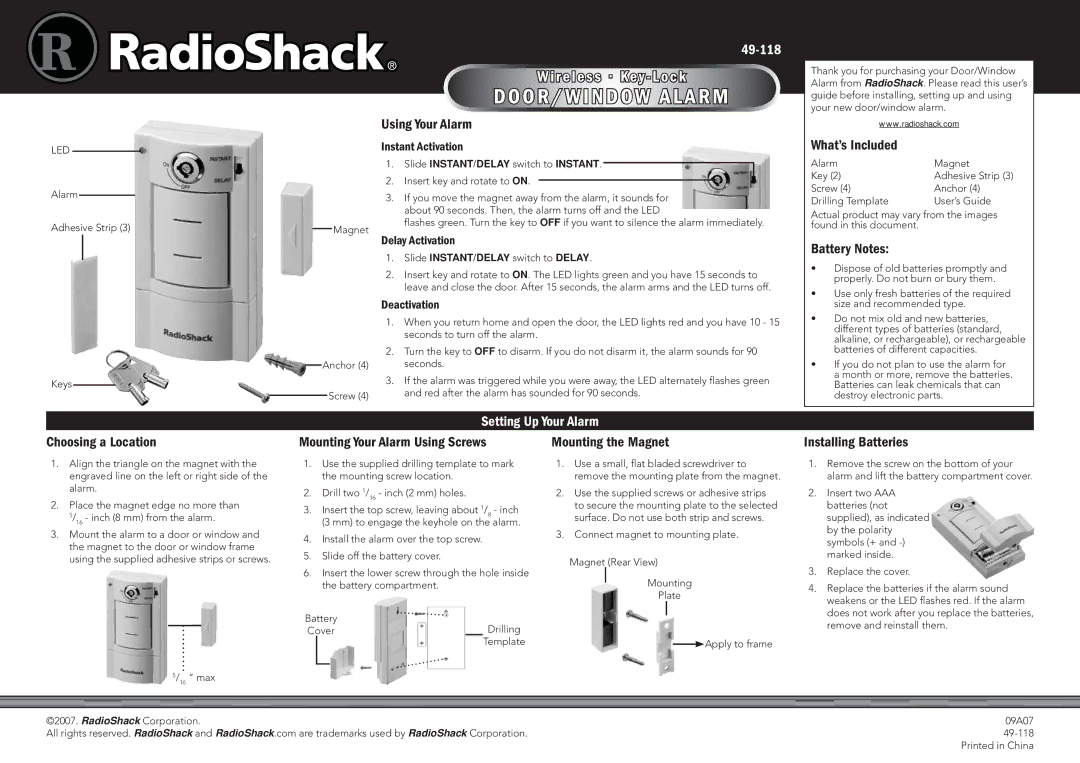
LED
Alarm
Adhesive Strip (3)
Keys
Magnet
Anchor (4)
Screw (4)
Using Your Alarm
Instant Activation
1.Slide INSTANT/DELAY switch to INSTANT. 
2.Insert key and rotate to ON.
3.If you move the magnet away from the alarm, it sounds for
about 90 seconds. Then, the alarm turns off and the LED
flashes green. Turn the key to OFF if you want to silence the alarm immediately.
Delay Activation
1.Slide INSTANT/DELAY switch to DELAY.
2.Insert key and rotate to ON. The LED lights green and you have 15 seconds to leave and close the door. After 15 seconds, the alarm arms and the LED turns off.
Deactivation
1.When you return home and open the door, the LED lights red and you have 10 - 15 seconds to turn off the alarm.
2.Turn the key to OFF to disarm. If you do not disarm it, the alarm sounds for 90 seconds.
3.If the alarm was triggered while you were away, the LED alternately flashes green and red after the alarm has sounded for 90 seconds.
www.radioshack.com
What’s Included
Alarm | Magnet |
Key (2) | Adhesive Strip (3) |
Screw (4) | Anchor (4) |
Drilling Template | User’s Guide |
Actual product may vary from the images found in this document.
Battery Notes:
•Dispose of old batteries promptly and properly. Do not burn or bury them.
•Use only fresh batteries of the required size and recommended type.
•Do not mix old and new batteries, different types of batteries (standard, alkaline, or rechargeable), or rechargeable batteries of different capacities.
•If you do not plan to use the alarm for a month or more, remove the batteries. Batteries can leak chemicals that can destroy electronic parts.
Setting Up Your Alarm
Choosing a Location | Mounting Your Alarm Using Screws | Mounting the Magnet | Installing Batteries |
1.Align the triangle on the magnet with the engraved line on the left or right side of the alarm.
2.Place the magnet edge no more than 5/16 - inch (8 mm) from the alarm.
3.Mount the alarm to a door or window and the magnet to the door or window frame using the supplied adhesive strips or screws.
1.Use the supplied drilling template to mark the mounting screw location.
2.Drill two 1/16 - inch (2 mm) holes.
3.Insert the top screw, leaving about 1/8 - inch (3 mm) to engage the keyhole on the alarm.
4.Install the alarm over the top screw.
5.Slide off the battery cover.
6.Insert the lower screw through the hole inside the battery compartment.
Battery
CoverDrilling
Template
1.Use a small, flat bladed screwdriver to remove the mounting plate from the magnet.
2.Use the supplied screws or adhesive strips to secure the mounting plate to the selected surface. Do not use both strip and screws.
3.Connect magnet to mounting plate.
Magnet (Rear View)
Mounting
Plate
![]() Apply to frame
Apply to frame
1.Remove the screw on the bottom of your alarm and lift the battery compartment cover.
2.Insert two AAA batteries (not supplied), as indicated by the polarity symbols (+ and
3.Replace the cover.
4.Replace the batteries if the alarm sound weakens or the LED flashes red. If the alarm does not work after you replace the batteries, remove and reinstall them.
5/ | 16 | “ max |
|
|
|
| |
|
|
|
|
©2007. RadioShack Corporation. | 09A07 | ||
All rights reserved. RadioShack and RadioShack.com are trademarks used by RadioShack Corporation. | |||
|
|
| Printed in China |