14-Channel Family
Radio System
User's Guide
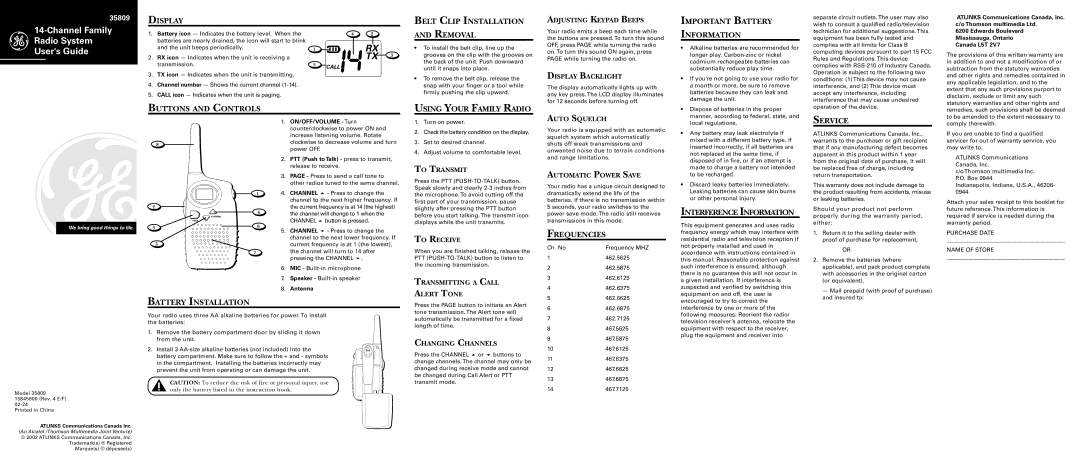
1.Battery icon — Indicates the battery level. When the batteries are nearly drained, the icon will start to blink and the unit beeps periodically.
2.RX icon — Indicates when the unit is receiving a transmission.
3.TX icon — Indicates when the unit is transmitting.
4.Channel number — Shows the current channel (1-14).
5.CALL icon — Indicates when the unit is paging.
AND REMOVAL
•To install the belt clip, line up the grooves on the clip with the grooves on the back of the unit. Push downward until it snaps into place.
•To remove the belt clip, release the snap with your finger or a tool while firmly pushing the clip upward.
Your radio emits a beep each time while the buttons are pressed. To turn this sound OFF, press PAGE while turning the radio on. To turn this sound ON again, press PAGE while turning the radio on.
DISPLAY BACKLIGHT
The display automatically lights up with any key press.The LCD display illuminates for 12 seconds before turning off.
INFORMATION
• Alkaline batteries are recommended for |
longer play. Carbon-zinc or nickel |
cadmium rechargeable batteries can |
substantially reduce play time. |
• If you’re not going to use your radio for |
a month or more, be sure to remove |
batteries because they can leak and |
damage the unit. |
technician for additional suggestions.This equipment has been fully tested and complies with all limits for Class B computing devices pursuant to part 15 FCC Rules and Regulations. This device complies with RSS-210 of Industry Canada. Operation is subject to the following two conditions: (1) This device may not cause interference, and (2) This device must accept any interference, including interference that may cause undesired
6200 Edwards Boulevard
Mississauga, Ontario
Canada L5T 2V7
The provisions of this written warranty are in addition to and not a modification of or subtraction from the statutory warranties and other rights and remedies contained in any applicable legislation, and to the extent that any such provisions purport to disclaim, exclude or limit any such statutory warranties and other rights and
We bring good things to life.
1.ON/OFF/VOLUME - Turn counterclockwise to power ON and increase listening volume. Rotate clockwise to decrease volume and turn power OFF.
2.PTT (Push to Talk) - press to transmit, release to receive.
3.PAGE - Press to send a call tone to other radios tuned to the same channel.
4.CHANNEL - Press to change the channel to the next higher frequency. If the current frequency is at 14 (the highest)
the channel will change to 1 when the CHANNEL button is pressed.
5.CHANNEL - Press to change the channel to the next lower frequency. If current frequency is at 1 (the lowest),
the channel will turn to 14 after pressing the CHANNEL .
6.MIC - Built-in microphone
7.Speaker - Built-in speaker
8.Antenna
1.Turn on power.
2.Check the battery condition on the display.
3.Set to desired channel.
4.Adjust volume to comfortable level.
TO TRANSMIT
Press the PTT (PUSH-TO-TALK) button. Speak slowly and clearly 2-3 inches from the microphone. To avoid cutting off the first part of your transmission, pause slightly after pressing the PTT button before you start talking. The transmit icon displays while the unit transmits.
TO RECEIVE
When you are finished talking, release the PTT (PUSH-TO-TALK) button to listen to the incoming transmission.
TRANSMITTING A CALL
ALERT TONE
Press the PAGE button to initiate an Alert tone transmission. The Alert tone will
AUTO SQUELCH
Your radio is equipped with an automatic squelch system which automatically shuts off weak transmissions and unwanted noise due to terrain conditions and range limitations.
AUTOMATIC POWER SAVE
Your radio has a unique circuit designed to dramatically extend the life of the batteries. If there is no transmission within 5 seconds, your radio switches to the power save mode. The radio still receives transmissions in this mode.
FREQUENCIES
1462.5625
2462.5875
3462.6125
4462.6375
5462.6625
6462.6875
manner, according to federal, state, and |
local regulations. |
• Any battery may leak electrolyte if |
mixed with a different battery type, if |
inserted incorrectly, if all batteries are |
not replaced at the same time, if |
disposed of in fire, or if an attempt is |
made to charge a battery not intended |
to be recharged. |
• Discard leaky batteries immediately. |
Leaking batteries can cause skin burns |
or other personal injury. |
INTERFERENCE INFORMATION
This equipment generates and uses radio frequency energy which may interfere with residential radio and television reception if not properly installed and used in accordance with instructions contained in this manual. Reasonable protection against such interference is ensured, although there is no guarantee this will not occur in a given installation. If interference is suspected and verified by switching this equipment on and off, the user is encouraged to try to correct the interference by one or more of the
SERVICE
ATLINKS Communications Canada, Inc., warrants to the purchaser or gift recipient that if any manufacturing defect becomes apparent in this product within 1 year from the original date of purchase, it will be replaced free of charge, including return transportation.
This warranty does not include damage to the product resulting from accidents, misuse or leaking batteries.
Should your product not perform properly during the warranty period, either:
1.Return it to the selling dealer with proof of purchase for replacement,
OR
2.Remove the batteries (where applicable), and pack product complete with accessories in the original carton (or equivalent).
— Mail prepaid (with proof of purchase) and insured to:
to be amended to the extent necessary to comply therewith.
If you are unable to find a qualified servicer for out of warranty service, you may write to:
ATLINKS Communications Canada, Inc.
c/o Thomson multimedia Inc. P.O. Box 0944
Indianapolis, Indiana, U.S.A., 46206- 0944
Attach your sales receipt to this booklet for future reference. This information is required if service is needed during the warranty period.
PURCHASE DATE
_____________________________________________________________________
NAME OF STORE
_____________________________________________________________________
Model 35809 15845800 (Rev. 4 E/F) 02-24
Printed in China
ATLINKS Communications Canada Inc.
(An Alcatel /Thomson Multimedia Joint Venture)
©2002 ATLINKS Communications Canada, Inc. Trademark(s) ® Registered Marque(s) ® déposée(s)
Your radio uses three AA alkaline batteries for power. To install the batteries:
1.Remove the battery compartment door by sliding it down from the unit.
2.Install 3 AA-size alkaline batteries (not included) into the battery compartment. Make sure to follow the + and - symbols in the compartment. Installing the batteries incorrectly may prevent the unit from operating or can damage the unit.
CAUTION: To reduce the risk of fire or personal injury, use only the battery listed in the instruction book.
automatically be transmitted for a fixed length of time.
CHANGING CHANNELS
Press the CHANNEL or buttons to change channels. The channel may only be changed during receive mode and cannot be changed during Call Alert or PTT transmit mode.
7462.7125
8467.5625
9467.5875
10467.6125
11467.6375
12467.6625
13467.6875
14467.7125
following measures: Reorient the radio/ television receiver’s antenna, relocate the equipment with respect to the receiver, plug the equipment and receiver into