IMPORTANT SAFETY INSTRUCTION
IMPORTANT SAFETY INSTRUCTION
Remote Control |
user manual
DRC286
|
| To reduce risk of electrical shock, do not | ||
| WARNING | |||
| remove cover or back (no user serviceable | |||
| RISK OF ELECTRIC SHOCK. | |||
| parts inside). Refer | servicing to | qualified | |
| DO NOT OPEN | personnel. |
|
|
| This symbol indicates “dangerous voltage” | This symbol | indicates | |
| inside the product that presents a risk of | important instructions ac- | ||
| electric shock or personal injury. | companying the product. | ||
|
|
|
|
|
FCC INFORMATION
This equipment has been tested and found to comply with the limits for a Class B digital device, pursuant to Part 15 of the FCC rules. These limits are designed to provide reason- able protection against harmful interference in a residential installation. This equipment generates, uses and can radiate radio frequency energy and, if not installed and used in accordance with the instructions, may cause harmful interference to radio communications. However, there is no guarantee that interference will not occur in a particular installation. If this equipment does cause harmful interference to radio or television reception, which can be determined by turning the equipment off and on, the user is encouraged to try to correct the interference by one or more of the following measures.
•Reorient or relocate the receiving antenna.
•Increase the separation between the equipment and receiver.
•Connect this equipment into an outlet on a circuit different from that to which the receiver is connected.
•Consult the dealer or an experienced radio/TV technician for help.
CAUTION: FCC Regulations state tha tunauthorized changes or modifi cations to this equip- ment may void the user’s authority to operate it.
This class B digital apparatus meets all requirements of the Canadian
The Shock Hazard Marking and Associated Graphical Symbol is provided on the bottom panel of unit.
Refer to the identifi cation/rating label located on the back panel of your product for its proper operating voltage.
1. Read these Instructions.
2. Keep these Instructions.
3. Heed all Warnings.
4. Follow all instructions.
5. Do not use this apparatus near water.
6. Clean only with a dry cloth.
7. Do not block any of the ventilation openings. Install in accordance with the manufacturer’s instructions.
8. Do not install near any heat sources such as radiators, heat registers, stoves, or other apparatus (including amplifiers) that produce heat.
9. Do not defeat the safety purpose of the polarized or grounding – type plug. A polarized plug has two blades with one wider than the other. A grounding type plug has two blades and a third ground- ing prong. The wide blade or the third prong are provided for your safety. If the provided plug does not fit into your outlet, consult an electrician for replace- ment of the obsolete outlet.
10.Protect the power cord from being walked on or pinched particularly at plugs, conven- ience receptacles. and the point where they exit from the apparatus.
11.Only use attachments/accessories spec- ified by the manufacturer.
12.Use only with a cart, stand, tri-
pod, bracket, or table specified by the manufacturer, or sold with the apparatus. When a cart is
used, use caution when moving | Portable Cart |
the cart/apparatus combination | |
to avoid injury from | Warning |
|
13.Unplug this apparatus during lightning stoms or when unused for long periods of time.
14.Refer all servicing to qualified service person- nel. Servicing is required when the apparatus has been damaged in anyway, such as power- supply cord or plug is damaged, liquid has been spilled or objects have fallen into the apparatus, the apparatus has been exposed to rain or moisture, does not operate nonnally,
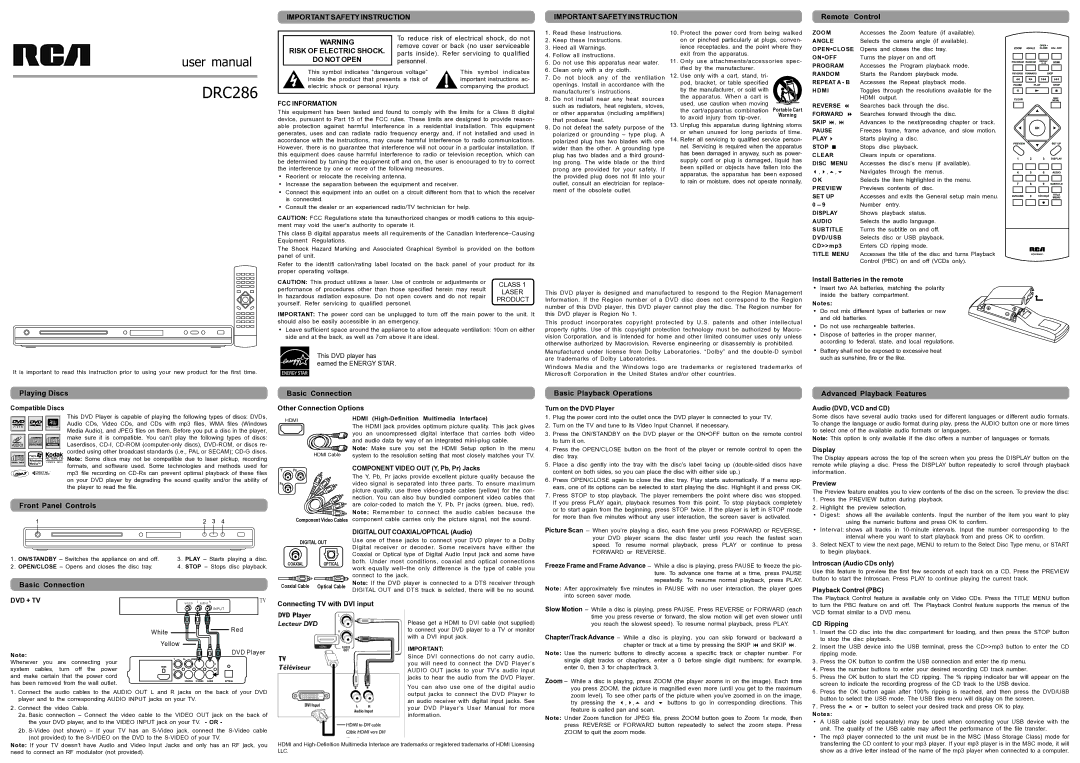
ZOOM | Accesses the Zoom feature (if available). | ||||
ANGLE | Selects the camera angle (if available). | ||||
OPEN•CLOSE Opens and closes the disc tray. | |||||
ON•OFF | Turns the player on and off. | ||||
PROGRAM | Accesses the Program playback mode. | ||||
RANDOM | Starts the Random playback mode. | ||||
REPEAT A - B | Accesses the Repeat playback mode. | ||||
HDMI |
|
|
| Toggles through the resolutions available for the | |
|
|
|
| HDMI output. | |
REVERSE | Searches back through the disc. | ||||
FORWARD | Searches forward through the disc. | ||||
SKIP | , | Advances to the next/preceding chapter or track. | |||
PAUSE | Freezes frame, frame advance, and slow motion. | ||||
PLAY |
|
|
| Starts playing a disc. | |
STOP |
|
|
| Stops disc playback. | |
|
|
| |||
|
|
| |||
CLEAR | Clears inputs or operations. | ||||
DISC | MENU | Accesses the disc’s menu (if available). | |||
, , | , | Navigates through the menus. | |||
O K |
|
|
| Selects the item highlighted in the menu. | |
PREVIEW | Previews contents of disc. | ||||
SET UP | Accesses and exits the General setup main menu. | ||||
0 – 9 |
|
|
| Number | entry. |
DISPLAY | Shows | playback status. | |||
AUDIO | Selects the audio language. | ||||
SUBTITLE | Turns the subtitle on and off. | ||||
DVD/USB | Selects disc or USB playback. | ||||
CD>>mp3 | Enters CD ripping mode. | ||||
TITLE MENU | Accesses the title of the disc and turns Playback | ||||
|
|
|
| Control (PBC) on and off (VCDs only). | |
It is important to read this instruction prior to using your new product for the first time.
CAUTION: This product utilizes a laser. Use of controls or adjustments or | CLASS 1 | |
performance of procedures other than those specified herein may result | ||
LASER | ||
in hazardous radiation exposure. Do not open covers and do not repair | ||
PRODUCT | ||
yourself. Refer servicing to qualified personel. | ||
|
IMPORTANT: The power cord can be unplugged to turn off the main power to the unit. It should also be easily accessible in an emergency.
•Leave sufficient space around the appliance to allow adequate ventilation: 10cm on either side and at the back, as well as 7cm above it are ideal.
This DVD player has earned the ENERGY STAR.
This DVD player is designed and manufactured to respond to the Region Management Information. If the Region number of a DVD disc does not correspond to the Region number of this DVD player, this DVD player cannot play the disc. The Region number for this DVD player is Region No 1.
This product incorporates copyright protected by U.S. patents and other intellectual property rights. Use of this copyright protection technology must be authorized by Macro- vision Corporation, and is intended for home and other limited consumer uses only unless otherwise authorized by Macrovision. Reverse engineering or disassembly is prohibited.
Manufactured under license from Dolby Laboratories. “Dolby” and the
Windows Media and the Windows logo are trademarks or registered trademarks of Microsoft Corporation in the United States and/or other countries.
Install Batteries in the remote
•Insert two AA batteries, matching the polarity inside the battery compartment.
Notes:
•Do not mix different types of batteries or new and old batteries.
•Do not use rechargeable batteries.
•Dispose of batteries in the proper manner, according to federal, state, and local regulations.
•Battery shall not be exposed to excessive heat such as sunshine, fire or the like.
Playing Discs
Compatible Discs
Basic Connection
Other Connection Options
Basic Playback Operations
Turn on the DVD Player
Advanced Playback Features
Audio (DVD, VCD and CD)
This DVD Player is capable of playing the following types of discs: DVDs, Audio CDs, Video CDs, and CDs with mp3 files, WMA files (Windows Media Audio), and JPEG files on them. Before you put a disc in the player, make sure it is compatible. You can’t play the following types of discs: Laserdiscs,
Front Panel Controls
1 | 2 | 3 | 4 |
HDMI
HDMI Cable
Y PR
PB
Component Video Cables
HDMI (High-Definition Multimedia Interface)
The HDMI jack provides optimum picture quality. This jack gives you an uncompressed digital interface that carries both video and audio data by way of an integrated
Note: Make sure you set the HDMI Setup option in the menu system to the resolution setting that most closely matches your TV.
COMPONENT VIDEO OUT (Y, Pb, Pr) Jacks
The Y, Pb, Pr jacks provide excellent picture quality because the video signal is separated into three parts. To ensure maximum picture quality, use three
Note: Remember to connect the audio cables because the component cable carries only the picture signal, not the sound.
1. Plug the power cord into the outlet once the DVD player is connected to your TV.
2. Turn on the TV and tune to its Video Input Channel, if necessary.
3. Press the ON/STANDBY on the DVD player or the ON•OFF button on the remote control to turn it on.
4. Press the OPEN/CLOSE button on the front of the player or remote control to open the disc tray.
5. Place a disc gently into the tray with the disc’s label facing up
6. Press OPEN/CLOSE again to close the disc tray. Play starts automatically. If a menu app- ears, one of its options can be selected to start playing the disc. Highlight it and press OK.
7. Press STOP to stop playback. The player remembers the point where disc was stopped. If you press PLAY again, playback resumes from this point. To stop playback completely or to start again from the beginning, press STOP twice. If the player is left in STOP mode for more than five minutes without any user interaction, the screen saver is activated.
Some discs have several audio tracks used for different languages or different audio formats. To change the language or audio format during play, press the AUDIO button one or more times to select one of the available audio formats or languages.
Note: This option is only available if the disc offers a number of languages or formats.
Display
The Display appears across the top of the screen when you press the DISPLAY button on the remote while playing a disc. Press the DISPLAY button repeatedly to scroll through playback information.
Preview
The Preview feature enables you to view contents of the disc on the screen. To preview the disc: 1. Press the PREVIEW button during playback.
2. Highlight the preview selection.
• Digest: shows all the available contents. Input the number of the item you want to play |
using the numeric buttons and press OK to confirm. |
1 | . ON/STANDBY – Switches the appliance on and off. | 3. PLAY – Starts playing a disc. |
2 | . OPEN/CLOSE – Opens and closes the disc tray. | 4. STOP – Stops disc playback. |
|
| DIGITAL OUT COAXIAL/OPTICAL (Audio) | |
DIGITAL OUT | Use one of these jacks to connect your DVD player to a Dolby | ||
|
| Digital receiver or decoder. Some receivers have either the | |
|
| Coaxial or Optical type of Digital Audio Input jack and some have | |
COAXIAL | OPTICAL | both. Under most conditions, coaxial and optical connections | |
work equally | |||
|
| ||
|
| connect to the jack. | |
Picture Scan – When you’re playing a disc, each time you press FORWARD or REVERSE, your DVD player scans the disc faster until you reach the fastest scan speed. To resume normal playback, press PLAY or continue to press FORWARD or REVERSE.
Freeze Frame and Frame Advance – While a disc is playing, press PAUSE to freeze the pic- ture. To advance one frame at a time, press PAUSE repeatedly. To resume normal playback, press PLAY.
• Interval: shows all tracks in | the number corresponding to the |
interval where you want to start playback from | and press OK to confirm. |
3. Select NEXT to view the next page, MENU to return to the Select Disc Type menu, or START to begin playback.
Introscan (Audio CDs only)
Use this feature to preview the first few seconds of each track on a CD. Press the PREVIEW button to start the Introscan. Press PLAY to continue playing the current track.
Basic Connection
DVD + TV
Note:
Whenever you are connecting your system cables, turn off the power and make certain that the power cord has been removed from the wall outlet.
VIDEO L AUDIO R | TV |
INPUT
White ![]()
![]()
![]()
![]() Red
Red
Yellow
DVD Player
Coaxial Cable Optical Cable | Note: If the DVD player is connected to a DTS receiver through |
| DIGITAL OUT and DTS track is selcted, there will be no sound. |
Connecting TV with DVI input
Please get a HDMI to DVI cable (not supplied) to connect your DVD player to a TV or monitor with a DVI input jack.
IMPORTANT:
Since DVI connections do not carry audio, you will need to connect the DVD Player’s AUDIO OUT jacks to your TV’s audio input jacks to hear the audio from the DVD Player.
You can also use one of the digital audio
Note: After approximately five minutes in PAUSE with no user interaction, the player goes into screen saver mode.
Slow Motion – While a disc is playing, press PAUSE. Press REVERSE or FORWARD (each time you press reverse or forward, the slow motion will get even slower until you reach the slowest speed). To resume normal playback, press PLAY.
Chapter/Track Advance – While a disc is playing, you can skip forward or backward a chapter or track at a time by pressing the SKIP ![]() and SKIP
and SKIP ![]() .
.
Note: Use the numeric buttons to directly access a specific track or chapter number. For single digit tracks or chapters, enter a 0 before single digit numbers; for example, enter 0, then 3 for chapter/track 3.
Zoom – While a disc is playing, press ZOOM (the player zooms in on the image). Each time you press ZOOM, the picture is magnified even more (until you get to the maximum
Playback Control (PBC)
The Playback Control feature is available only on Video CDs. Press the TITLE MENU button to turn the PBC feature on and off. The Playback Control feature supports the menus of the VCD format similar to a DVD menu.
CD Ripping
1 | . Insert the CD disc into the disc compartment for loading, and then press the STOP button |
| to stop the disc playback. |
2 | . Insert the USB device into the USB terminal, press the CD>>mp3 button to enter the CD |
| ripping mode. |
3 | . Press the OK button to confirm the USB connection and enter the rip menu. |
4 | . Press the number buttons to enter your desired recording CD track number. |
5 | . Press the OK button to start the CD ripping. The % ripping indicator bar will appear on the |
| screen to indicate the recording progress of the CD track to the USB device. |
1. Connect the audio cables to the AUDIO OUT L and R jacks on the back of your DVD player and to the corresponding AUDIO INPUT jacks on your TV.
2. Connect the video Cable.
2a. Basic connection – Connect the video cable to the VIDEO OUT jack on the back of the your DVD player, and to the VIDEO INPUT jack on your TV. - OR -
2b.
Note: If your TV doesn’t have Audio and Video Input Jacks and only has an RF jack, you need to connect an RF modulator (not provided).
output jacks to connect the DVD Player to an audio receiver with digital input jacks. See your DVD Player’s User Manual for more information.
HDMI and
zoom level). To see other parts of the picture when you’ve zoomed in on the image,
try pressing the ![]() ,
, ![]() ,
, ![]() and
and ![]() buttons to go in corresponding directions. This feature is called pan and scan.
buttons to go in corresponding directions. This feature is called pan and scan.
Note: Under Zoom function for JPEG file, press ZOOM button goes to Zoom 1x mode, then press REVERSE or FORWARD button repeatedly to select the zoom steps. Press ZOOM to quit the zoom mode.
6 | . Press the OK button again after 100% ripping is reached, and then press the DVD/USB |
| button to select the USB mode. The USB files menu will display on the screen. |
7 | . Press the or button to select your desired track and press OK to play. |
Notes:
•A USB cable (sold separately) may be used when connecting your USB device with the unit. The quality of the USB cable may affect the performance of the file transfer.
•The mp3 player connected to the unit must be in the MSC (Mass Storage Class) mode for transferring the CD content to your mp3 player. If your mp3 player is in the MSC mode, it will show as a drive letter instead of the name of the mp3 player when connected to a computer.