English
QuickStartGuide EZ3100 Series RCA Small Wonder Camcorder www.rcaaudiovideo.com
Congratulations on purchasing your new RCA Small Wonder Camcorder.
Please read these instructions for quick tips on using the product.
The User Manual PDF file can also be found in the CD ROM under the User Manuals folder.
1. Content of the box
• | Small Wonder Camcorder | • | Carrying pouch |
• | USB cable | • | Wrist strap |
• | AV cable | • Memory Manager CD rom |
• | Quick Start Guide | • | AC/DC adaptor |
On/off switch* | * To reset the camcorder (in case it is not functioning properly): |
| Press and hold the On/off switch for more than 10 seconds. |
| | | | | | | |
| | | | | | | |
| | | | | | | |
| Microphone | | |
| Recording | AV output | |
| indicator | LCD screen |
| |
| Lens | |
| | |
| | USB and HDMI | SD card slot |
| | video output |
| | |
| | Playback/pause | Delete recordings |
| | |
| | Setup menu | Switch between |
| | | Photo preview |
| | Record | and Video preview |
| | | modes |
Press and hold until the camcorder turns on or off
There are three basic modes for operating the camcorder: Video preview mode, Photo preview mode and Playback mode. It will always launch in video preview mode after being switched on. Refer to the diagram below for switching between modes.
 Switch on
Press
 MODE
MODE
Video preview | | | | | Photo preview |
mode 1 | | | | mode 2 |
| |
| | | |
Press
 MODE
MODE
To end Playback mode,
simply press RECORD 
Press 
 which will then return the camcorder to Video
preview mode
Playback mode
1Start and stop recording in Video preview mode; enter Video preview mode from other modes
2Pause and resume recording
3 Zoom in during recording
4 Zoom out during recording
55 Switch between Video preview mode or Photo preview mode
Video recording indicator
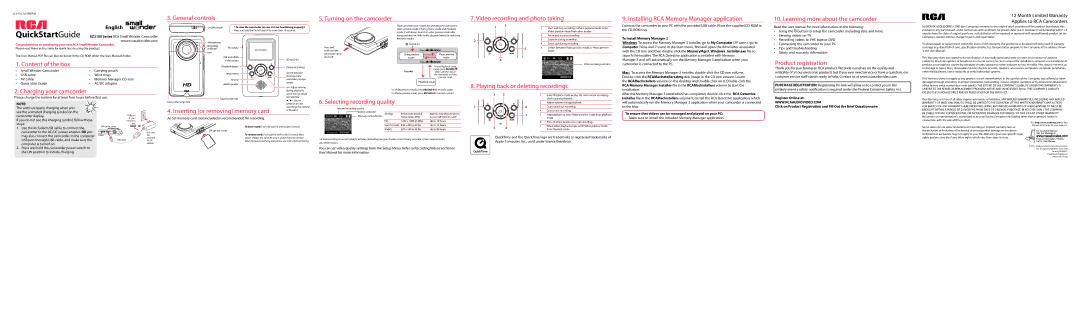
Connect the camcorder to your PC with the provided USB cable. Place the supplied CD-ROM in the CD-ROM tray.
To install Memory Manager 3
Windows: To access the Memory Manager 3 installer, go to My Computer (XP users) /go to Computer (Vista and 7 users) in the Start menu, find and open the drive letter associated with the CD rom and then double-click the MemoryMgr3_Windows_Installer.exe file to launch the installer. The RCA Detective application is installed with Memory
Manager 3 and will automatically run the Memory Manager 3 application when your camcorder is connected to the PC.
Mac: To access the Memory Manager 3 installer, double-click the CD rom volume. Double-click the RCAMacInstallers.dmg disk image in the CD rom volume. Locate the RCAMacInstallers volume on the desktop and Double-click on it. Double-click the
Read the user manual for more information on the following:
•Using the  button to setup the camcorder (including date and time)
•Viewing videos on TV
•Recording videos to VHS tape or DVD
•Connecting the camcorder to your PC
•Tips and troubleshooting
•Safety and warranty information
Product registration
Thank you for purchasing an RCA product. We pride ourselves on the quality and reliability of all our electronic products but if you ever need service or have a question, our customer service staff stands ready to help. Contact us at www.rcaaudiovideo.com
AUDIOVOX ACCESSORIES CORP. (the Company) warrants to the original retail purchaser of this product that should this product or any part thereof, under normal use and conditions, be proven defective in material or workmanship within 12 months from the date of original purchase, such defect(s) will be repaired or replaced with reconditioned product (at the Company’s option) without charge for parts and repair labor.
To obtain repair or replacement within the terms of this Warranty, the product is to be delivered with proof of warranty coverage (e.g. dated bill of sale), specification of defect(s), transportation prepaid, to the Company at the address shown in the User Manual.
This Warranty does not extend to the elimination of externally generated static or noise, to correction of antenna problems, loss/interruptions of broadcast or internet service, to costs incurred for installation, removal or reinstallation of product, to corruptions caused by computer viruses, spyware or other malware, to loss of media, files, data or content, or to damage to tapes, discs, removable memory devices or cards, speakers, accessories, computers, computer peripherals, other media players, home networks or vehicle electrical systems.
This Warranty does not apply to any product or part thereof which, in the opinion of the Company, has suffered or been damaged through alteration, improper installation, mishandling, misuse, neglect, accident, or by removal or defacement
2. Charging your camcorder
Please charge the battery for at least four hours before first use.
during playback; |
zoom during record |
and preview |
Tripod screw hole |
1In Video preview mode, press RECORD  to record a video
2 In Photo preview mode, press RECORD  to record a photo
1 | Enter Playback mode to play the most recent recording; |
| start or pause playback |
installation.
After the Memory Manager 3 installation has completed, double-click the RCA Detective Installer file in the RCAMacInstallers volume to install the RCA Detective application, which
unlikely event a safety notification is required under the Federal Consumer Safety Act.
Register Online at:
LIMITED TO THE REPAIR OR REPLACEMENT PROVIDED ABOVE AND, IN NO EVENT, SHALL THE COMPANY’S LIABILITY EXCEED THE PURCHASE PRICE PAID BY PURCHASER FOR THE PRODUCT.
This Warranty is in lieu of all other express warranties or liabilities. ANY IMPLIED WARRANTIES, INCLUDING ANY IMPLIED
NOTE:
The unit is properly charging when you see the animated charging symbol on the
| camcorder display. | USB port |
| of your |
| If you do not see this charging symbol, follow these |
| computer |
| Camcorder strap hole | / – Skip to |
| previous or next |
| |
| 4. Inserting (or removing) memory card | recording; fast rewind |
| or forward |
| |
| An SD memory card (not included) is recommended for recording. | |
6. Selecting recording quality
Selected recording quality
Battery indicator | | | |
| Resolutions (pixel) & | Approx. recording durations |
Settings |
Memory card indicator | | Frame Rates (FPS) | on a 32 GB memory card 2 |
HD | 1440 x 1080 @ 30fps | Up to 10 hours |
| 2 | Adjust volume during playback |
6 | 3 | Cue to previous recording |
| 4 | Cue to next recording |
| | |
7 | 5 | Stop playback or enter Video preview mode from playback |
| | mode |
will automatically run the Memory Manager 3 application when your camcorder is connected to the Mac.
To ensure that videos can be managed and played on your PC:
• Make sure to install the included Memory Manager application.
WWW.RCAAUDIOVIDEO.COM
Click on Product Registration and Fill Out the Brief Questionnaire
WARRANTY OF MERCHANTABILITY, SHALL BE LIMITED TO THE DURATION OF THIS WRITTEN WARRANTY. ANY ACTION FOR BREACH OF ANY WARRANTY HEREUNDER INCLUDING ANY IMPLIED WARRANTY OF MERCHANTABILITY MUST BE BROUGHT WITHIN A PERIOD OF 24 MONTHS FROM DATE OF ORIGINAL PURCHASE. IN NO CASE SHALL THE COMPANY BE LIABLE FOR ANY CONSEQUENTIAL OR INCIDENTAL DAMAGES FOR BREACH OF THIS OR ANY OTHER WARRANTY.
No person or representative is authorized to assume for the Company any liability other than expressed herein in connection with the sale of this product.
| may also connect the camcorder to the computer | | provided |
| USB port through USB cable, and make sure the | USB cable |
| AC/DC |
computer is turned on. | adapter |
|
2. Press and hold the camcorder power switch to | |
the ON position to initiate charging. | |
slowly release the card. As card is under minimal tension |
when locked in memory slot, please use care when removing. |
2Actual recording time and capacity will vary depending on type of video content being recorded, system requirements, and other factors.
You can set video quality settings from the Setup Menu. Refer to Recording Videos section in User Manual for more information.
QuickTime and the QuickTime logo are trademarks or registered trademarks of Apple Computer, Inc., used under license therefrom.
rights and you may also have other rights which vary from state to state.
© 2011 Audiovox Accessories Corporation
111 Congressional Blvd., Suite 350
Carmel, IN 46032
Trademark Registered
Printed in China