TIPS: Each device key is associated with a type of device—the TV is preset to search for TVs, SAT•CBL•DTC for satellite receivers, cable boxes or digital TV converters (DTC), and VCR•DVD for VCRs or DVD players.
The ON•OFF key serves as an indicator light during programming, giving you feedback at each stage of the process.
The Manual Code Search method may take a long time because the remote searches through all of the codes in its memory one-by-one. If your brand is listed in the Brand Codes or the Code Lists, first try the Brand Code Search or the Direct Code Entry method.
To exit without saving a new code at any point in the Manual Code Search, press the GO BACK key.
1.Manually turn on the device you
want to control.
2.If you’re programming the TV or SAT•CBL•DTC key, go to step 3.
If you’re programming the VCR•DVD key, you need to tell the remote which kind of device you want this key to control, VCR or DVD.
Press and hold the VCR•DVD key. While you’re holding down the VCR•DVD key, use your other hand to press the number key for the type of device you want to control with this key: 2 for VCR, 3 for DVD.
NOTES
Throughout the programming of each key, keep the remote pointed at the IR sensor of the device you are programming the remote to control.
Test the remote with the device to make sure the device key is programmed with the correct code for maximum functionality. If some features don’t work, try a different code. See the “Testing the Code for Maximum Functionality” section below for more information.
During the Manual Code Search, the remote ignores keypresses that aren’t part of the search.
The search times out after two minutes (the ON•OFF key blinks four times and turns off, and the last programmed code under that device key is retained).
The ON•OFF key blinks four times and turns off when the remote has gone through all the codes. The remote exits the Manual Code Search. If your device hasn’t turned off yet, try a different search method.
Testing the Code for Maximum Functionality
1.Try a variety of the device’s functions with the remote. If some features of your devices don’t work, go to the next step to try a different code.
2.Repeat the Manual Code Search from the beginning. When the device turns off for the first time, don’t press the STOP key, which would store the same code. Instead, with the unit now off, continue to press the ON•OFF key repeatedly until the unit turns back on.
3.Once the unit turns back on, you have found another code that operates the device. Press the STOP key.
4.Test the key’s functionality again by trying a variety of functions. If the code controls the majority of the device’s functions, programming is complete. If the code stored does not give maximum functionality, try another code.
CH and VOL keys have dual functions: they can act as navigation keys in menu systems as well as channel and volume controllers outside the menus. The CH keys also provide skip forward and skip back control for DVD players and DVRs that support this functionality.
GO BACK exits remote programming; it also performs the same functions as on your original remotes
The INPUT and — (dash) key has three functions: (1) it toggles through all the video sources connected to your TV; (2) when the remote is in VCR mode, this button toggles between VCR and the TV input; (3) when you’re entering digital channel numbers directly, this button lets you separate the main channel number from the sub-channel number (such as 59.1)
IMPORTANT
Because this remote controls more than one device, you must first “tell” the remote which device you wish to operate. That means, if you wish to operate your TV, you must first press the TV key to put the remote in the TV Mode. The remote stays in that device mode until you press a different device key. For example, if your remote is in TV Mode and you want to operate the DVD player, you must press the VCR•DVD key to change device modes.
Backlighting
Backlight illumination helps you see the remote control keys better in the dark. You can turn backlight illumination on or off by pressing the backlight key ( ). Backlighting stays on as long as keys are being pressed and turns off six seconds after the last keypress. Once the backlight time has timed out, any keypress will reactivate it. If the backlight illumination is on, and you press the backlight key, the backlight turns off.
Advanced Functions
Code Retrieval
Once you’ve programmed the remote to control your devices, you may want to record the codes for future reference. If you used the Direct Code Entry method, this is easy. Just find the codes you entered and make a note of them in the boxes below. If you used one of the Code Search methods to program your remote or if you used the Direct Entry method but don’t remember the code, you will need to retrieve each device’s five-digit code. Retrieving the actual code and writing it down will save you time if you ever need to program the remote again (e.g., if programming is lost when you change the batteries). If the codes are recorded, you can use the Direct Entry method to reprogram your remote to control your devices, which is quick and easy.
ON•OFF key | 1. Press and hold the device key |
| | (TV, SAT•CBL•DTC, VCR•DVD) |
| | whose code you wish to retrieve. |
| |
| | The ON•OFF key turns on. Keep |
| | pressing the device key. |
2.While holding the device key down, press and hold the INFO key. The ON•OFF key turns off. After holding down both keys for three seconds, the ON•OFF key turns back on.
3.Release both keys. The ON•OFF key remains on.
4.Starting with the number 1 key, press and release each number key on the keypad in the following order: 1-9, then 0. The number that causes the ON•OFF key to blink is the first number of the code. As you find each number of the code, write it down for future reference.
Note: All TV codes begin with the number 1; all VCR and DVR codes begin with the number 2; all DVDs, the number 3; and
Troubleshooting
Problem: The remote does not operate your device.
•Make sure the remote is in the correct mode by pressing the corresponding device key (TV, SAT•CBL•DTC, VCR•DVD). This tells the remote which device to operate.
•Remove any obstacles between the remote and the device. Make sure you’re aiming the remote at the device’s IR sensor.
•Make sure the batteries are fresh and are properly installed. Replace the batteries with two new AA batteries, if necessary (see the Battery Installation section).
Problem: The remote can’t be programmed to operate your device.
•If you are testing the remote while programming it, you may be too far away from the device or at a wrong angle. There must be an unobstructed path between the remote and the IR sensor on the device. Move closer and make sure you point the remote at the device you’re trying to control.
•If you’re using the Direct Entry programming method to enter the codes for your brand and the unit is still not functioning properly, try the auto, brand, or manual search method.
•To control combo units, like TV/VCRs or TV/DVDs, you must program the individual corresponding device keys to control each part of the combo unit. Once programmed successfully, the TV key controls the TV functions, and the VCR•DVD key controls the VCR or DVD functions.
•Make sure the batteries are fresh and are properly installed.
Problem: The remote doesn’t perform commands properly.
• | Make sure the remote is in the correct mode by pressing the |
| corresponding device key (TV, SAT•CBL•DTC, VCR•DVD). This |
| tells the remote which device to operate. |
• | Make sure device is ready (for example, the DVD player has a |
| disc loaded). |
• | You may have pressed an invalid key for the mode the remote is in. |
• | If you’re trying to enter a channel number directly, try pressing |
Problem: The device’s menu does not appear on the TV screen.
•Make sure you have connected the device to your TV properly and selected the correct input. (See your devices’ Owner’s Manuals for proper connection procedures.)
•Make sure the remote is in the correct mode by pressing the corresponding device key (TV, SAT•CBL•DTC, VCR•DVD). This tells the remote which device to operate.
•Menu access isn’t supported for all brands. You may need to use your original remote control to access menu functions for some devices.
For more information, please visit www.rcaaccessories.com
Consumer Help Line: 1-800-420-7968
Care and Maintenance
•Keep the remote dry. If it gets wet, wipe it dry immediately.
•Use and store the remote only in normal temperature environments.
•Handle the remote gently and carefully. Don’t drop it.
•Keep the remote away from dust and dirt.
•Wipe the remote with a damp cloth occasionally to keep it looking new.
•Modifying or tampering with the remote’s internal devices can cause malfunction and invalidate its warranty.
Limited Lifetime Warranty
Audiovox Electronics Corporation (the “Company”) warrants to you the original retail purchaser of this product that should it, under normal use and conditions, be proven defective in material or workmanship during its lifetime while you own it, such defect(s) will be repaired or replaced (at the Company’s option) without charge for parts and repair labor. To obtain repair or replacement within the terms of this Warranty, the product is to be delivered with proof of warranty coverage (e.g. dated bill of sale),
3.Press and hold the device key you want to program. While you’re holding down the device key, use your other hand to press and hold the remote’s ON•OFF key at the same time.
4.Wait until the ON•OFF key comes on and stays on. Then release both keys.
5.Point the remote directly at the front panel of the device you want to control. Press ON•OFF on the remote and wait 2 seconds. The remote is testing a single code for your device.
Did your device turn off?
YES: Press the STOP key to store the code. You’re done! You’ve programmed this device key.
NO: Press ON•OFF again. The remote tests the next code for your device.
Keep pressing ON•OFF every 2 seconds until your device turns back on. When it does, press STOP.
TIP: Because there are so many codes, you may have to press the ON•OFF key many times—possibly hundreds of times.
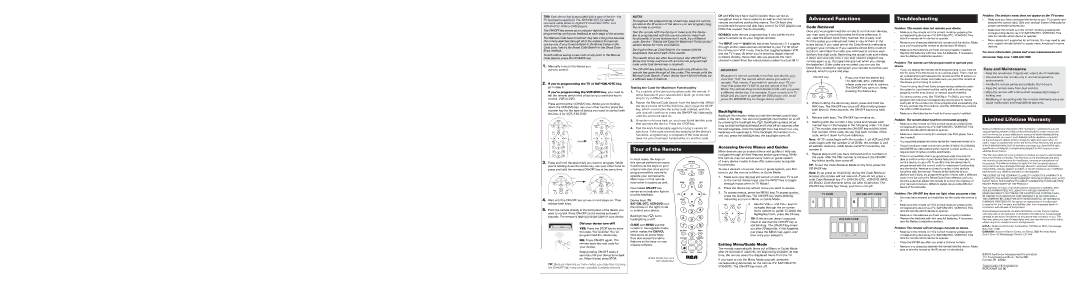
Tour of the Remote
In most cases, the keys on this remote perform the same functions as the keys on your original remotes once you’ve programmed this remote to operate your components. Many keys on this remote have other functions as well.
Illuminated ON•OFF key serves as an indicator light to provide feedback.
Device keys (TV, SAT•CBL•DTC, VCR•DVD) put the remote in the right mode to control your device.
Backlight key ( ) turns backlighting on/off.
GUIDE and MENU put the remote in menu/guide mode, which makes the CH/VOL keys serve as arrow keys; they also access the same features as the keys on your original remotes.
Actual model may vary from illustration
Accessing Device Menus and Guides
Many devices use on-screen menus and guides to help you navigate through all their features and programming. While this remote may not access every menu or guide system of every device model, it does offer some menu and guide functionality.
To use a device’s on-screen menu or guide system, you first have to put the remote in Menu or Guide Mode.
1.Make sure your devices are turned on and your TV is set to the correct device input (use the INPUT key to toggle through inputs when in TV Mode.)
2.Press the device key whose menu you want to access.
3.To access menus, press the MENU key. To access guides, press the GUIDE key. The ON•OFF key starts blinking, indicating you are in Menu or Guide Mode.
4. Use the VOL+/- and CH+/- keys to navigate through the on-screen menu system or guide. To select the highlighted item, press the OK key.
TIP: If the remote doesn’t respond, check to see that the ON•OFF key is still blinking. The ON•OFF key times out after 20 seconds. If this happens, just press the MENU key again, and then retry your selection.
Exiting Menu/Guide Mode
The remote automatically times out of Menu or Guide Mode after 20 seconds of inactivity (no keys being pressed). At that time, the remote clears the displayed menu from the TV.
If you want to exit the Menu Mode yourself, press the corresponding device key on the remote (TV, SAT•CBL•DTC, VCR•DVD). The ON•OFF key turns off.
all satellite receivers, cable boxes and DTV converters, the number 5.
5.Repeat step 4 until you have retrieved all five numbers in the code. After the fifth number is retrieved, the ON•OFF key blinks briefly, then turns off.
TIP: To exit the Code Retrieval Mode at any time, press the GO BACK key.
Note: If you press an invalid key during the Code Retrieval process, the remote will not respond. If you do not press a valid Code Retrieval key (TV, SAT•CBL•DTC, VCR•DVD, INFO, GO BACK), Code Retrieval times out after 15 seconds. The ON•OFF key blinks four times, and then turns off.
| | TV CODE | | SAT•CBL•DTC CODE |
| | | | | | | | | | | | | | | | |
| 1 | | | | | | | | 5 | | | | | | | |
| | | | | | | | | | | | | | | | |
| | | | | | | | | SAT | | CABLE | | DTV CONVERTER |
| | | | | | | | | | | | | | | | |
| | | | | | | | | | | | | | | | |
| | | | | | VCR•DVD CODE | | | | | |
| | | | | | | | | | | | | | | | |
| | | | | | | | | | | | | | | | |
| | | | | | | | DVD | VCR | | | | | |
| | | | | | | | | | | | | | | | |
| the ENTER key after entering the channel number as this is a |
| requirement of certain models and brands. |
• | There is a possibility that a programmed code may only be |
| able to control some of your device features (for example, only |
| turns a device on and off). To confirm that the device key is |
| programmed with the correct code for maximum functionality, |
| test the device. Attempt to control a variety of the device’s |
| functions with the remote. If some of the features of your |
| devices don’t work, try programming the remote with a different |
| code in the list using the Direct Code Entry Method, until you |
| find the code that allows the remote to control the majority of |
| your device’s functions. Different codes can provide different |
| levels of functionality. |
Problem: The ON•OFF key does not light when you press a key.
•You may have pressed an invalid key for the mode the remote is in.
•Make sure the remote is in the correct mode by pressing the corresponding device key (TV, SAT•CBL•DTC, VCR•DVD). This tells the remote which device to operate.
•Make sure the batteries are fresh and are properly installed. Replace the batteries with two new AA batteries, if necessary (see the Battery Installation section).
Problem: The remote will not change channels on device.
•Make sure the remote is in the correct mode by pressing the corresponding device key (TV, SAT•CBL•DTC, VCR•DVD). This tells the remote which device to operate.
•Press the ENTER key after you enter a channel number.
•Remove any obstacles between the remote and the device. Make sure to aim the remote at the IR sensor on the device.
specification of defect(s), transportation prepaid, to the Company at the address shown below.
This Warranty does not cover product purchased, serviced or used outside the United States or Canada. This Warranty is not transferable and does not extend to costs incurred for installation, removal or reinstallation of the product. This Warranty does not apply if in the Company’s opinion, the product has been damaged through alteration, improper installation, mishandling, misuse, neglect, accident, or the simultaneous use of different battery types (e.g. alkaline, standard or rechargeable).
THE EXTENT OF THE COMPANY’S LIABILITY UNDER THIS WARRANTY IS LIMITED TO THE REPAIR OR REPLACEMENT PROVIDED ABOVE AND, IN NO EVENT, SHALL THE COMPANY’S LIABILITY EXCEED THE PURCHASE PRICE PAID BY PURCHASER FOR THE PRODUCT.
This Warranty is in lieu of all other express warranties or liabilities. ANY IMPLIED WARRANTIES, INCLUDING ANY IMPLIED WARRANTY OF MERCHANTABILITY OR FITNESS FOR A PARTICULAR PURPOSE SHALL BE LIMITED TO DURATION OF THIS WARRANTY. IN NO CASE SHALL THE COMPANY BE LIABLE FOR ANY CONSEQUENTIAL OR INCIDENTAL DAMAGES WHATSOEVER. No person or representative is authorized to assume for the Company any liability other than expressed herein in connection with the sale of this product.
Some states/provinces do not allow limitations on how long an implied warranty lasts or the exclusion or limitation of incidental or consequential damage so the above limitations or exclusions may not apply to you. This Warranty gives you specific legal rights and you may also have other rights, which vary from state/province to state/province.
U.S.A.: Audiovox Electronics Corporation, 150 Marcus Blvd., Hauppauge, New York 11788
CANADA: Audiovox Return Center, c/o Genco, 6685 Kennedy Road, Unit 3, Door 16, Mississauga, Ontario L5T 3A5
©2010 Audiovox Accessories Corporation
111 Congressional Blvd., Suite 350
Carmel, IN 46032
Trademark(s) ® Registered
RCR312WR US 06