| the Direct Code Entry method, this is easy. Just find the codes | 4. | Leave the remote aimed at the TV. Once the Sleep Timer is |
| you entered and make a note of them in the boxes below. If you |
| used one of the Code Search methods to program your remote or | | set, you can continue to use the remote without affecting |
| if you used the Direct Entry method but don’t remember the code, | | the Sleep Timer. However, the remote must be put back in |
| you will need to retrieve each device’s five-digit code. Retrieving | | TV mode and pointed at the TV to activate the Sleep Timer. |
| the actual code and writing it down will save you time if you ever | Note: If the ON•OFF key is pressed, the Sleep Timer is canceled. |
| need to program the remote again. If the codes are recorded, you | | |
| can use the Direct Entry method to reprogram your remote to | | |
| Troubleshooting |
| control your devices, which is quick and easy. |
| TIPS: All TV codes start with the number 1; all VCR and DVR | | | |
| | |
| codes start with the number 2; all DVD player codes, the number | | Problem: The remote does not operate your device. |
| 3; all audio device codes, the number 4; and all satellite receiver, | |
| | • | Make sure the remote is in the correct mode by pressing the |
| cable box, and digital TV converters, the number 5. | |
| | | corresponding device key (TV, SAT•CBL•DTC, DVD, DVR•AUX, |
| To exit the Code Retrieval Mode at any time, press the CLEAR | | |
| | | AUDIO, VCR). This tells the remote which device to operate. |
| key. | | | | | | | | | | | | | | • | Remove any obstacles between the remote and the device. Make |
| If you press an invalid key during the Code Retrieval process, | | | sure you’re aiming the remote at the device’s IR sensor. |
| the remote will not respond. If you do not press a valid Code | | • | Make sure the batteries are fresh and are properly installed. |
| Retrieval key (TV, SAT•CBL•DTC, DVD, DVR•AUX, AUDIO, VCR, | | | Replace the batteries with two new AA batteries, if necessary |
| INFO, CLEAR), Code Retrieval times out after 15 seconds. The | | | (see the Battery Installation section). |
| ON•OFF key blinks four times, and then turns off. | | | |
| | | | | | | | | | | | | | | | | | | | | | | | | Problem: The remote can’t be programmed to operate your |
| | | | | | | | | | | | | | | | | | | | | | | | |
| 1. Press and hold the device key (TV, SAT•CBL•DTC, DVD, | device. |
| | AUDIO, VCR, DVR•AUX) whose code you wish to retrieve. | • | If you are testing the remote while programming it, you may be |
| | The ON•OFF key illuminates. Keep pressing the device key. | | too far away from the device or at a wrong angle. There must be |
| 2. While holding the device key down, press and hold the | | an unobstructed path between the remote and the IR sensor on |
| | the device. Move closer and make sure you point the remote at the |
| | INFO key. The ON•OFF key illumination turns off. After | |
| | | device you’re trying to control. |
| | holding down both keys for three seconds, it turns back on. | |
| | • | If you’re using the Direct Entry programming method to enter |
| 3. Release both keys. The ON•OFF key remains illuminated. |
| | the codes for your brand and the unit is still not functioning |
| 4. Starting with the number 1 key, press and release each | | properly, try the auto, brand, or manual search method. |
| | number key on the keypad in the following order: 1-9, then | • | To control combo units, like TV/VCRs or TV/DVDs, you must |
| | 0. The number that causes the ON•OFF key to blink is the | | program the individual corresponding device keys to control |
| | first number of the code. As you find each number of the | | each part of the combo unit. Once programmed successfully, |
| | code, write it down for future reference. Then start with the | | the TV key controls the TV functions, and the DVD or VCR key |
| | | controls the DVD or VCR functions. |
| | number 1 key again. | | | | | | | | | | | | | | |
| | | | | | | | | | | | | | | • | Make sure the batteries are fresh and are properly installed. |
| 5. Repeat step 4 until you have retrieved all five numbers in |
| | |
| | the code. After the fifth number is retrieved, the ON•OFF | Problem: The remote doesn’t perform commands properly. |
| | key blinks briefly, then turns off. |
| | • | Make sure the remote is in the correct mode by pressing the |
| | | | | | | | | | | | | | | | | | | | | | | | |
| | | | | | | | | | | | | | | | | | | | | | | | | | corresponding device key (TV, SAT•CBL•DTC, DVD, DVR•AUX, |
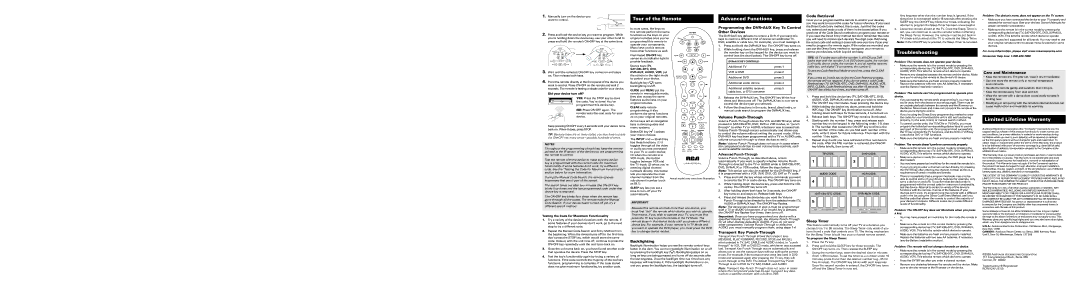
| | | | TV CODE | | | | DVD CODE | | | | AUDIO, VCR). This tells the remote which device to operate. |
| | | | | | | | | | | | | | | | | | | | | | | | | • | Make sure device is ready (for example, the DVD player has a |
| | | | | | | | | | | | | | | | | | | | | | | | |
| | 1 | | | | | | | | | | | 3 | | | | | | | | | | | | | disc loaded). |
| | | | | | | | | | | | | | | | | | | | | | | • | You may have pressed an invalid key for the mode the remote is in. |
| | | | | | | | | | | | | | | | | | | | | | | | |
| | | | | | | | | | | | | | | | | | | | | | | | | • | If you’re trying to enter a channel number directly, try pressing |
| | | | | | | | | | | | | | | | | | | | | | | | |
| | | | | | | | | | | | | | | | | | | | | | | | | | the ENTER key after entering the channel number as this is a |
| | | | AUDIO CODE | | | | VCR code | | | | requirement of certain models and brands. |
| | | | | | | | • | There is a possibility that a programmed code may only be |
| | 4 | | | | | | | | | | | | | | | | | | | | | | | | able to control some of your device features (for example, only |
| | | | | | | | | | | | | | | | | | | | | | | | | turns a device on and off). To confirm that the device key is |
| | | | | | | | | | | | | | | | | | | | | | | | | | programmed with the correct code for maximum functionality, |
| | | | | | | | | | | | | | | | | | | | | | | | | | test the device. Attempt to control a variety of the device’s |
| | | | | | | | | | | | | | | | | | | | | | | | | | functions with the remote. If some of the features of your |
| | | | | | | | | | | | | | | | | | | | | | | | | |
| | sat•cbl•dtc code | | | dvr•aux1 code | | devices don’t work, try programming the remote with a different |
| | | | | | | | | | | | | | | | | | | | | | | | | | code in the list using the Direct Code Entry Method, until you |
| 5 | | | | | | | | | | | | | | | | | | | | | | | | find the code that allows the remote to control the majority of |
| | | | | | | | | | | | | | | | | | | | | | | | your device’s functions. Different codes can provide different |