RP3538 EN (20_10_06) 19/10/06 3:58 PM Page 1
u s e r m a n u a l
Guide de l’utilisateur
Powering the Recorder
Important Battery Information
•Alkaline batteries are recommended for longer play. Carbon-zinc or nickel cadmium rechargeable batteries can substantially reduce play time.
•If you’re not going to use your player for a month or more, be sure to remove batteries because they can leak and damage the unit.
•Dispose of batteries in the proper manner, according to federal, state, and local regulations.
•Any battery may leak electrolyte if mixed with a different battery type, if inserted incorrectly, if all batteries are not replaced at the same time, if disposed of in fire, or if an attempt is made to charge a battery not intended to be recharged.
•Discard leaky batteries immediately. Leaking batteries can cause skin burns or other personal injury.
Battery Installation
1.Open hinged battery door by pressing down just above the arrow, sliding it as indicated and lifting up. Note that to avoid damage to the battery door, do not attempt to force door beyond its normal stopping point.
2.Insert 2 “AA” alkaline batteries into the battery compartment. Be sure each battery is installed as shown on the battery diagram in the battery compartment.
3.Close the battery door by lowering and sliding door into the closed position.
Record
Records continuously when the recorder is in the RECORD mode.
1.Press RECORD button (PLAY button will depress also). Note that your recorder is equipped with a microcassette sensing mechanism. This mechanism prevents the RECORD button from being pressed when cassette is not in the recorder. (See Erase Protection.)
2.Select HI or LO with the MIC sensitivity switch. Recording level may be fine tuned with the volume control.
3.Speak normally into the microphone. To obtain optimum recording quality, place the recorder with the microphone freely exposed to sound source and as close as convenient. A built-in automatic record level control will set record level for optimum recordings. Avoid recording near unwanted noise sources, such as air conditioners or fans.
4.Push STOP/EJECT button when finished recording.
TIP: For conferences, to obtain optimum recording quality, place the recorder with the microphone freely exposed to the sound source and as close as convenient. A built-in automatic recording level control will set record level for optimum recordings. Avoid recording near unwanted noise sources, such as air conditioners or fans.
Record with an External Microphone
To record with external microphone, plug the microphone into the MIC JACK. The built-in microphone is disconnected.
Headphone Jack
Plugging in an optional headphone, the speaker is automatically silenced for private listening. When recording with the built-in microphone, you can use the optional headphone to listen to what is being recorded. Note that the headphone jack is designed to permit use of stereo headphones with your mono recorder. Playback will be heard in mono only.
Automatic Voice Activated Recording Switch (AVR)
The AVR feature allows the recorder to sense sound and to record only when you are speaking into the microphone. When dictation stops for approximately 6 seconds, tape operation will stop. Recording will start again when you resume dictation.
• On position—a tape saver. Ideal feature to allow for hands-free operation during |
Care & Maintenance
Tape Erase
To erase a tape simply record over the unwanted recording.
Erase Protection
When you record new material, the cassette deck records
over whatever is on a tape. To protect a tape fromA accidental erasure, break off one or both plastic tabs (one  for each tape side) on the side of the cassette tape. If you decide later to record on the tape, seal the hole with a
piece of cellophane tape.
QUIT SLACKING
A little bit of slack in your tapes can cause scratches on the tape, or worse yet, the tape could break. If you notice some slack in the tape, use a pencil to tighten it up before you insert it.
Cleaning the Tape Heads
Over time, iron oxide particles from the magnetic tape build up on the parts that come in contact with the tape. These deposits can cause incomplete erasure, a muffled sound during playback.
To clean the heads, open the compartment door, push the PLAY button and gently clean the heads, capstan and pinch wheel with a head cleaner.
Allow 30 minutes drying time when using a liquid cleaner.
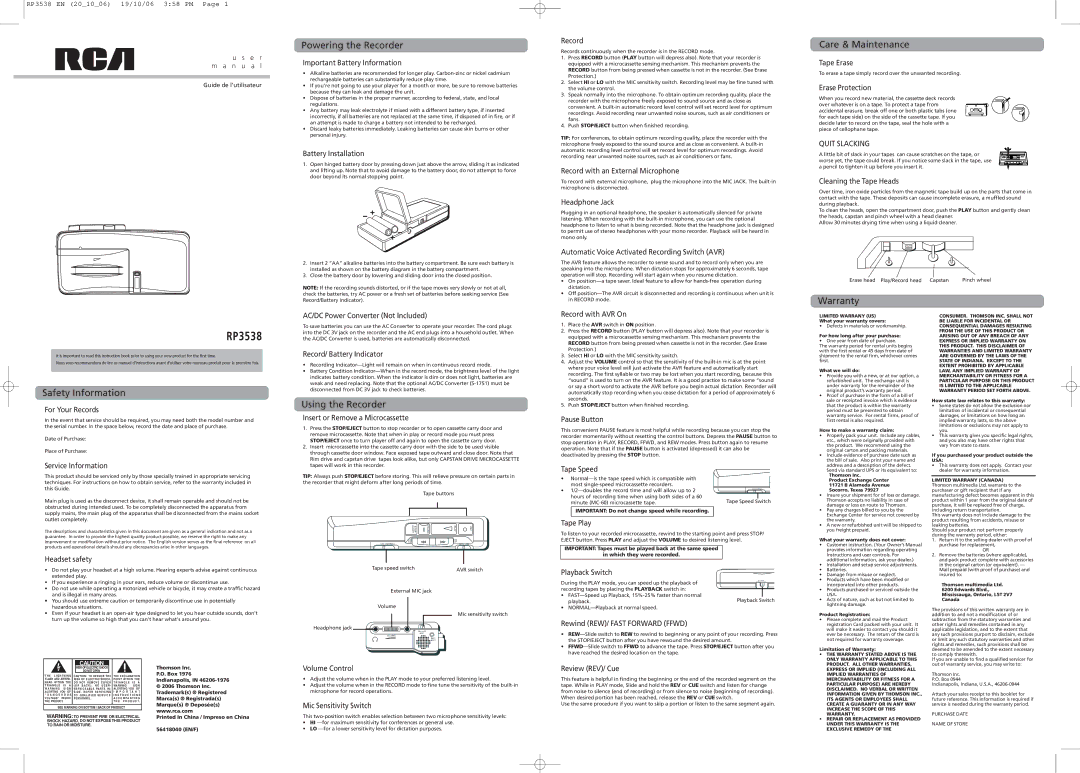
Erase head Play/Record head Capstan | Pinch wheel |
RP3538
It is important to read this instruction book prior to using your new product for the first time.
Nous vous recommandons de lire ce manuel d’instructions avant d’utiliser votre nouveau produit pour la première fois.
Safety Information
For Your Records
In the event that service should be required, you may need both the model number and the serial number. In the space below, record the date and place of purchase.
Date of Purchase:
Place of Purchase:
Service Information
This product should be serviced only by those specially trained in appropriate servicing techniques. For instructions on how to obtain service, refer to the warranty included in this Guide.
Main plug is used as the disconnect device, it shall remain operable and should not be obstructed during intended used. To be completely disconnected the apparatus from supply mains, the main plug of the apparatus shall be disconnected from the mains socket outlet completely.
The descriptions and characteristics given in this document are given as a general indication and not as a guarantee. In order to provide the highest quality product possible, we reserve the right to make any improvement or modification without prior notice. The English version serves as the final reference on all products and operational details should any discrepancies arise in other languages.
Headset safety
•Do not play your headset at a high volume. Hearing experts advise against continuous extended play.
•If you experience a ringing in your ears, reduce volume or discontinue use.
•Do not use while operating a motorized vehicle or bicycle, it may create a traffic hazard and is illegal in many areas.
•You should use extreme caution or temporarily discontinue use in potentially hazardous situations.
•Even if your headset is an open-air type designed to let you hear outside sounds, don't turn up the volume so high that you can't hear what's around you.
| | | | | | | | | |
| | | | CAUTION | | | | | Thomson Inc. |
| | | | RISK OF ELECTRIC SHOCK | | | | |
| | | | DO NOT OPEN | | | | | P.O. Box 1976 |
| T H E L I G H T N I N G | CAUTION: TO REDUCE THE | THE EXCLAMATION | |
| FLASH AND ARROW- | RISK OF ELECTRIC SHOCK, | POINT WITHIN THE | | Indianapolis, IN 46206-1976 |
| HEAD WITHIN THE | DO NOT REMOVE COVER | T R I A N G L E | I S A | |
| T R I A N G L E | I S A | ( O R B A C K ) . N O U S E R - | WARNING | SIGN | | © 2006 Thomson Inc. |
| WA R N I N G | S I G N | SERVICEABLE PARTS IN - | ALERTING YOU OF | |
| ALERTING YOU OF | S I D E . R E F E R S E RV I C I N G | I M P O R T A N T | | Trademark(s) ® Registered |
| " D A N G E R O U S | TO Q UA L I F I E D S E RV I C E | I N S T R U C T I O N S | |
| VOLTAGE" | INSIDE | PERSONNEL. | A C C O M PA N Y I N G | | Marca(s) ® Registrada(s) |
| THE PRODUCT. | | | | T H E P R O D U C T. | | Marque(s) ® Deposée(s) |
| | | | | | | | |
| SEE MARKING ON BOTTOM / BACK OF PRODUCT | | |
| | | www.rca.com |
| WARNING: TO PREVENTFIREOR ELECTRICAL |
| Printed In China / Impreso en China |
| SHOCKHAZARD,DO NOTEXPOSETHIS PRODUCT | |
TO RAIN OR MOISTURE .
56418040 (EN/F)
NOTE: If the recording sounds distorted, or if the tape moves very slowly or not at all, check the batteries, try AC power or a fresh set of batteries before seeking service (See Record/Battery Indicator).
AC/DC Power Converter (Not Included)
To save batteries you can use the AC Converter to operate your recorder. The cord plugs into the DC 3V jack on the recorder and the AC end plugs into a household outlet. When the AC/DC Converter is used, batteries are automatically disconnected.
Record/ Battery Indicator
•Recording Indicator—Light will remain on when in continuous record mode.
•Battery Condition Indicator—When in the record mode, the brightness level of the light indicates battery condition. When the indicator is dim or does not light, batteries are weak and need replacing. Note that the optional AC/DC Converter (5-1751) must be disconnected from DC 3V jack to check batteries.
Using the Recorder
Insert or Remove a Microcassette
1.Press the STOP/EJECT button to stop recorder or to open cassette carry door and remove microcassette. Note that when in play or record mode you must press STOP/EJECT once to turn player off and again to open the cassette carry door.
2.Insert microcassette into the cassette carry door with the side to be used visible through cassette door window. Face exposed tape outward and close door. Note that Rim drive and capstan drive tapes look alike, but only CAPSTAN DRIVE MICROCASSETTE tapes will work in this recorder.
TIP: Always push STOP/EJECT before storing. This will relieve pressure on certain parts in the recorder that might deform after long periods of time.
Tape buttons
STOP EJECT | PAUSE | PLAY | REC |
FFWD CUE | | REW | REV |
1/2 • • NORMAL | | | OFF • • ON |
Tape speed switch | AVR switch |
|
External MIC jack
Volume
Mic sensitivity switch
Headphone jack
HI • • LO
MIC
VOLUME
REC/


 BATT
BATT
Volume Control
•Adjust the volume when in the PLAY mode to your preferred listening level.
•Adjust the volume when in the RECORD mode to fine tune the sensitivity of the built-in microphone for record operations.
Mic Sensitivity Switch
This two-position switch enables selection between two microphone sensitivity levels:
•HI —for maximum sensitivity for conferences or general use.
•LO —for a lower sensitivity level for dictation purposes.
dictation. |
• Off position—The AVR circuit is disconnected and recording is continuous when unit is |
in RECORD mode. |
Record with AVR On
1.Place the AVR switch in ON position.
2.Press the RECORD button (PLAY button will depress also). Note that your recorder is equipped with a microcassette sensing mechanism. This mechanism prevents the RECORD button from being pressed when cassette is not in the recorder. (See Erase Protection.)
3.Select HI or LO with the MIC sensitivity switch.
4.Adjust the VOLUME control so that the sensitivity of the built-in mic is at the point where your voice level will just activate the AVR feature and automatically start recording. The first syllable or two may be lost when you start recording, because this “sound” is used to turn on the AVR feature. It is a good practice to make some “sound or say a short word to activate the AVR before you begin actual dictation. Recorder will automatically stop recording when you cease dictation for a period of approximately 6 seconds.
5.Push STOP/EJECT button when finished recording.
Pause Button
This convenient PAUSE feature is most helpful while recording because you can stop the recorder momentarily without resetting the control buttons. Depress the PAUSE button to stop operation in PLAY, RECORD, FFWD, and REW modes. Press button again to resume operation. Note that if the PAUSE button is activated (depressed) it can also be deactivated by pressing the STOP button.
Tape Speed
•Normal—is the tape speed which is compatible with most single-speed microcassette recorders.
• 1/2—doubles the record time and will allow up to 2 | 1/2 • • NORMAL |
hours of recording time when using both sides of a 60 | | |
| |
minute (MC-60) microcassette tape. | Tape Speed | Switch |
| | |
IMPORTANT: Do not change speed while recording.
Tape Play
To listen to your recorded microcassette, rewind to the starting point and press STOP/ EJECT button. Press PLAY and adjust the VOLUME to desired listening level.
IMPORTANT: Tapes must be played back at the same speed
in which they were recorded.
Playback Switch
During the PLAY mode, you can speed up the playback of | PLAYBACK |
NORMAL • • FAST |
recording tapes by placing the PLAYBACK switch in: | | |
| |
• FAST—Speed up Playback, 15%-25% faster than normal | | |
playback. | Playback Switch |
• NORMAL—Playback at normal speed. | | |
| |
Rewind (REW)/ FAST FORWARD (FFWD)
•REW—Slide switch to REW to rewind to beginning or any point of your recording. Press the STOP/EJECT button after you have rewound the desired amount.
•FFWD—Slide switch to FFWD to advance the tape. Press STOP/EJECT button after you have reached the desired location on the tape.
Review (REV)/ Cue
This feature is helpful in finding the beginning or the end of the recorded segment on the tape. While in PLAY mode, Slide and hold the REV or CUE switch and listen for change from noise to silence (end of recording) or from silence to noise (beginning of recording). When desired portion has been reached, release the REV or CUE switch.
Use the same procedure if you want to skip a portion or listen to the same segment again.
Warranty
LIMITED WARRANY (US)
What your warranty covers:
•Defects in materials or workmanship.
For how long after your purchase:
•One year from date of purchase.
The warranty period for rental units begins with the first rental or 45 days from date of shipment to the rental firm, whichever comes first.
What we will do:
•Provide you with a new, or at our option, a refurbished unit. The exchange unit is under warranty for the remainder of the original product’s warranty period.
•Proof of purchase in the form of a bill of sale or receipted invoice which is evidence that the product is within the warranty period must be presented to obtain warranty service. For rental firms, proof of first rental is also required.
How to make a warranty claim:
•Properly pack your unit. Include any cables, etc., which were originally provided with the product. We recommend using the original carton and packing materials.
•Include evidence of purchase date such as the bill of sale. Also print your name and address and a description of the defect.
Send via standard UPS or its equivalent to:
Thomson Inc.
Product Exchange Center
11721 B Alameda Avenue Socorro, Texas 79927
•Insure your shipment for of loss or damage. Thomson accepts no liability in case of damage or loss en route to Thomson.
•Pay any charges billed to you by the Exchange Center for service not covered by the warranty.
•A new or refurbished unit will be shipped to you freight prepaid.
What your warranty does not cover:
•Customer instruction. (Your Owner’s Manual provides information regarding operating Instructions and user controls. For additional information, ask your dealer.)
•Installation and setup service adjustments.
•Batteries.
•Damage from misuse or neglect.
•Products which have been modified or incorporated into other products.
•Products purchased or serviced outside the USA.
•Acts of nature, such as but not limited to lightning damage.
Product Registration:
•Please complete and mail the Product registration Card packed with your unit. It will make it easier to contact you should it ever be necessary. The return of the card is not required for warranty coverage.
Limitation of Warranty:
•THE WARRANTY STATED ABOVE IS THE ONLY WARRANTY APPLICABLE TO THIS PRODUCT. ALL OTHER WARRANTIES, EXPRESS OR IMPLIED (INCLUDING ALL IMPLIED WARRANTIES OF MERCHANTABILITY OR FITNESS FOR A PARTICULAR PURPOSE) ARE HEREBY DISCLAIMED. NO VERBAL OR WRITTEN INFORMATION GIVEN BY THOMSON INC., ITS AGENTS OR EMPLOYEES SHALL CREATE A GUARANTY OR IN ANY WAY INCREASE THE SCOPE OF THIS WARRANTY.
•REPAIR OR REPLACEMENT AS PROVIDED UNDER THIS WARRANTY IS THE EXCLUSIVE REMEDY OF THE
CONSUMER. THOMSON INC. SHALL NOT BE LIABLE FOR INCIDENTAL OR CONSEQUENTIAL DAMAGES RESULTING FROM THE USE OF THIS PRODUCT OR ARISING OUT OF ANY BREACH OF ANY EXPRESS OR IMPLIED WARRANTY ON THIS PRODUCT. THIS DISCLAIMER OF WARRANTIES AND LIMITED WARRANTY ARE GOVERNED BY THE LAWS OF THE STATE OF INDIANA. EXCEPT TO THE EXTENT PROHIBITED BY APPLICABLE LAW, ANY IMPLIED WARRANTY OF MERCHANTABILITY OR FITNESS FOR A PARTICULAR PURPOSE ON THIS PRODUCT IS LIMITED TO THE APPLICABLE WARRANTY PERIOD SET FORTH ABOVE.
How state law relates to this warranty:
•Some states do not allow the exclusion nor limitation of incidental or consequential damages, or limitations on how long an implied warranty lasts, so the above limitations or exclusions may not apply to you.
•This warranty gives you specific legal rights, and you also may have other rights that vary from state to state.
If you purchased your product outside the USA:
•This warranty does not apply. Contact your dealer for warranty information.
LIMITED WARRANY (CANADA)
Thomson multimedia Ltd. warrants to the purchaser or gift recipient that if any manufacturing defect becomes apparent in this product within 1 year from the original date of purchase, it will be replaced free of charge, including return transportation.
This warranty does not include damage to the product resulting from accidents, misuse or leaking batteries.
Should your product not perform properly during the warranty period, either:
1.Return it to the selling dealer with proof of purchase for replacement,
OR
2.Remove the batteries (where applicable), and pack product complete with accessories in the original carton (or equivalent). — Mail prepaid (with proof of purchase) and insured to:
Thomson multimedia Ltd. 6200 Edwards Blvd., Mississauga, Ontario, L5T 2V7 Canada
The provisions of this written warranty are in addition to and not a modification of or subtraction from the statutory warranties and other rights and remedies contained in any applicable legislation, and to the extent that any such provisions purport to disclaim, exclude or limit any such statutory warranties and other rights and remedies, such provisions shall be deemed to be amended to the extent necessary to comply therewith.
If you are unable to find a qualified servicer for out of warranty service, you may write to:
Thomson Inc.
P.O. Box 0944
Indianapolis, Indiana, U.S.A., 46206-0944
Attach your sales receipt to this booklet for future reference. This information is required if service is needed during the warranty period.
PURCHASE DATE
NAME OF STORE