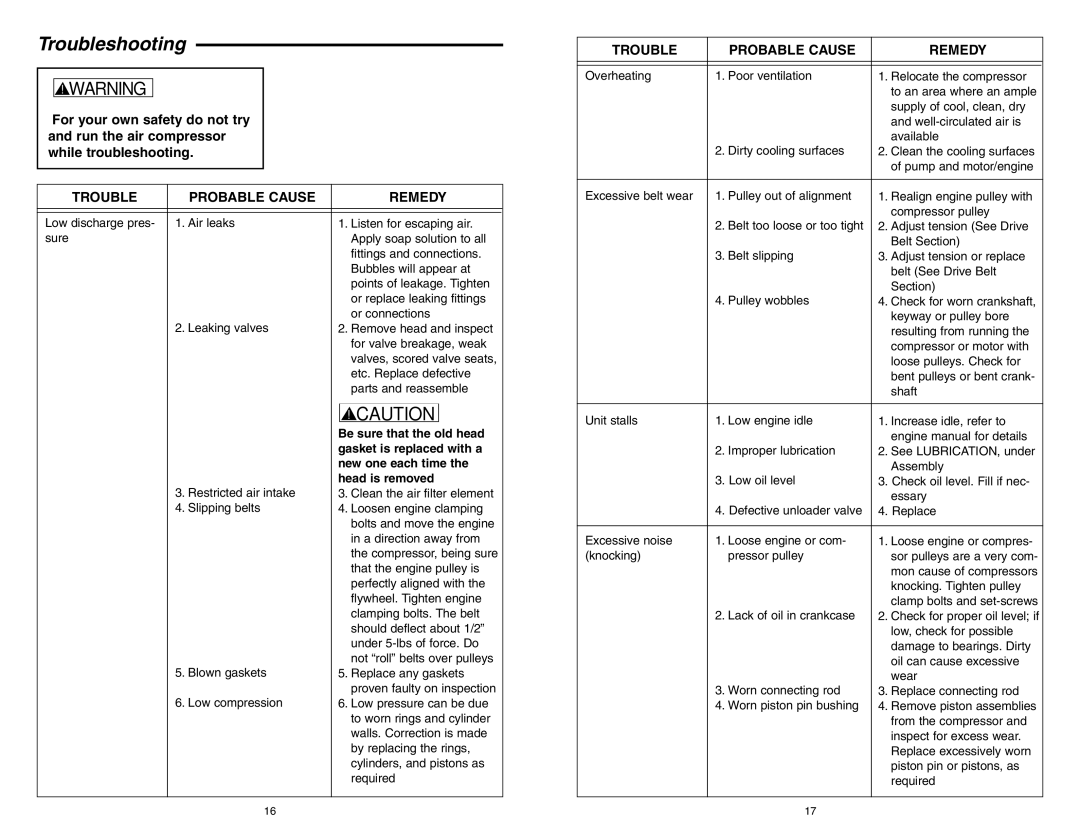
Troubleshooting

!WARNING

For your own safety do not try and run the air compressor while troubleshooting.

TROUBLE

PROBABLE CAUSE


REMEDY


Low discharge pres-

1. Air leaks

1. Listen for escaping air.

sure


Apply soap solution to all


fittings and connections.


Bubbles will appear at


points of leakage. Tighten


or replace leaking fittings


or connections


2. Leaking valves

2. Remove head and inspect


for valve breakage, weak


valves, scored valve seats,


etc. Replace defective


parts and reassemble


! CAUTION


Be sure that the old head


gasket is replaced with a


new one each time the


head is removed


3. Restricted air intake

3. Clean the air filter element


4. Slipping belts

4. Loosen engine clamping


bolts and move the engine


in a direction away from


the compressor, being sure


that the engine pulley is


perfectly aligned with the


flywheel. Tighten engine


clamping bolts. The belt


should deflect about 1/2”


under 5-lbs of force. Do


not “roll” belts over pulleys


5. Blown gaskets

5. Replace any gaskets


proven faulty on inspection


6. Low compression

6. Low pressure can be due


to worn rings and cylinder


walls. Correction is made


by replacing the rings,


cylinders, and pistons as


required


TROUBLE

PROBABLE CAUSE

REMEDY


Overheating

1. Poor ventilation

1. Relocate the compressor


to an area where an ample


supply of cool, clean, dry


and well-circulated air is


available


2. Dirty cooling surfaces

2. Clean the cooling surfaces


of pump and motor/engine


Excessive belt wear

1. Pulley out of alignment

1. Realign engine pulley with


compressor pulley


2. Belt too loose or too tight

2. Adjust tension (See Drive


Belt Section)


3. Belt slipping

3. Adjust tension or replace


belt (See Drive Belt


Section)


4. Pulley wobbles

4. Check for worn crankshaft,


keyway or pulley bore


resulting from running the


compressor or motor with


loose pulleys. Check for


bent pulleys or bent crank-


shaft


Unit stalls

1. Low engine idle

1. Increase idle, refer to


engine manual for details


2. Improper lubrication

2. See LUBRICATION, under


Assembly


3. Low oil level

3. Check oil level. Fill if nec-


essary


4. Defective unloader valve

4. Replace


Excessive noise

1. Loose engine or com-

1. Loose engine or compres-

(knocking)

pressor pulley

sor pulleys are a very com-


mon cause of compressors


knocking. Tighten pulley


clamp bolts and set-screws


2. Lack of oil in crankcase

2. Check for proper oil level; if


low, check for possible


damage to bearings. Dirty


oil can cause excessive


wear


3. Worn connecting rod

3. Replace connecting rod


4. Worn piston pin bushing

4. Remove piston assemblies


from the compressor and


inspect for excess wear.


Replace excessively worn


piston pin or pistons, as


required


16

17

Page 9
Image 9
RIDGID GP90135 Troubleshooting, Be sure that the old head, Gasket is replaced with a, New one each time, Head is removed

GP90135 specifications

The RIDGID GP90135 is a remarkable piece of equipment, designed to meet the rigors of both professional and DIY projects. Its innovative design and robust functionality make it an indispensable tool for plumbers, contractors, and home improvement enthusiasts alike.

One of the standout features of the GP90135 is its powerful performance. With a high-efficiency motor, this tool delivers robust torque and consistent power, ensuring that it can tackle even the toughest tasks with ease. This is particularly important when dealing with a variety of materials, as it allows for a smoother and more efficient workflow.

Another notable characteristic of the GP90135 is its advanced ergonomic design. RIDGID has prioritized user comfort, which is evident in the tool's lightweight construction and well-placed handles. These features reduce operator fatigue during extended use, making it more manageable for users to carry out demanding projects without discomfort.

The GP90135 also incorporates advanced technologies to enhance usability. Its built-in LED indicators provide real-time information on operation status, allowing users to manage their work effectively. This feature is invaluable when operating in low-light conditions or tight spaces where visibility is often compromised.

In terms of versatility, the RIDGID GP90135 is equipped with adjustable speed settings, enabling users to tailor the tool’s performance to specific tasks. Whether it’s drilling through tougher materials or making precision cuts, this tool provides the flexibility needed to achieve the best results.

Durability is another key characteristic of the GP90135. Constructed from high-quality materials, it is designed to withstand the wear and tear of daily use in demanding environments. This reliability not only extends the life of the tool but also ensures that it consistently performs at a high level.

Maintenance is simplified with the GP90135 as well. Its user-friendly design allows for easy access to essential components, ensuring that users can keep the tool in top condition with minimal effort.

Overall, the RIDGID GP90135 combines power, versatility, and ease of use. Its advanced features and technologies cater to the needs of a wide range of users, making it a valuable addition to any toolkit. Whether for professional applications or home improvement tasks, the GP90135 stands out as a reliable and effective solution.