ASSEMBLY
UNPACKING
This product requires assembly.
Carefully remove the product and any accessories from the box. Make sure that all items listed in the packing list are included.
Inspect the product carefully to make sure no breakage or damage occurred during shipping.
Do not discard the packing material until you have care- fully inspected and satisfactorily operated the product.
If any parts are damaged or missing, please call
PACKING LIST
Drywall Screwdriver with Magnetic Bit Holder and #2 Phillips Bit installed
R2 Square Recess Screwdriver Bit Operator’s Manual
![]() WARNING:
WARNING:
If any parts are damaged or missing do not operate this product until the parts are replaced. Failure to heed this warning could result in serious personal injury.
![]() WARNING:
WARNING:
Do not attempt to modify this product or create accessories not recommended for use with this product. Any such alteration or modification is misuse and could result in a hazardous condition leading to possible serious personal injury.
ADJUSTING
PULL TO REMOVE SLEEVE
ADJUSTABLE
NOSEPIECE
1/4 in. PHILLIPS
SCREWDRIVER BIT
![]() WARNING:
WARNING:
Do not connect to power supply until assembly is complete. Failure to comply could result in accidental starting and possible serious personal injury.
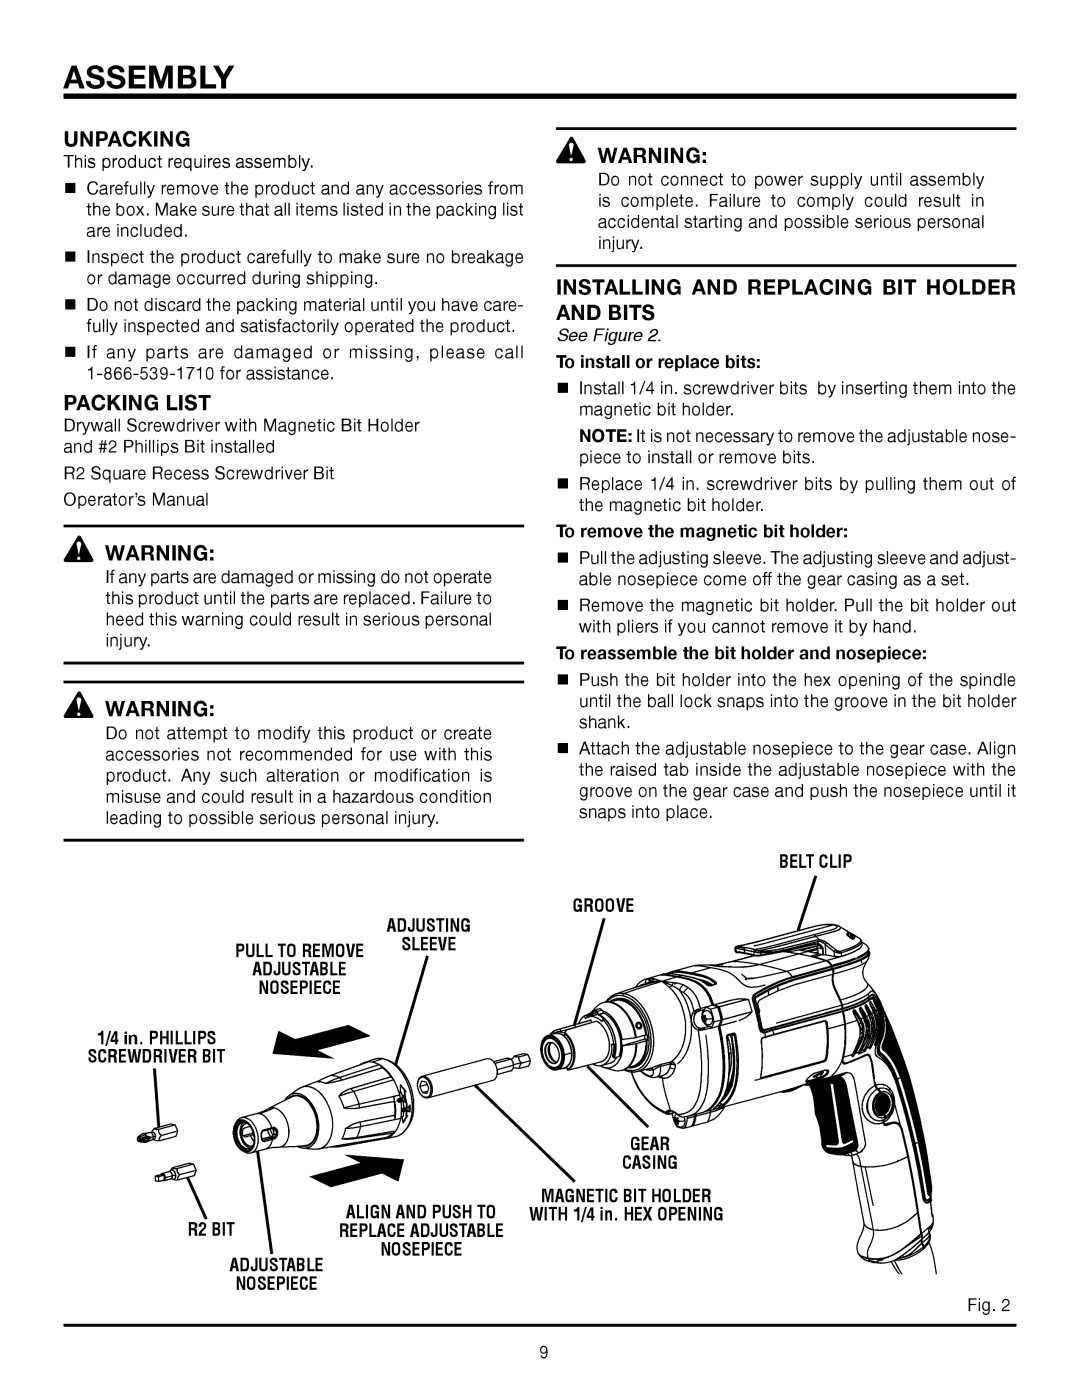
INSTALLING AND REPLACING BIT HOLDER AND BITS
See Figure 2.
To install or replace bits:
Install 1/4 in. screwdriver bits by inserting them into the magnetic bit holder.
NOTE: It is not necessary to remove the adjustable nose- piece to install or remove bits.
Replace 1/4 in. screwdriver bits by pulling them out of the magnetic bit holder.
To remove the magnetic bit holder:
Pull the adjusting sleeve. The adjusting sleeve and adjust- able nosepiece come off the gear casing as a set.
Remove the magnetic bit holder. Pull the bit holder out with pliers if you cannot remove it by hand.
To reassemble the bit holder and nosepiece:
Push the bit holder into the hex opening of the spindle until the ball lock snaps into the groove in the bit holder shank.
Attach the adjustable nosepiece to the gear case. Align the raised tab inside the adjustable nosepiece with the groove on the gear case and push the nosepiece until it snaps into place.
BELT CLIP
GROOVE
|
| GEAR |
|
| CASING |
| ALIGN AND PUSH TO | MAGNETIC BIT HOLDER |
R2 BIT | WITH 1/4 in. HEX OPENING | |
REPLACE ADJUSTABLE |
| |
ADJUSTABLE | NOSEPIECE |
|
|
| |
NOSEPIECE |
|
|
Fig. 2
9