227505EM1 V.qxd 6/25/05 8:22 Page 5
HOW TO DETERMINE WHICH CUTTER TO USE
These are only a few suggestions. Choose the cutter to fit your personal tastes or recipes.
GRINDING CUTTER
For finely ground texture: to make pâtés, spreads, hamburger, chopped liver, baby food, etc.
CHOPPING CUTTER
For coarsely ground texture: vegetables, coarsely chopped beef for chili or soups, relishes, etc.
HOW TO ASSEMBLE YOUR FOOD GRINDER
NOTE: Before using first time, disassemble and wash GRINDING CHUTE parts thoroughly. See page 5 for cleaning instructions.
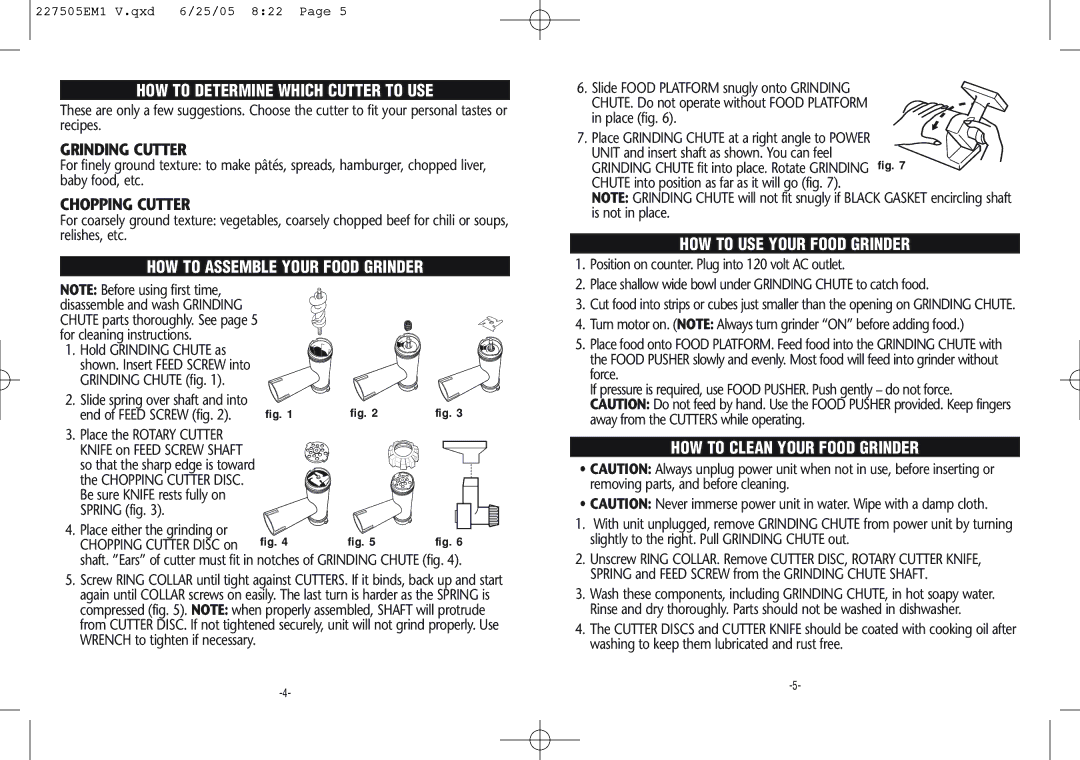
1. Hold GRINDING CHUTE as shown. Insert FEED SCREW into GRINDING CHUTE (fig. 1).
2. | Slide spring over shaft and into | fig. 1 | fig. 2 | fig. 3 |
| end of FEED SCREW (fig. 2). | |||
3. | Place the ROTARY CUTTER |
|
|
|
| KNIFE on FEED SCREW SHAFT |
|
|
|
| so that the sharp edge is toward |
|
|
|
| the CHOPPING CUTTER DISC. |
|
|
|
| Be sure KNIFE rests fully on |
|
|
|
| SPRING (fig. 3). |
|
|
|
4. | Place either the grinding or | fig. 4 | fig. 5 | fig. 6 |
| CHOPPING CUTTER DISC on |
shaft. ”Ears” of cutter must fit in notches of GRINDING CHUTE (fig. 4).
5.Screw RING COLLAR until tight against CUTTERS. If it binds, back up and start again until COLLAR screws on easily. The last turn is harder as the SPRING is compressed (fig. 5). NOTE: when properly assembled, SHAFT will protrude from CUTTER DISC. If not tightened securely, unit will not grind properly. Use WRENCH to tighten if necessary.
6.Slide FOOD PLATFORM snugly onto GRINDING CHUTE. Do not operate without FOOD PLATFORM in place (fig. 6).
7.Place GRINDING CHUTE at a right angle to POWER
UNIT and insert shaft as shown. You can feel
GRINDING CHUTE fit into place. Rotate GRINDING fig. 7 CHUTE into position as far as it will go (fig. 7).
NOTE: GRINDING CHUTE will not fit snugly if BLACK GASKET encircling shaft is not in place.
HOW TO USE YOUR FOOD GRINDER
1.Position on counter. Plug into 120 volt AC outlet.
2.Place shallow wide bowl under GRINDING CHUTE to catch food.
3.Cut food into strips or cubes just smaller than the opening on GRINDING CHUTE.
4.Turn motor on. (NOTE: Always turn grinder “ON” before adding food.)
5.Place food onto FOOD PLATFORM. Feed food into the GRINDING CHUTE with the FOOD PUSHER slowly and evenly. Most food will feed into grinder without force.
If pressure is required, use FOOD PUSHER. Push gently – do not force. CAUTION: Do not feed by hand. Use the FOOD PUSHER provided. Keep fingers away from the CUTTERS while operating.
HOW TO CLEAN YOUR FOOD GRINDER
•CAUTION: Always unplug power unit when not in use, before inserting or removing parts, and before cleaning.
•CAUTION: Never immerse power unit in water. Wipe with a damp cloth.
1.With unit unplugged, remove GRINDING CHUTE from power unit by turning slightly to the right. Pull GRINDING CHUTE out.
2.Unscrew RING COLLAR. Remove CUTTER DISC, ROTARY CUTTER KNIFE, SPRING and FEED SCREW from the GRINDING CHUTE SHAFT.
3.Wash these components, including GRINDING CHUTE, in hot soapy water. Rinse and dry thoroughly. Parts should not be washed in dishwasher.
4.The CUTTER DISCS and CUTTER KNIFE should be coated with cooking oil after washing to keep them lubricated and rust free.
