SERVICE AND ADJUSTMENTS

SIDE-TO-SIDE ADJUSTMENT (See Figs. 16 and 17)

Raise mower to its highest position.

At the midpoint of both sides of mower, measure height from bottom edge of mower to ground. Distance “A” on both sides of mower should be the same or within 1/4" of each other.

If adjustment is necessary, make adjustment on one side of mower only.

To raise one side of mower, tighten lift link adjustment nut on that side.

To lower one side of mower, loosen lift link adjustment nut on that side.

NOTE: Three full turns of adjustment nut will change mower height about 1/8".

Recheck measurements after adjusting.

BOTTOM EDGE OF


BOTTOM EDGE

MOWER


OF MOWER

TO GROUND


TO GROUND

“A”

GROUND LINE

“A”

FIG. 16

SUSPENSION ARM

LIFT LINK ADJUSTMENT NUT

FIG. 17

FRONT-TO-BACK ADJUSTMENT (See Figs. 18 and 19)

IMPORTANT: DECK MUST BE LEVEL SIDE-TO-SIDE. IF THE FOLLOWING FRONT-TO-BACK ADJUSTMENT IS NECESSARY, BE SURE TO ADJUST BOTH FRONT LINKS EQUALLY SO MOWER WILL STAY LEVEL SIDE-TO-SIDE.

To obtain the best cutting results, the mower housing should be adjusted so that the front is approximately 1/8" to 1/2" lower than the rear when the mower is in its high- est position.

Check adjustment on right side of tractor. Measure distance “D” directly in front and behind the mandrel at bottom edge of mower housing as shown.

Before making any necessary adjustments, check that both front links are equal in length.

If links are not equal in length, adjust one link to same length as other link.

To lower front of mower loosen nut “E” on both front links an equal number of turns.

When distance “D” is 1/8" to 1/2" lower at front than rear, tighten nuts “F” against trunnion on both front links.

To raise front of mower, loosen nut “F” from trunnion on both front links. Tighten nut “E” on both front links an equal number of turns. The two front links must remain equal in length.

When distance “D” is 1/8" to 1/2" lower at front than rear, tighten nut “F” against trunnion on both front links.

Recheck side-to-side adjustment.

MANDREL

"D"

"D"

FIG. 18

BOTH FRONT LINKS MUST BE EQUAL IN LENGTH

NUT "F"

NUT "E"

TRUNNION

FRONT LINKS

FIG. 19

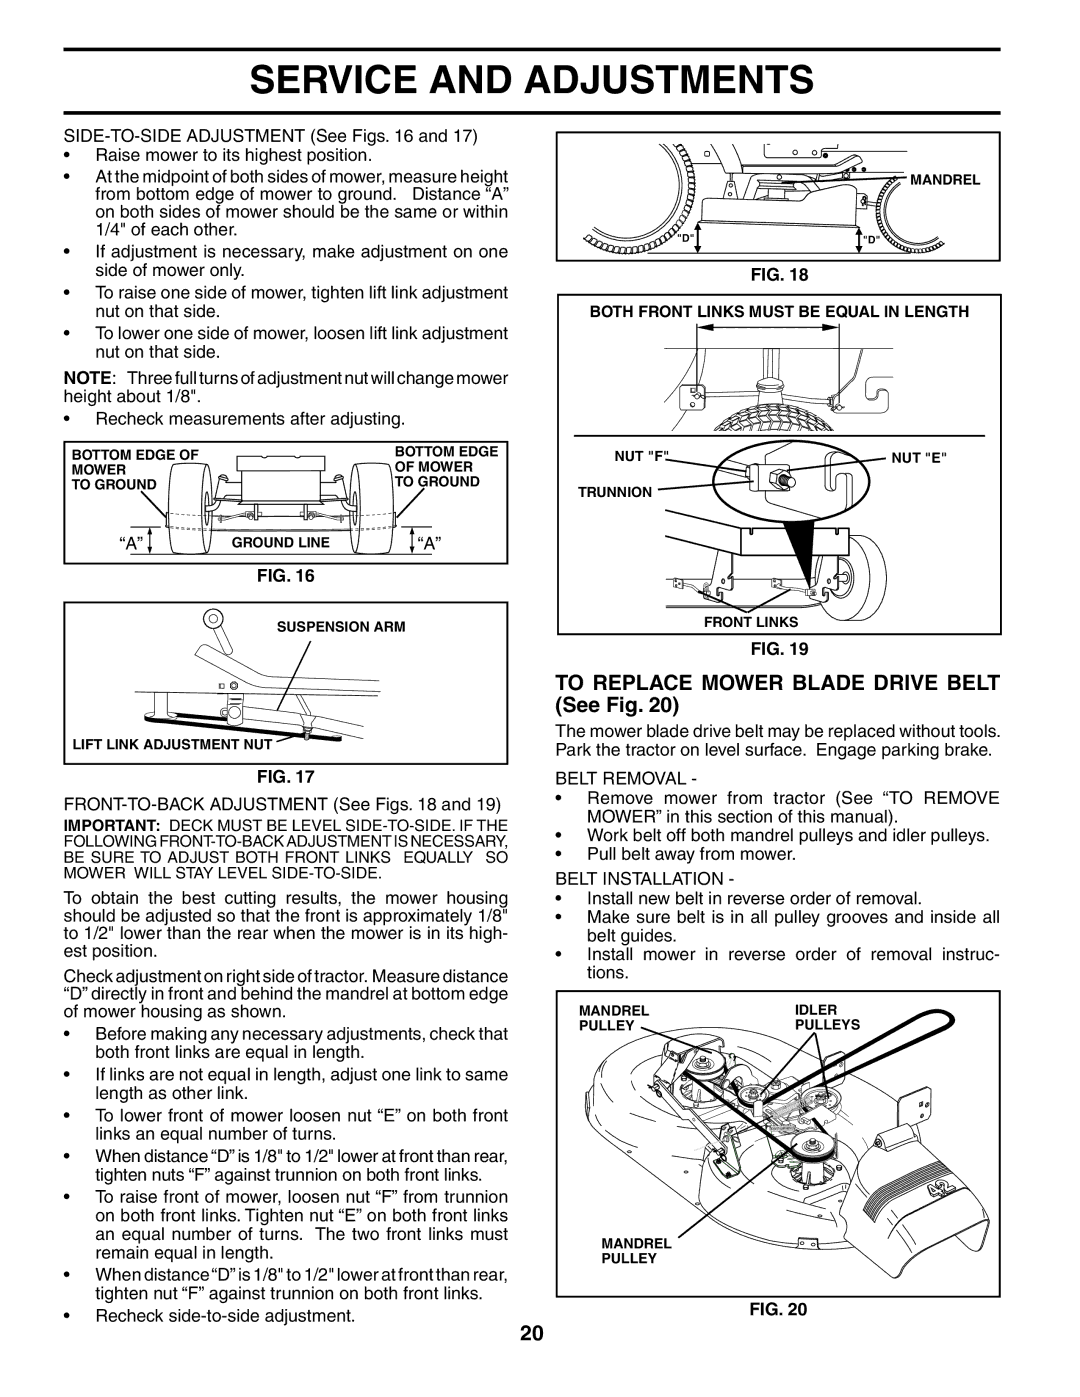
TO REPLACE MOWER BLADE DRIVE BELT (See Fig. 20)

The mower blade drive belt may be replaced without tools. Park the tractor on level surface. Engage parking brake.

BELT REMOVAL -

Remove mower from tractor (See “TO REMOVE MOWER” in this section of this manual).

Work belt off both mandrel pulleys and idler pulleys.

Pull belt away from mower.

BELT INSTALLATION -

Install new belt in reverse order of removal.

Make sure belt is in all pulley grooves and inside all belt guides.

Install mower in reverse order of removal instruc- tions.

MANDREL

IDLER

PULLEY

PULLEYS

MANDREL


PULLEY


FIG. 20

20

Page 20
Image 20
Ryobi 197788 manual To Replace Mower Blade Drive Belt See Fig, Belt Removal, Belt Installation

197788 specifications

The Ryobi 197788 is a versatile and innovative tool that caters to the needs of both DIY enthusiasts and professional contractors. This battery-operated, compact tool is designed to deliver outstanding performance in a variety of applications, making it a go-to choice for anyone looking to complete tasks efficiently and effectively.

One of the standout features of the Ryobi 197788 is its brushless motor technology. This advanced motor not only increases the tool's efficiency but also enhances its longevity. Brushless motors are known for producing less heat and requiring less maintenance, which translates to greater reliability during use. The powerful motor ensures that users can tackle even the most demanding projects without compromising performance.

The Ryobi 197788 is equipped with a variable speed trigger, allowing users to adjust the speed according to the specific requirements of the task at hand. This feature provides enhanced control whether drilling, driving, or screwing. Additionally, the tool boasts an ergonomic design, featuring a comfortable grip that reduces fatigue during extended use. This important characteristic makes the Ryobi 197788 an excellent choice for those tackling large jobs or working in tight spaces.

Another remarkable aspect of the Ryobi 197788 is its compatibility with the Ryobi ONE+ battery system. This system allows users to interchange batteries across a wide range of tools, which saves time and money. The included battery is designed for maximum runtime, providing ample power to keep you going without frequent interruptions.

The Ryobi 197788 is also equipped with built-in LED lighting, ensuring that users can work in low-light conditions without sacrificing visibility. The integrated lights illuminate the work area, allowing for precise work even in dimly lit environments. This feature is particularly useful for those who often find themselves working in garages, attics, or sheds.

Additionally, the tool’s compact size allows for easy maneuverability and storage. Weighing in at a lightweight design, the Ryobi 197788 can easily be transported to different job sites without causing strain.

In summary, the Ryobi 197788 is a powerful and efficient tool that combines advanced technologies with user-friendly features. Its brushless motor, variable speed trigger, ergonomic design, battery compatibility, and built-in LED lighting make it a reliable option for a diverse range of applications. Whether you are a seasoned professional or a DIY novice, this tool can significantly enhance your productivity and make your projects more enjoyable.