OPERATION
BLADE AND HEX KEY STORAGE
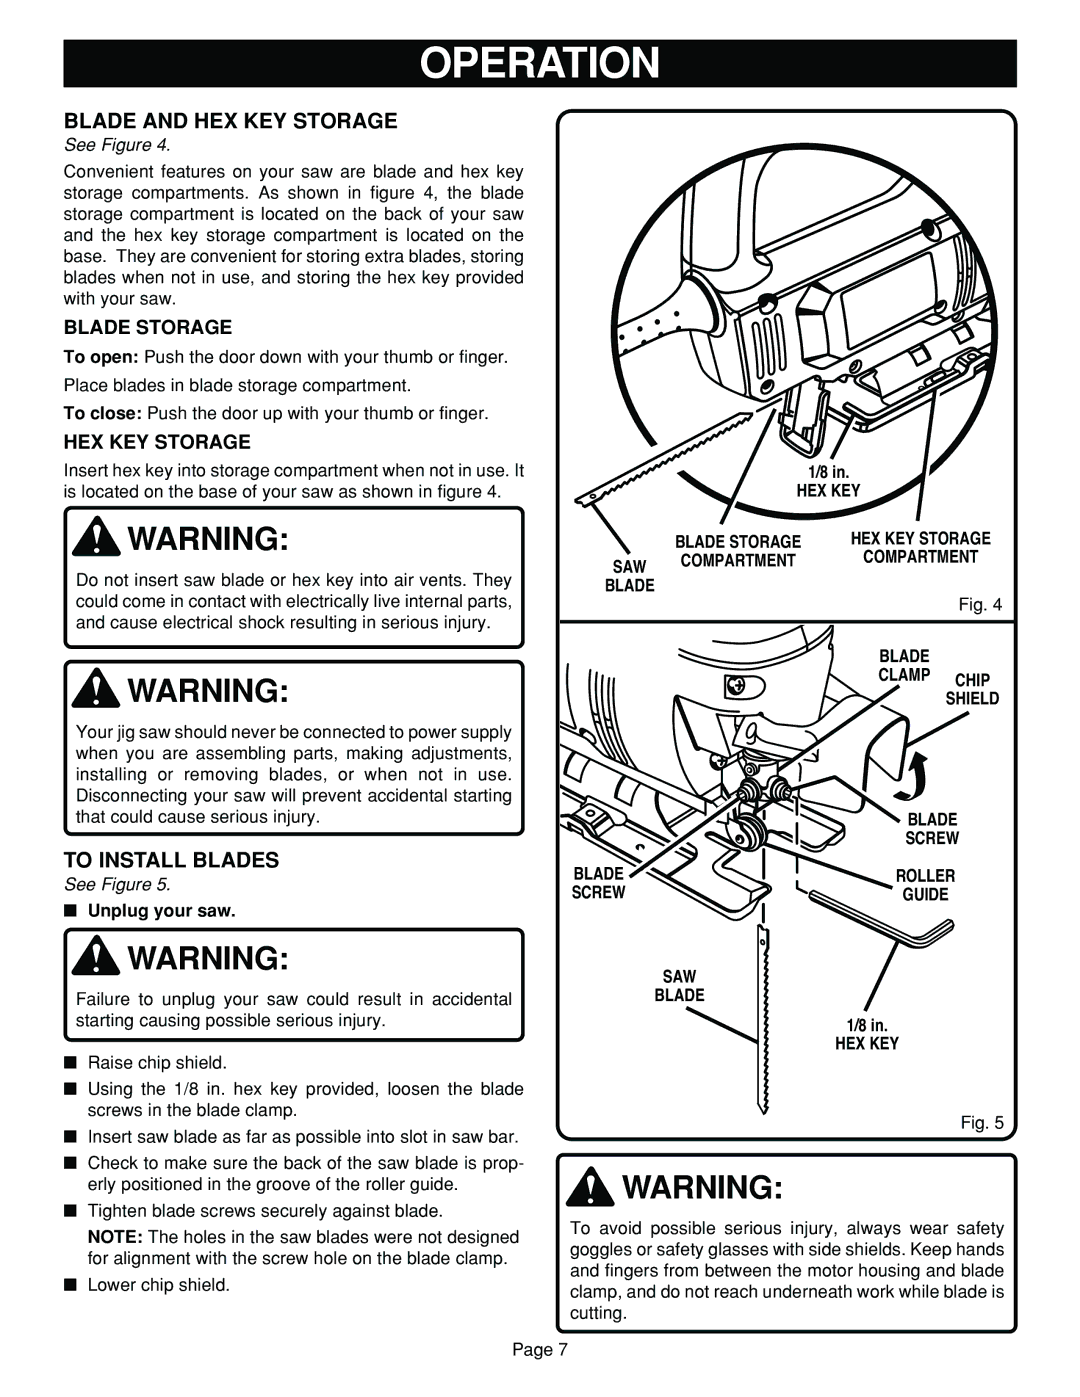
See Figure 4.
Convenient features on your saw are blade and hex key storage compartments. As shown in figure 4, the blade storage compartment is located on the back of your saw and the hex key storage compartment is located on the base. They are convenient for storing extra blades, storing blades when not in use, and storing the hex key provided with your saw.
BLADE STORAGE
To open: Push the door down with your thumb or finger.
Place blades in blade storage compartment.
To close: Push the door up with your thumb or finger.
HEX KEY STORAGE
Insert hex key into storage compartment when not in use. It is located on the base of your saw as shown in figure 4.
![]() WARNING:
WARNING:
Do not insert saw blade or hex key into air vents. They could come in contact with electrically live internal parts, and cause electrical shock resulting in serious injury.
![]() WARNING:
WARNING:
Your jig saw should never be connected to power supply when you are assembling parts, making adjustments, installing or removing blades, or when not in use. Disconnecting your saw will prevent accidental starting that could cause serious injury.
TO INSTALL BLADES
See Figure 5.
■Unplug your saw.
1/8 in.
HEX KEY
| BLADE STORAGE | HEX KEY STORAGE |
SAW | COMPARTMENT | COMPARTMENT |
|
| |
BLADE |
| Fig. 4 |
|
| |
|
| BLADE |
|
| CLAMP CHIP |
|
| SHIELD |
BLADE
SCREW
BLADE | ROLLER |
SCREW | GUIDE |
WARNING: | SAW |
Failure to unplug your saw could result in accidental | BLADE |
starting causing possible serious injury. | 1/8 in. |
| HEX KEY |
■Raise chip shield.
■Using the 1/8 in. hex key provided, loosen the blade
| screws in the blade clamp. | Fig. 5 | |
■ | Insert saw blade as far as possible into slot in saw bar. | ||
| |||
■ Check to make sure the back of the saw blade is prop- | WARNING: | ||
| erly positioned in the groove of the roller guide. | ||
|
| ||
■ Tighten blade screws securely against blade. | To avoid possible serious injury, always wear safety | ||
| NOTE: The holes in the saw blades were not designed | ||
| goggles or safety glasses with side shields. Keep hands | ||
| for alignment with the screw hole on the blade clamp. | ||
| and fingers from between the motor housing and blade | ||
■ | Lower chip shield. | ||
clamp, and do not reach underneath work while blade is | |||
|
| ||
cutting.
Page 7
