„Blu-ray diskų grotuvas su įmontuotu kietuoju disku
Pagrindinės savybės
„Blu-ray diskų savybės
„Blu-ray diskų grotuvo su įmontuotu Kietuoju disku savybės
Įspėjimas
Saugumo informacija
Susijusias su prietaiso naudojimo
Smūgio ar susižeidimo pavojų
Diskų naudojimas
Svarbūs saugumo nurodymai
Atsargumo priemonės
Diskų saugojimas ir naudojimas
Įspėjimai dėl naudojimo
Diskų saugojimas
Korpuso priežiūra
Peržiūros apribojimai
Turinys
Nustatymai Pagrindinės Funkcijos
Pažangios Funkcijos
Kaip padalinti skyrių į dvi dalis
Pažangios Funkcijos Priedas
Diskų tipai ir atkuriamas turinys
Pradžia
Diskų tipai, kurių negalima atkurti
Prieš pradedant naudotis šia instrukcija
Diskų tipai
„Blu-ray diskų suderinamumas
Garso CD CD-DA
Įrašymo į HDD trukmė
Palaikomi bylų formatai
Pastabos apie USB jungiamumą
Palaikomos vaizdo bylos
ASF
Wmv
WMA
VOB
Autorių teisės
Regiono kodas
Palaikomos muzikos rinkmenos
Avchd „Advanced Video Codec High Definition
Šis įrenginys nepalaiko USB „flash atminties
Atkuriamų diskų logotipai
Priedai
BD-LIVE
ATKŪRIMO/PAUZĖS
Priekinis skydelis
ANT
Galinis skydelis
Nuotolinio valdymo pultas
Susipažinimas su nuotolinio valdymo pultu
Kaip įdėti baterijas
Dėmesio
TV Power
Nuotolinio valdymo pulto nustatymas Valdomi TV kodai
TV Mute
Prijunkite RF laidą, kaip parodyta
Sujungimai
Antžeminė Antena RF Laidas
Garso/Vaizdo laidas
Hdmi kabelis nepridedamas
Prijungimas prie televizoriaus
Raudonas Baltas Raudonas Mėlynas Žalias
TV šaltinį Garso kabeliai
Būdas Prijungimas prie televizoriaus vaizdas Gera kokybė
Kairysis/baltas terminalu
Raudona Balta Geltona
Prijungimas prie garso sistemos
Raudonas Baltas
Prisijungimas prie tinklo
Kabelinis tinklas
Arba
Paslauga Tinklas su kompiuteriu, galima „AllShare funkcija
Tinklas su kompiuteriu
Belaidis tinklas
„AllShare funkcija Galima
WPA2-PSK Tkip / AES
Nustatymų „Settings meniu įjungimas
Nustatymai
Prieš pradedant „Plug & Play
Kanalų sąrašas
TV žiūrėjimas „Watch TV
Kanalų sąrašas
Kanalų valdymas
Kanalų valdymo langas
Kaip naudotis Tools mygtuku
Nustatymai
Ekranas
3D nustatymai
33D „Blu-ray disko atkūrimo režimas
„Smart Hub ekrano dydis
Ekrano formatas
„BD Wise funkcija Tik Samsung įrenginiuose
Raiška
„720p
1080p@60F 576i/480i
„576p/480p
„576i/480i
DTV išmanioji raiška
Kadrų skaičius 24Ks
Hdmi spalvų formatas
„Still režimas
Hdmi „Deep Color
Skaitmeninė išvestis
„Progressive režimas
Skaitmeninės išvesties pasirinkimas
Bitų srautas
„Dolby Digital
PCM diskretizavimo dažnio mažinimas
Dinaminio diapazono valdymas
„Downmixing režimas
Kanalai
Paieška kabeliniame tinkle
Rankinė paieška
Budėjimo režimo automatinis nustatymas
Kanalų sąrašo perkėlimas
Tinklas
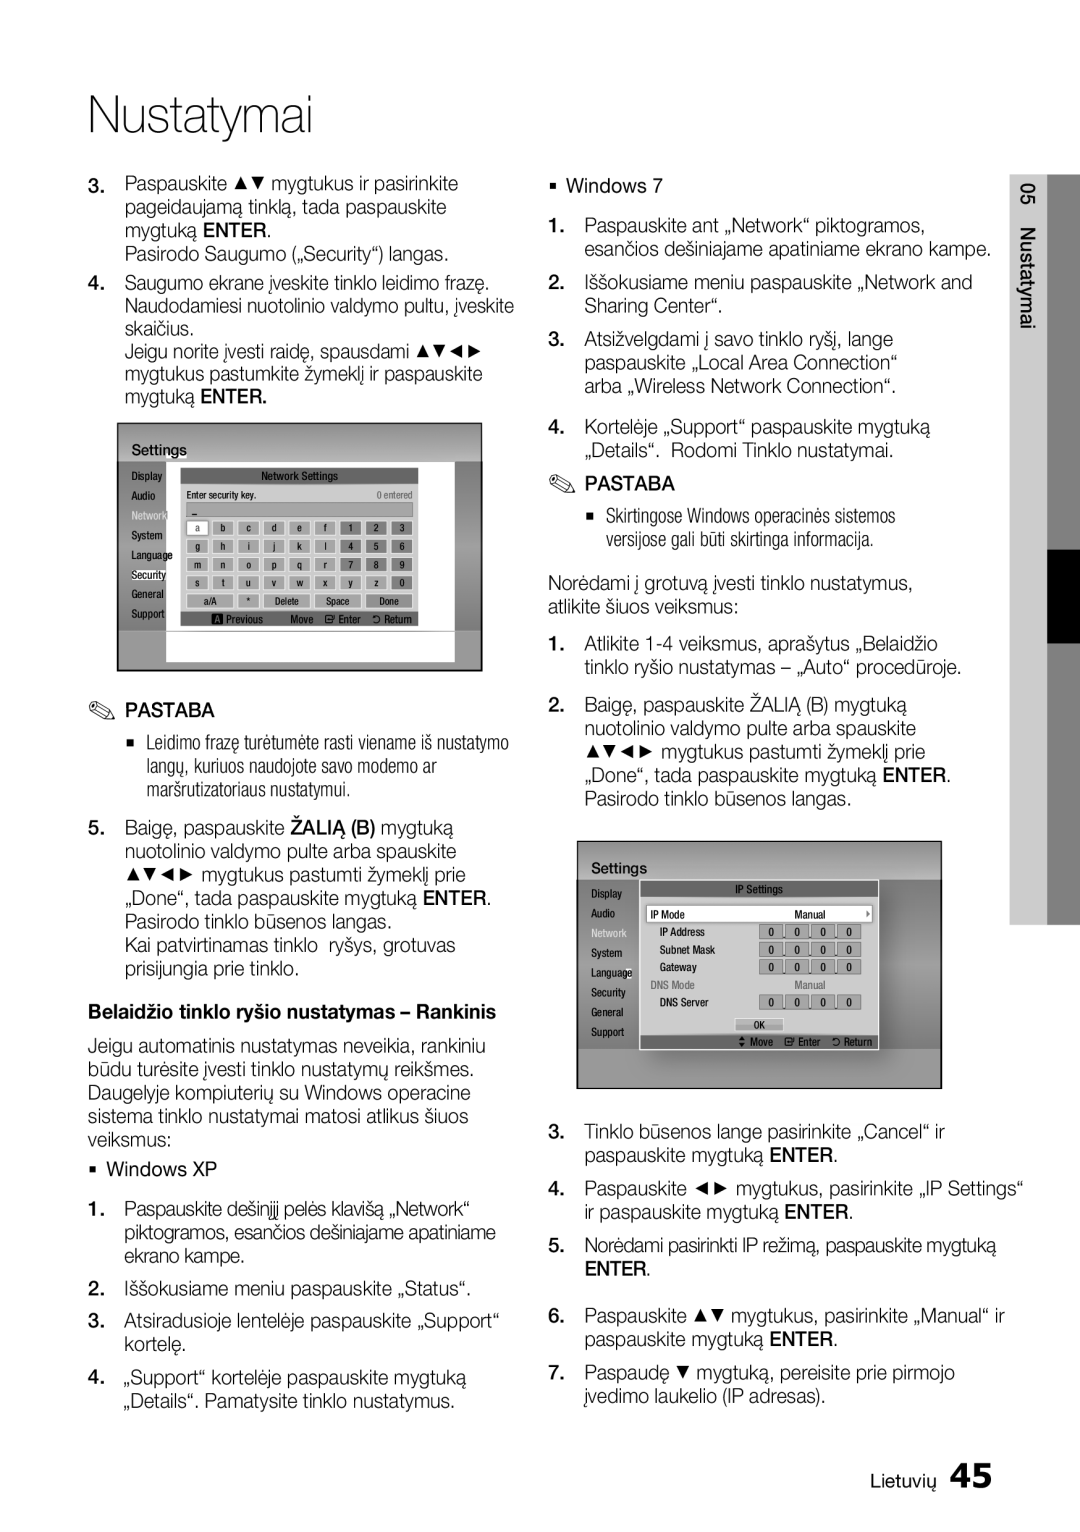
Tinklo nustatymai
Laidinis tinklas
Laidinio tinklo nustatymas Auto
Belaidis tinklas
Paspauskite mygtukus ir pasirinkite „Wireless General
Norėdami pasirinkti IP režimą, paspauskite mygtuką Enter
Belaidžio tinklo ryšio nustatymas Auto
Esančios dešiniajame apatiniame ekrano kampe
Windows Paspauskite ant „Network piktogramos
Tinklo būsena
„One Foot Connection funkcija
Paspauskite mygtuką Enter
Pradiniai nustatymai
„BD-LIVE internetinis ryšys
„Anynet+HDMI-CEC funkcija
BD duomenų valdymas
DivX „Video-On-Demand
Laiko juosta
Atstatymas
BD tėvų kontrolė
Nuotolinis valdymas tinkle Programinės įrangos atnaujinimas
Priekinis ekranas
Bendras Palaikymas
Internetu
Per USB
Disko pagalba
Atsiuntimas budėjimo režime
Susisiekite su Samsung
3D keitiklis
Atkūrimas
Disko sandara
Vaizdo įrašų atkūrimas
Kaip naudotis Pavadinimų meniu
Kaip naudotis Disko meniu
Pavadinimų sąrašo atkūrimas
Turinio meniu naudojimas
Sulėtinta peržiūra Peržiūra po kardą
Kaip naudotis Tools mygtuku
BD-ROM / DVD
Atkūrimo metu paspauskite mygtuką Tools
„Dynamic sustiprinamas vaizdo aiškumas
„Normal pasirinkite šį nustatymą daugeliui įprastų vaizdų
Garso kalbos pasirinkimas
Subtitrų kalbos pasirinkimas
Tools
Bonusview nustatymas
Informacijos pasirinkimas
Garso CD CD-DA/MP3 atkūrimas
Muzikos klausymas
AMG funkcija
Garso CD CD-DA/MP3 kartojimas
Grojaraštis
Nuotraukų peržiūra
Jpeg bylų atkūrimas
Norėdami įeiti į muzikos sąrašą, paspauskite Return mygtuką
Įdėkite diską su Jpeg bylomis į disko stalčių
Atkūrimas iš prijungto USB įrenginio
Skaidrių peržiūros „Slide Show funkcija
Paspauskite mygtuką Tools
Pradedama skaidrių peržiūra
Vaizdo nustatymai
Skaitmeninės televizijos funkcijos
Ekranas
Kaip naudoti Tools mygtuką
„Dual I II pasirinkimas
Signalo informacija
Pasirinkto kanalo užrakinimas
Išsaugoti kaip mėgstamą
Laiko valdymas
Langas „Vedlys
Enter mygtukas
Paspauskite mygtuką ir pasirinkite
Skaitmeninės televizijos Žiūrėjimas su 3D efektais
Atšaukti ar redaguoti programavimą
Raudoną a mygtuką Paspauskite mygtuką Enter
Lange „Vedlyje paspauskite Raudoną a mygtuką
Įprastinis teleteksto puslapis
Teleteksto paslaugos naudojimas
Rodomo televizijos kanalo įrašymas
Pažangios funkcijos
Įrašymas
Laikinas įrašymo sustabdymas
Kitų kanalų žiūrėjimas programos įrašymo metu
Disko atkūrimas televizijos programos įrašymo metu
Laiko keitimo „Time Shift funkcija
Kaip sustabdyti laiko keitimo „Time Shift funkciją
Informacija apie „Time Shift funkciją
Įrašo atkūrimas
Rodoma judėjimo juosta
Kaip padalinti skyrių į dvi dalis
Naujo pavadinimo priskyrimas įrašui
Kaip padalinti skyrių dalinis pašalinimas
Įrašo pavadinimo keitimas
Garso CD CD-DA disko išarchyvavimas
Vaizdo įrašo, muzikos ar nuotraukų kopijavimas
Kopijavimas
USB
„Smart Hub paslaugos naudojimas
Tinklo paslaugos
Pirmą kartą
„Smart Hub naudojimas
Kai kuriose šalyse siuntimas negalimas
Apie „Smart Hub trumpai
Rekomenduojamas turinys
„My Applications rodoma asmeninė jūsų
Pagalbinės klaviatūros naudojimas
Prieigos sukūrimas
Teksto, skaičių ir simbolių įvedimas
Nustatymų meniu Mėlynas D
Prisijungimas
Prieigos valdymas
Paslaugos prieigos registravimas
Atstatymas
Slaptažodžio keitimas
Paslaugų prieigos pašalinimas
Savybės
Redagavimo režimo meniu
Perkėlimas
Perkėlimas į katalogą
Katalogo pervadinimas
Naujas katalogas
Užrakinimas
Uždarykite redagavimo režimo meniu
Atrakinimas
Mokamos programos
„Samsung Apps
Pašalinimas
Mano prieiga
Kaip naudotis „Samsung Apps „Samsung Apps pagal kategorijas
Pagalba
Rūšiavimo kortelės
Automatinis išsaugojimas
Kaip naudotis „AllShare funkcija
Gedimų nustatymas
Priedas
Užmiršote slaptažodį
Problemą. Atlikite nustatytuosius veiksmus dar kartą
Aptarnavimo centrą
Pažiūrėkite, ar diskas švarus ir nesubraižytas
Kaip žiūrėti 3D televizorių
Taisymas
Techniniai duomenys
Pastaba dėl atitikties ir suderinamumo
Lietuvių
Apsauga nuo kopijavimo
Atsakomybės dėl tinklo paslaugų atsisakymas
Priedas Lietuvių
Licencija
English
Italiano
Suomi
Polski
Hrvatski
86851, San Diego, CA, 92138, USA
העתקה יופסקו
מוצר זה משלב טכנולוגיה קניינית תחת רישיון מטעם תאגיד
אמריקאים ועולמיים אחרים שהתקבלו או שהם עומדים ותלויים
ﺔϴΑήﻌﻟا ﺔϐϠﻟا
Tinklalapis
Valstybė
Garantinė informacija
Tinkamas šio prietaiso baterijų išmetimas