DVD-VR320
Getting Started
Important Note
DVD-Video, Audio-CD
Precaution
Holding discs
DVD-Video
Audio CD
DVD-R Disc Playback and Recording
DVD-RW Disc Playback and Recording
Do not use the following discs
Protection
Contents
Reference
Started
General Features
Before Reading User’s Manual
Recording mode XP high quality mode, SP
Classified as a Date Once, Daily or Weekly
Unpacking
Accessories
If the remote control does not operate properly
Setting the Remote Control
Button Function
Description
Front Panel
Rear Panel
Fan
Timer REC Button
STANDBY/ON Button Number Button IPC Button VCR Button
DVD Button
TV Control Buttons
Quick Overview
Connections
Connecting the Scart Cable
Remove the aerial or network input cable from
Television
Connect this cable to the 75Ω aerial jack marked
Connecting Audio/Video Cable
AV2 in EXT By means of 21-pin Scart Cable
AV1 TV By means of 21-pin Scart Cable
Video output jack on the rear of the DVD
Connecting Video Cable
VIDEOoutput jack on the rear of the DVD
Connect Component video cables between
Component Video OUT jacks on the rear
If your A/V receiver is equipped with a Dolby Digital
Audio settings. See
AV Receiver Connections
Connecting an External Devices
Press this button on the remote control to open
On-Screen Menu Navigation
… / †, œ / √ Buttons
OK Button
Plug & Auto Setup
Select Country using the …† œ √ buttons
Then press OK button
Wait current time and date are displayed
Setting the clock Automatically
Setting the Date and Time
System Setup
Auto Setup
Then press the OK or √ button
Manual Setup
Clearing a Preset Station
If you Then Wish to store
Station displayed
Picture, if necessary
Station press the OK button on the remote control
Press the …† buttons to select Swap
To change the programme number assigned to a
For example, to move a TV station in programme
Setting Up Language Options
Press the …† buttons to select Language, then
Setting Up the Audio Options
Setup
System
Digital Output
3D Noise Reduction Motion adaptive noise reduction
DivXR Registration
TV Aspect
Setting Up the Parental Control
About the Rating Level
Or √ button
Press the …† buttons to select On, then press
Press the …† buttons to select Change
VCR Setting
About the Change Level
Tape Length
Auto Play
Auto Repeat
IPC Intelligent Picture Control
Automatic Chapter
Creator
Press the …† buttons to select System, then
Press the …† buttons to select 6 Hours or
Front Display
Press the REC button to start recording
RGB, then press the OK or √ button
Video Output
Press the …† buttons to select Video Output
Setting up Progressive scan
Component mode
Message Video Output Mode Progressive
Scan will appear
Canceling
Message Video Output Mode Interlace Scan will appear
Do not press the P.SCAN button if you are
Progressive mode. Nothing will be
Before Playing
Region code DVD-Video only
Disc types that can be played
Discs that cannot be played
Playing a Disc
Playback
Using the Search & Skip Functions
Moving to a scene directly using the Anykey
About Anykey
Slow Motion Play Step Motion Play
Slow Motion Play
Repeat Play
Playing Repeatedly Repeat Playback
To return to normal playback
Disc
Using the Subtitle button
Using the Anykey button
Selecting the Subtitle language
Selecting the Audio language
Angle
Using the Angle button
Zooming-In
Press the Clear button to delete the selected bookmark
Playing back a Bookmark
Clearing a Bookmark
Clearing a Marker
Using the Markers
Playing back a Marker
Buttons on the Remote Control used for CD playback
Playing back an Audio CD CD-DA
Audio CD CD-DA Screen Elements
Press the œœ /√√ buttons Fast Play
MP3 Screen Elements
Playing back an MP3 Disc
Playing back an MP3 Disc
Play Option Mode
Repeat mode will be highlighted
Playing back a Picture Disc
LaybackP
OK or √ button
Playing back an MPEG4 Disc
Press the …† buttons to select DivX, then press
Tape VCR Features
Tracking
Press the …† buttons to select Forward Intro
Use scan and play when you don’t know exactly
Variable Search System
Before Recording
Recording
Recordable discs
This recorder can record on the following discs
Recording Mode
DVD-RAM/-RWVR mode
Recording Formats
Unrecordable video
Pausing / Resuming
Content Protection for Recordable Media Cprm
Recording From External Devices
To stop recording
Making a Timer
Recording OTR
Fill in the items using the …†œ √ buttons
If the timer settings overlap
Recording Speed DVD
Recording Speed VCR
Press the …† buttons to select Standard Timer
Record List
With the unit in Stop mode, press the Menu
Press the …† buttons to select the number
Deleting the Scheduled Record List
Currently recording
ShowView code
Using the ShowView Feature
Press the …† buttons to select ShowView
ShowView Extended
Before starting
Special Recording Features
Maximum Recording Time SP vs. LP
Watch a Different Channel
Add Recording Time
Direct copy DVD to VCR
Copy to DVD or VCR
To copy from DVD to VCR
To copy from VCR to DVD
Direct copy VCR to DVD
Playing the Title List
Using the Title List button
Using the Menu button
Editing
Title List Screen Elements
Then press the OK or √ button twice
Press the Stop button to stop playing
Renaming Labeling a Title
Selected title
Diting
Locking Protecting a Title
Deleting a Title
OK button. The key icon on the information
Deleting a Section of a Title
Edit Title List Screen Elements
Advanced Editing
Playlist
Creating a Playlist
Press the OK button at the start point
Edit Playlist screen is displayed
Using the Menu button
Playing Titles in the Playlist
Renaming a Playlist Title
Selected playlist title
Editing a Scene for the Playlist
Press the …†œ √ buttons to select the scene you
Want to play, then press the OK button
Playlist title to be played is selected
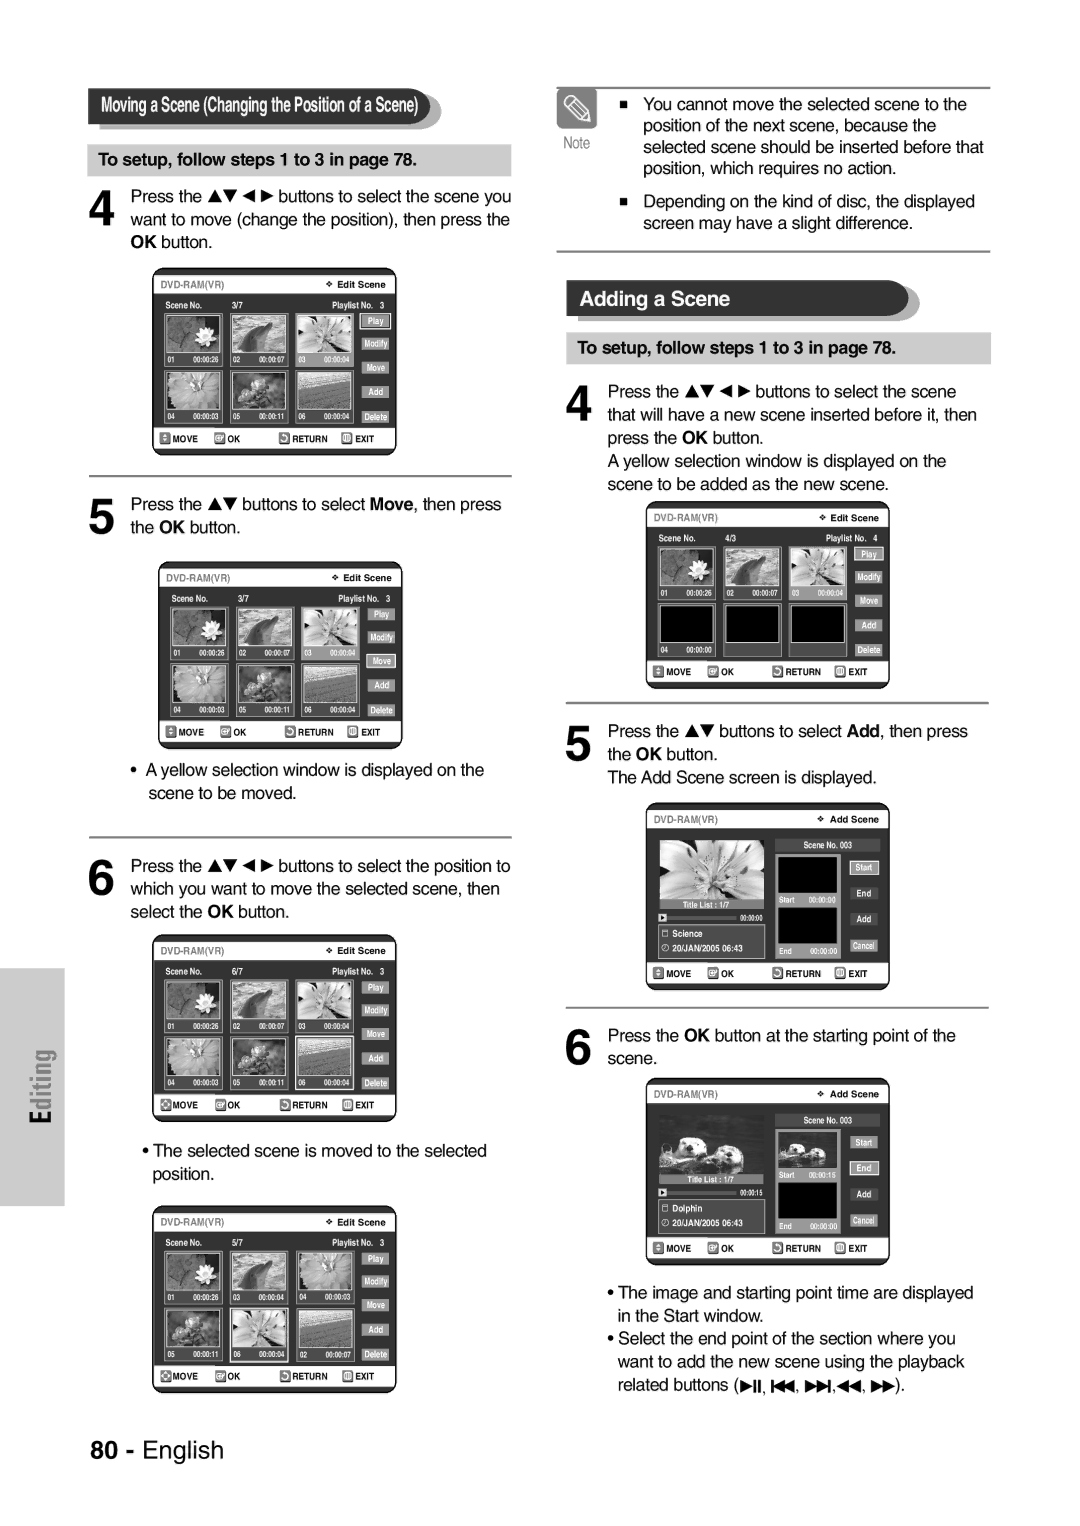
To setup, follow steps 1 to 3
Then press the OK button
OK button
To setup, follow the steps 1 to 3
Copying a Playlist to the VCR
Press the …† œ √ buttons to select the scene you
Want to delete, and then press the OK button
Deleting a Playlist from the Playlist
You may need to clear disc protection before
Disc Manager
Editing the Disc Name
Disc Protection
Formatting a Disc
Press the …† button to select Disc Finalise
DVD-VR mode DVD-V mode
Finalising a Disc
Unfinalising a Disc V/VR mode
Press the …† button to select Disc Unfinalise
If you select Yes, you will be prompted again with
To continue?’
Delete All Title Lists
Lists, then press the OK or √ button
Reference
Reference
For a while when Power turns on Cannot record TV
Timer recording does
No response Forgot the password
Input is displayed
Troubleshooting DVD
Troubleshooting VCR
Check if the safety tab is intact on the cassette
Check the DVD Recorder & VCR antenna connections
Is the DVD Recorder & VCR tuner properly set?
Specifications
General
Input
Audio Output
Ellas Greece