Collegamento a una sorgente di alimentazione

LED di caricamento sull'adattatore


LED di caricamento


In carica

Il LED rosso è acceso


Il caricamento è terminato

Il LED verde è acceso


Errore di caricamento

Il LED rosso è spento o lampeggia


Azzeramento della carica

Il LED arancione è acceso

(tramite l'adattatore)


ATTENZIONE

Prima di collegare il cavo o l'adattatore, controllare il verso dell'inserimento e non cercare di forzare per evitare di danneggiare i cavi o la fotocamera.

Se il LED di ricarica dell'adattatore non si accende né lampeggia dopo aver inserito la batteria, verificare che questa sia stata inserita correttamente.

In caso di ricarica con la fotocamera accesa, non è possibile caricare completamente la batteria. Spegnere la fotocamera durante le operazioni di ricarica.

Quando si inserisce la batteria completamente scarica per ricaricarla, non accendere contemporaneamente la fotocamera. La fotocamera potrebbe non accendersi a causa della carica insufficiente della batteria.

Ènecessario ricaricare la batteria per più di 10 secondi prima di utilizzare nuovamente la fotocamera.

Non usare frequentemente il flash e non filmare dopo aver ricaricato solo per breve tempo una batteria completamente scarica. Anche se il caricabatterie è inserito, la fotocamera potrebbe spegnersi perché la batteria ricaricabile è di nuovo scarica.

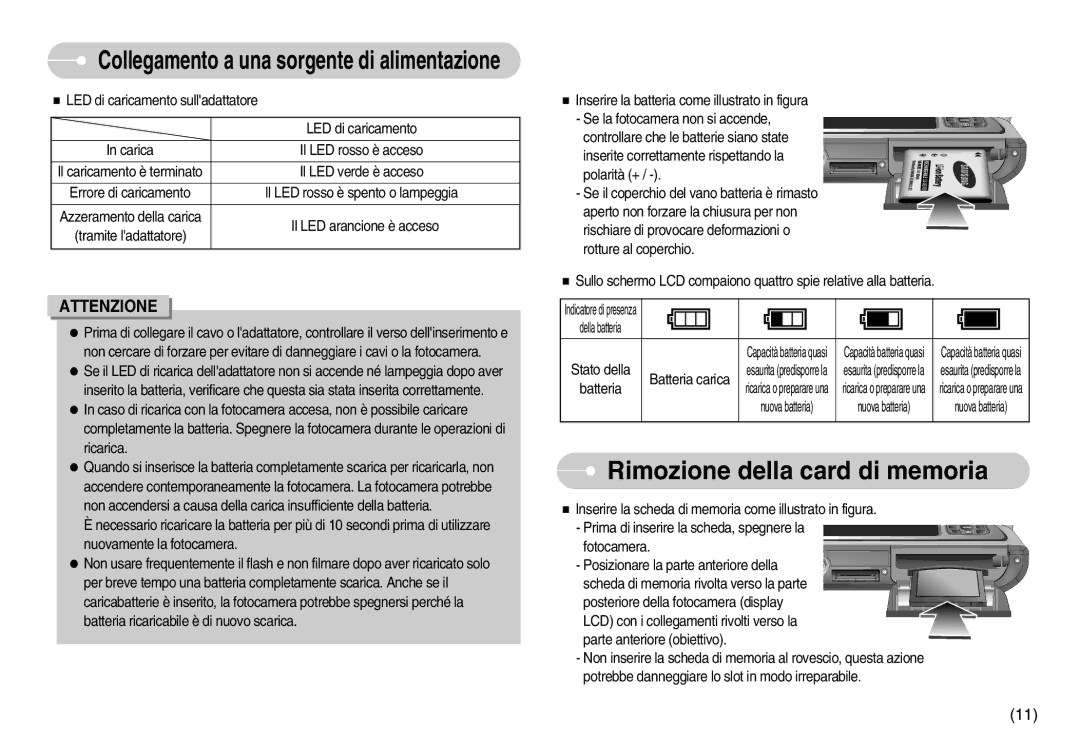
Inserire la batteria come illustrato in figura

- Se la fotocamera non si accende, controllare che le batterie siano state

inserite correttamente rispettando la polarità (+ / -).

- Se il coperchio del vano batteria è rimasto aperto non forzare la chiusura per non rischiare di provocare deformazioni o rotture al coperchio.

Sullo schermo LCD compaiono quattro spie relative alla batteria.

Indicatore di presenza


della batteria


Capacità batteria quasi

Capacità batteria quasi

Capacità batteria quasi

Stato della

Batteria carica

esaurita (predisporre la

esaurita (predisporre la

esaurita (predisporre la

batteria

ricarica o preparare una

ricarica o preparare una

ricarica o preparare una


nuova batteria)

nuova batteria)

nuova batteria)


Rimozione della card di memoria

Inserire la scheda di memoria come illustrato in figura.

- Prima di inserire la scheda, spegnere la fotocamera.

- Posizionare la parte anteriore della scheda di memoria rivolta verso la parte posteriore della fotocamera (display LCD) con i collegamenti rivolti verso la parte anteriore (obiettivo).

-Non inserire la scheda di memoria al rovescio, questa azione potrebbe danneggiare lo slot in modo irreparabile.

(11)

Page 12
Image 12
Samsung EC-L70ZZSBB/E1, EC-L70ZZBBA/DE, EC-L70ZZBBA/E1 manual Rimozione della card di memoria

EC-L70ZZSBB/E1, EC-L70ZZBBA/E1, EC-L70ZZBBA/DE specifications

The Samsung EC-L70ZZBBA/DE and EC-L70ZZSBB/E1 are compact digital cameras designed for users who seek high-quality images in a portable form. These models are particularly appealing for casual photography enthusiasts and travelers, offering an excellent blend of features and technology.

One of the standout attributes of these cameras is their impressive 14-megapixel resolution, which delivers vivid details and clarity. This high resolution ensures that your photographs are sharp and suitable for printing in various sizes without sacrificing quality. The cameras are equipped with a 7x optical zoom lens, allowing users to capture distant subjects with ease. This versatility makes the camera ideal for everything from landscape shots to candid portraits.

Another notable feature is the camera's 2.7-inch LCD screen, which provides a clear and bright view of your subjects, even in bright daylight. This display also allows for easy navigation through the camera’s settings and playback modes. Both models come with advanced image stabilization technology, which minimizes blur caused by camera shake, ensuring clear and stable images in various shooting conditions.

The EC-L70 series incorporates various shooting modes, including Smart Auto mode, which intelligently selects the appropriate settings based on the scene being photographed. This feature is particularly useful for novice photographers who may not be familiar with manual settings. Furthermore, the camera supports various scene modes, including sunset, beach, and portrait, providing creative options for different photography styles.

Power efficiency is another important aspect of these models, making them suitable for long outings or vacations. Utilizing standard AA batteries, users can easily find replacements when needed, ensuring they are prepared for extended shooting sessions.

In terms of connectivity, the Samsung EC-L70 cameras support USB connections, allowing for easy file transfers to computers and other devices. This feature enhances workflow for users wanting to edit or share their photos quickly.

Overall, the Samsung EC-L70ZZBBA/DE and EC-L70ZZSBB/E1 embody a perfect combination of quality, portability, and user-friendly technology. With their robust feature set and compact design, these cameras cater to the needs of photographers looking for a reliable companion to capture life's moments in stunning detail. Whether you're a seasoned pro or just getting started, these models deliver the performance and versatility required for various photographic endeavors.