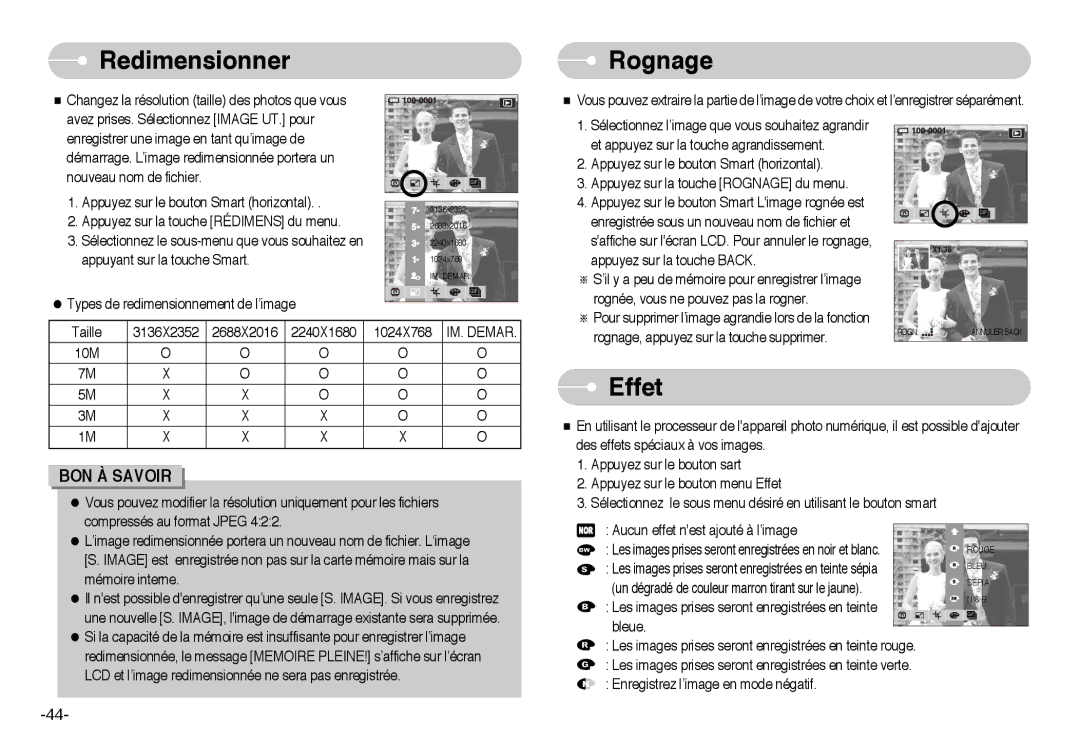
Redimensionner

Rognage

Changez la résolution (taille) des photos que vous avez prises. Sélectionnez [IMAGE UT.] pour enregistrer une image en tant qu’image de démarrage. L’image redimensionnée portera un nouveau nom de fichier.

1.Appuyez sur le bouton Smart (horizontal). .

2.Appuyez sur la touche [RÉDIMENS] du menu.

3.Sélectionnez le sous-menu que vous souhaitez en appuyant sur la touche Smart.

Types de redimensionnement de l’image

3136x2352

2688x2016

2240x1680

1024x768

IM. DEMAR.

Vous pouvez extraire la partie de l’image de votre choix et l’enregistrer séparément.

1. Sélectionnez l’image que vous souhaitez agrandir

et appuyez sur la touche agrandissement.

2. Appuyez sur le bouton Smart (horizontal).

3. Appuyez sur la touche [ROGNAGE] du menu.

4. Appuyez sur le bouton Smart L'image rognée est

enregistrée sous un nouveau nom de fichier et

s'affiche sur l'écran LCD. Pour annuler le rognage,

appuyez sur la touche BACK.

S’il y a peu de mémoire pour enregistrer l’image

rognée, vous ne pouvez pas la rogner.

Pour supprimer l’image agrandie lors de la fonction

Taille

3136X2352

2688X2016

2240X1680

1024X768

IM. DEMAR.

10M

O

O

O

O

O

7M

X

O

O

O

O

rognage, appuyez sur la touche supprimer.

ROGN:

ANNULER:BACK

5M

X

X

O

O

O

3M

X

X

X

O

O

1M

X

X

X

X

O

BON À SAVOIR

Vous pouvez modifier la résolution uniquement pour les fichiers compressés au format JPEG 4:2:2.

L’image redimensionnée portera un nouveau nom de fichier. L‘image [S. IMAGE] est enregistrée non pas sur la carte mémoire mais sur la mémoire interne.

Il n'est possible d'enregistrer qu’une seule [S. IMAGE]. Si vous enregistrez une nouvelle [S. IMAGE], l'image de démarrage existante sera supprimée. Si la capacité de la mémoire est insuffisante pour enregistrer l’image redimensionnée, le message [MEMOIRE PLEINE!] s’affiche sur l’écran LCD et l’image redimensionnée ne sera pas enregistrée.

Effet

En utilisant le processeur de l'appareil photo numérique, il est possible d'ajouter des effets spéciaux à vos images.

1.Appuyez sur le bouton sart

2.Appuyez sur le bouton menu Effet

3.Sélectionnez le sous menu désiré en utilisant le bouton smart

: Aucun effet n'est ajouté à l’image


: Les images prises seront enregistrées en noir et blanc.


ROUGE

: Les images prises seront enregistrées en teinte sépia


BLEU

(un dégradé de couleur marron tirant sur le jaune).


SÉPIA


N & B

: Les images prises seront enregistrées en teinte


bleue.


: Les images prises seront enregistrées en teinte rouge.

: Les images prises seront enregistrées en teinte verte.

: Enregistrez l’image en mode négatif.

-44-

Page 45
Image 45
Samsung EC-NV10ZBBD/E1, EC-NV10ZBBD/FR, EC-NV10ZBBL/E1, EC-NV10ZBBC/FR, EC-NV10ZBBB/FR manual Redimensionner Rognage, IM. Demar

EC-NV10ZBBA/FR, EC-NV10ZBBC/FR, EC-NV10ZBBB/FR, EC-NV10ZBBW/E1, EC-NV10ZBBC/E2 specifications

The Samsung EC-NV10 series, including models EC-NV10ZBBL/E1, EC-NV10ZBBA/TH, EC-NV10ZBBT/E1, EC-NV10ZBBA/AR, and EC-NV10ZBBC/TR, represents a blend of advanced technology and user-centered design, making it a compelling choice for both amateur and professional photographers. These models cater to various photography needs, offering a range of compelling features that make capturing high-quality images seamless and enjoyable.

One of the standout features of the EC-NV10 series is its 10.2-megapixel sensor. This high-resolution sensor enables users to capture detailed photographs with vibrant colors and excellent clarity. Additionally, the cameras are equipped with a powerful 5x optical zoom lens, allowing for versatile shooting options, from wide-angle landscapes to close-up portraits, providing photographers with the flexibility they need in various situations.

The EC-NV10 models also incorporate Samsung's Smart Auto technology, which intelligently analyzes the shooting environment to optimize camera settings automatically. This feature significantly simplifies the photography process, allowing users to focus on composition rather than technical adjustments. Along with Smart Auto, the cameras include a range of scene modes, including sunset, portrait, and macro, further enhancing their usability across different shooting conditions.

In terms of design, the Samsung EC-NV10 series showcases a sleek and compact form factor. Its lightweight build makes it easy to carry, ideal for spontaneous photography sessions. The cameras also feature a bright and clear LCD display that simplifies navigation through settings and playback of captured images. The user-friendly interface ensures that even those new to photography can quickly adapt to the camera's functionalities.

The series supports various shooting modes and video recording capabilities, allowing users to create full HD videos, sharing their stories with ease. Coupled with built-in image stabilization technology, the EC-NV10 cameras minimize the effects of blurriness caused by shaky hands, ensuring that every photo and video is sharp and fluid.

Connectivity options, including USB and HDMI ports, facilitate easy transfer of images to computers and other devices for editing and sharing. With these features, the Samsung EC-NV10 series encapsulates the essence of modern photography technology, enabling users to shoot with confidence and creativity in any setting. Overall, these models are fantastic options for anyone seeking a reliable and powerful compact camera.