Návod k použití
Chraňte zrak objektu
Informace k bezpečnosti a ochraně zdraví
Nerozebírejte ani se nepokoušejte opravit fotoaparát
Nesahejte na přístroj mokrýma rukama
Předcházejte rušení kardiostimulátorů
Informace k bezpečnosti a ochraně zdraví
Blesk je při činnosti velmi horký a mohl by popálit kůži
Může dojít k požáru či k úrazu elektrickým proudem
Baterie používejte pouze ke schválenému účelu
Průběhu činnosti blesku se jej nedotýkejte
Přenos dat a odpovědnost
Informace o autorských právech
Uspořádání návodu k použití
Např
Označení použitá v tomto návodu
Ikony použité v návodu
Režim
Expozice jas
Výrazy použité v návodu
Použití tlačítka spouště
Objekt, pozadí a kompozice
Nastavení volby tlačítka Direct Link
Speciální funkce fotoaparátu
Zachyťte fotografii
Fotoaparátu
Spusťte režim MobileLink
Používání funkce MobileLink
Používání aplikace Remote Viewfinder
Vyberte možnost Makro Zachyťte fotografii
Vzorky snímání Makro
Bodové. str
Časté otázky
Snímku příliš tmavý Nefotografujte proti slunci
Vyrovnávací. str
Pořizování snímků osob
Náhled
Nabíjení baterie a zapnutí fotoaparátu
Obsah
Obsah
100
Obsah
Základní funkce
Volitelné příslušenství
Rozbalení
Vnitřní anténa
Uspořádání fotoaparátu
Rozevírací tlačítko blesku Vypínač
Tlačítko spouště Blesk
Tlačítko transfokátoru
Tlačítko Direct Link
Stavová kontrolka
Dotyková
Nastavení volby tlačítka Direct Link
Vyberte volbu Obecné → Direct Link tlačítko Wi-Fi
Používání tlačítka Direct Link
Otočte voličem režimů na
Používání adaptéru paměťové karty
Vložení baterie a paměťové karty
Uvolněte baterii
Vyjmutí baterie a paměťové karty
Zapnutí fotoaparátu v režimu Přehrávání
Nabíjení baterie a zapnutí fotoaparátu
Nabíjení baterie
Zapnutí fotoaparátu
Zobrazení obrazovky závisí na zvoleném jazyce
Provedení úvodního nastavení
Stisknutím vyberte Nastavení data/času, poté stiskněte nebo
Stiskněte
Provedení úvodního nastavení
Možnosti snímání
Použité ikony
Informace o snímání
Ikona Popis
Ikony na obrazovce Režim
Výběr režimů
Editor fotografií Úprava fotografií pomocí různých efektů
Můj magický rámeček Zachycení fotografie a výběr oblasti
Pak výběr oblasti, která bude animována pro vytvoření
Stránky sdílející soubory. str
Stisknutím potvrdíte zvýrazněnou možnost nebo nabídku
Výběr možností nebo nabídek
Výběr pomocí tlačítek
Rolujte na možnost nebo nabídku
Nastavení uložíte stisknutím
Výběr klepnutím
Stiskněte / a vyberte Vyvážení bílé, poté stiskněte nebo
Stiskněte / a vyberte možnost Vyvážení bílé
Přejetí Zlehka přejeďte prstem přes obrazovku
Režim Typ zobrazení
Nastavení zobrazení a zvuku
Nastavení typu displeje
Histogramech
Vyberte možnost
Nastavení zvuku
Stiskněte opakovaně
Zvolte Zvuk → Pípnutí
Stisknutím se vrátíte do režimu Snímání
Pořizování snímků
Transfokace
Digitální transfokátor
Optický rozsah Indikátor transfokátoru Digitální rozsah
Vyberte Intelli zoom
Režimu Snímání stiskněte
Transfokace Intelli
Nastavení transfokátoru Intelli
Režimu Snímání stiskněte Vyberte OIS Vyberte možnost
Omezení otřesů fotoaparátu OIS
Rámeček ostření
Správné držení fotoaparátu
Namáčknutí spouště
Je-li zobrazeno
Jak zabránit rozostření objektu snímku
Použití aretace ostření
Při rychlém pohybu objektu
Rozšířené funkce
Otočte voličem režimů na Nastavte objekt do rámečku
Používání režimu Smart Auto
Používání režimu Smart Auto
Používání režimu Program
Otočte voličem režimů na Nastavte požadovanou možnost
Přehled možností naleznete v části„Možnosti snímání. str
Používání režimu Priorita clony, Priorita závěrky a Ručně
Hodnota clony
Expoziční doba
Upravte hodnotu clony
Používání režimu Priorita clony
Nastavte možnosti
Vyberte možnost Stisknutím Spoušť pořiďte snímek
Používání režimu Priorita závěrky
Otočte voličem režimů na Vyberte možnost
Stiskněte tlačítko → / a upravte rychlost závěrky
Používání režimu Ručně
Stiskněte / a upravte hodnotu clony nebo rychlost závěrky
Ruční režim umožňuje ruční volbu clony i expoziční doby
Používání režimu Inteligentní
Otočte voličem režimů na Vyberte scénu
Možnost Popis
Po dokončení uvolněte Spoušť
Používání režimu Panoráma
Směru, který umožňuje pořídit zbytek panoramatu
Stisknutím a přidržením Spoušť začněte snímat
Používání režimu Panoráma
Vyberte rámeček
Používání režimu Magický plus
Používání režimu Můj magický rámeček
Klepněte na Nastavit
Stisknutím tlačítka Spoušť zachyťte fotografii
Klepnutím na možnost fotografii uložíte
Stisknutím se vrátíte na předchozí obrazovku
Používání režimu Rozdělený snímek
Zvolte styl rozdělení
Rozmazání hrany → hodnoty
Na obrazovce nakreslete oblast, která se má animovat
Používání režimu Pohyblivá fotografie
Vyberte efekt
Použití režimu Filtr snímku
Stiskněte možnost záznam videa a spusťte záznam
Používání režimu Filtr filmu
Přerušení záznamu
Snímání videa
Otočte voličem režimů na , , , , nebo
Nastavte požadované možnosti
Ikona
Záznam videa s funkcí Inteligentní detekce scény
Otočte voličem režimů na Nastavte požadované možnosti
Seznam možností naleznete v části„Možnosti snímání. str
Zde se dozvíte více o možnostech nastavení režimu Snímání
Možnosti snímání
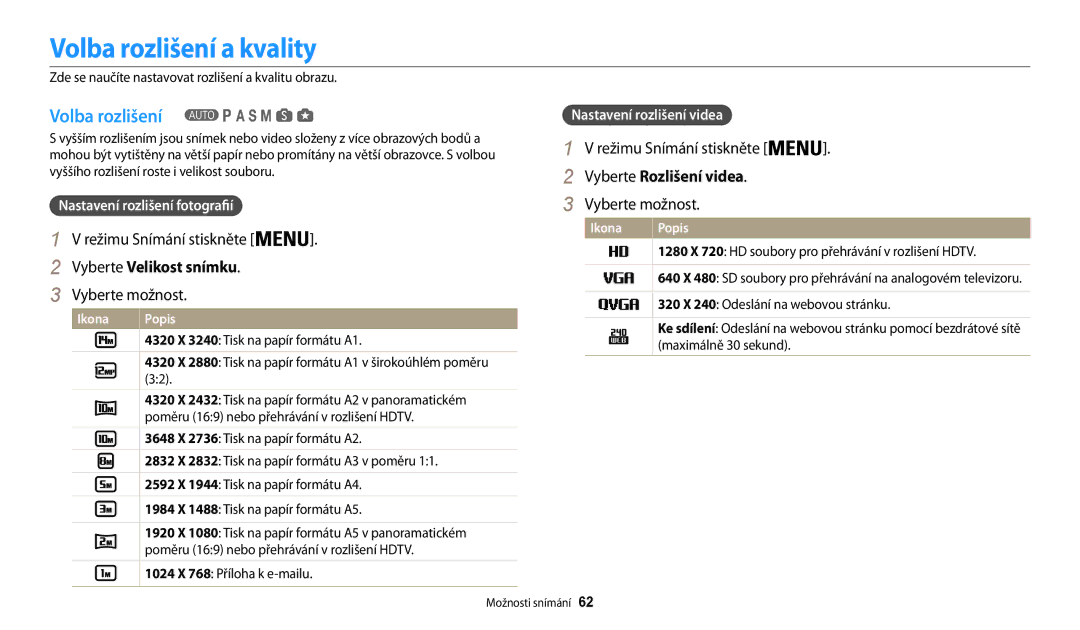
Vyberte Rozlišení videa
Volba rozlišení a kvality
Volba rozlišení
Vyberte Velikost snímku
Jemná Pořízené snímky jsou ve vysoké kvalitě
Výběr kvality snímků
Režimu Snímání stiskněte . Vyberte Kvalita Vyberte možnost
Velmi jemná Pořízené snímky mají extra vysokou kvalitu
Snímání při špatném osvětlení
Potlačení červených očí
Používání blesku
Vyrovnávací
Nastavení voleb blesku
Vypnuto
Červené oči
Pomalá synchronizace
Režimu Snímání stiskněte Přejděte na položku Stiskněte
Uložíte nastavení
Nastavení intenzity blesku
Režimu Snímání stiskněte . Vyberte ISO Vyberte možnost
Nastavení citlivosti ISO
Změna zaostření fotoaparátu
Používání makra
Používání automatického ostření
Vyberte Ruční
Stiskněte / a upravte vzdálenost ostření
Auto makro
Vyberte Dotykový AF
Nastavení oblasti ostření
Ruční nastavení ostření
Vyberte Oblast ostření
Používání ostření se sledováním
Vyberte možnost Dotykový AF → Ostření se sledováním
Vyberte možnost Dotykový AF → Snímání jedním dotykem
Snímek pořídíte dotknutím se objektu
Používání funkce Snímání jedním dotykem
Vyberte Rozpozn. tváře → Normální
Používání Rozpozn. tváře
Rozpoznání tváří
Pořízení autoportrétu
Kompozice snímku
Pořízení snímku úsměvu
Detekce zavřených očí mrknutí
Vyberte Rozpozn. tváře → Úsměv
Tipy pro rozpoznávání tváře
Režimu Snímání stiskněte Vyberte EV
Nastavení jasu a barev
Ruční nastavení expozice EV
Stisknutím / nastavte expozici
Kompenzace protisvětla ACB
Změna možností měření
Režimu Snímání stiskněte Vyberte Měření Vyberte možnost
Volba nastavení Vyvážení bílé
Světelnému zdroji
Vyberte Vyvážení bílé
Vyberte možnost Vyvážení bílé → Tepl. bar
Stiskněte Stisknutím
Vlastní určení Vyvážení bílé
Vyberte Vyvážení bílé → Vlastní nastavení
Zaostřete Stiskněte a přidržte Spoušť
Používání režimů série
Pořizování sekvenčních fotografií
Režimu Snímání stiskněte Vyberte možnost
Zvolte Odstupňování AE
Pořizování sériových fotografií
Úprava snímků
Režimu Snímání stiskněte Vyberte Nast.obr Vyberte možnost
Stisknutím / upravíte každou hodnotu
Vyp. živý zvuk Vypne funkci Živý zvuk a nahraje šum
Ztlumení zvuku transfokátoru
Režimu Snímání stiskněte . Vyberte Zvuk Vyberte možnost
Zap. živý zvuk Pro redukci šumu použije funkci Živý zvuk
Používání programů na počítači … ………………
Přehrávání/Úpravy
Informace o souboru fotografie
Prohlížení snímků a videí v režimu Přehrávání
Spuštění režimu Přehrávání
Pomocí Se pohybujte mezi soubory
Poklepáním na soubor jej zobrazíte na celé obrazovce
Informace o video souboru
Zobrazení souborů jako miniatur
Procházejte náhledy souborů
Stiskněte tlačítko
Výběrem otevřete seznam
Výběrem seznam zobrazte
Režimu Přehrávání otáčejte Transfokátor doleva
Vyberte možnost Vymazat → Hromadné odstr
Zapnuto
Opakujte kroky 1 a 2 pro ochranu dodatečných souborů
Režimu Přehrávání stiskněte
Vyberte Kopie na kartu
Zobrazení snímků
Vyberte Vymazat → Vymazat vše
Po objevení kontextové nabídky vyberte Ano
Prohlížení panoramatických fotografií
Režimu Přehrávání rolujte na panoramatickou fotografii
Stiskněte tlačítko nebo klepněte na možnost
Stisknutím Se vrátíte do režimu Přehrávání
Vyberte Možnosti prezentace
Režimu Přehrávání rolujte na soubor GIF
Vyberte Spustit prezentaci
Prohlédněte si prezentaci
Vyberte Oříznout film
Přehrávání videa
Nebo klepnutím na volbu Ořez video ořízněte
Stiskněte tlačítko Nebo klepněte na volbu Koncový bod
Stiskněte tlačítko nebo klepněte na možnost Zachytit
Pořízení snímku z videa
Klepnutím na možnost nastavení uložte
Změna rozlišení snímků
Otočení snímku
Otočte voličem režimů na , a pak vyberte možnost
Bez efektu
Oříznutí fotografie
Používání efektů Inteligentního filtru
Na snímky používejte různé efekty
Pak vybrat možnost Úprava
Nastavení fotografie
Nastavení tmavých objektů, jasu, kontrastu nebo sytosti
Vinětace Lomo fotoaparátů
Možnost upravíte
Klepněte na tlačítko a pak vyberte možnost úprav
Stisknutím tlačítka / možnost upravíte
Klepněte na možnost Klepnutím na možnost nastavení uložte
Vyberte Připojení → Video výstup
Zobrazení souborů na televizi
Připojte fotoaparát jako výměnný disk k počítači
Přenos souborů do počítače
Přenos souborů do počítače s operačním systémem Windows
Vyberte možnost Připojení → i-Launcher → Vypnuto
Odpojení fotoaparátu pro Windows XP
Přenos souborů do počítače s operačním systémem Mac OS
Zapněte fotoaparát
Instalaci dokončete podle pokynů na obrazovce
Používání programů na počítači
Instalace programu i-Launcher
Vyberte možnost Připojení → i-Launcher → Zapnuto
Položka Požadavky
Používání programu i-Launcher
Dostupné programy při používání programu i-Launcher
Požadavky operačního systému Windows
Minimálně 110 MB
Požadavky operačního systému Mac OS
Otevření programu i-Launcher
Mac OS 10.5 nebo novější
Používání programu Multimedia Viewer
Zobrazení snímků
Název souboru
Zobrazení videa
Aktualizace firmwaru
Stažení programu PC Auto Backup
Odesílání fotografií a videí přes e-mail … ………
Bezdrátová síť
Ad hoc AP Zabezpečený AP
Připojení k síti Wlan a konfigurace sítě
Připojení k síti Wlan
Vyberte přístupový bod AP
Nebo klepněte na možnost
Používání prohlížeče pro přihlášení
Následně stiskněte tlačítko nebo klepněte na možnost
Vyberte každou možnost a zadejte požadované informace
Tipy pro připojení k síti
Zadávání textu
Automatické ukládání souborů do chytrého telefonu
Ve fotoaparátu vyberte možnost AutoShare → Zapnuto
Ve fotoaparátu zachyťte fotografii
Odesílání fotografií nebo videí na chytrý telefon
Ve fotoaparátu vyberte možnost odesílání
Fotoaparát odešle soubory
Na chytrém telefonu nastavte následující možnosti snímání
Použití chytrého telefonu jako dálkové samospouště
Ostření je automaticky nastaveno na Vícebodové ostření
Možnosti
Odesílání snímků a videí do počítače
Instalace programu pro funkci Automatická záloha do počítače
Chcete-li změnit počítač pro zálohování, vyberte možnost
Vyberte počítač pro zálohování
Vyberte možnost OK
Pokud jste dříve provedli zálohování, přeskočte na krok
Vyberte pole Jméno napište své jméno a pak vyberte možnost
Odesílání fotografií a videí přes e-mail
Změna e-mailových nastavení
Vyberte Nastavení odesílatele
Nastavení e-mailového hesla
Stiskněte Klepněte na možnost Nastavení hesla → Zapnuto
Jakmile se zobrazí vyskakovací okno, vyberte možnost OK
Vyberte Změna hesla
Vyberte možnost Další
Vyberte soubory, které chcete odeslat
Vyberte Odeslat
Vyberte možnost Hotovo
Vyberte možnost Nahrát
Použití internetových stránek ke sdílení snímků a videí
Přístup k webové stránce
Nahrání snímků či videa
Použití internetových stránek ke sdílení snímků a videí
Nahrát
Používání funkce AllShare Play k odesílání souborů
Nahrávání fotografií do online úložiště
Otočte voličem režimů na Vyberte možnost → Webové úložiště
Otočte voličem režimů na Vyberte možnost → Blízká zařízení
Používání funkce AllShare Play k odesílání souborů
Povolte na zařízení fotoaparátu se připojit k zařízení
Odesílání fotografií pomocí funkce Wi-Fi Direct
Poté vyberte Sdílet Wi-Fi → Wi-Fi Direct
Stiskněte
Nastavení
Vyberte položku
Nabídka Nastavení
Otevření nabídky nastavení
Otočte voličem režimů na Vyberte nabídku
Zvuk
Displej
Položka Popis
Připojení
Položka
Obecné
Určete, zda se fotoaparát po určitém čase, kdy jej
Tlačítko Wi-Fi
Resetovat
Tisk data
Přílohy
Hlášení Navržené řešení
Chybová hlášení
Nezdařil
Paměť plná
Žádné snímky
Přenos fotografií se
Tělo fotoaparátu
Údržba fotoaparátu
Čištění fotoaparátu
Objektiv a displej fotoaparátu
Používání a ukládání fotoaparátu
Podporované paměťové karty
Paměťové karty
Velikost Velmi jemná Jemná
Kapacita karty
Velikost Velmi jemná Jemná Normální
Velikost 30 fps
Upozornění při používání paměťových karet
Model
Baterie
Údaje o baterii Výdrž baterie
Technické údaje Popis
Poznámky k nabíjení baterie
Hlášení slabé baterie
Poznámky k užívání baterie
Upozornění týkající se používání baterií
Správné zacházení a likvidace baterií a nabíječek
Poznámky k nabíjení z připojeného počítače
Poznámky k nabíjení baterie
Při nesprávném či neopatrném použití baterie hrozí smrtelná
Zranění. Z bezpečnostních důvodů zacházejte s baterií takto
Pravidla pro likvidaci
Situace Navržené řešení
Dříve, než se obrátíte na servis
Správně
Není správné datum a čas
Dotykový displej nebo
Tlačítka nefungují
Fotoaparát
Snímky se nezobrazují na
Televizoru
Počítač nerozpoznal
Ostření
Technické údaje fotoaparátu
Snímač obrazu
Displej
Vyvážení bílé
Efekty
Ukládání
Přehrávání
Rozměry Š x V x H
Bezdrátová síť
Rozhraní
Napájecí zdroj
Slovníček
Ohnisková vzdálenost
EV kompenzace
Hodnota expozice EV
Zaměnitelný formát obrazového souboru Exif
Měření
Citlivost ISO
Jpeg Joint Photographic Experts Group
Displej z tekutých krystalů LCD
Vyvážení bílé vyvážení barev
Optický transfokátor
Kvalita
Rozlišení
Správná likvidace výrobku
Elektrický a elektronický odpad
Platí pro země s odděleným systémem sběru
Displej Objektiv Tělo fotoaparátu
Rejstřík
Režim Přehrávání Režim Snímání
Nabíjení Pozor Vkládání
Ostření na střed Vícebodové ostření
Nastavení Umístění
Auto Makro Ruční
Bodové Středově vyváženo 77 Vícebodové
ACB 98 Červené oči 98 Jas
Ostrost Sytost
Ořezání Záznam
Nahrání snímků či videa 123 Přístup
Velice vysoká rychlost 81 Video