1CH Blu-ray
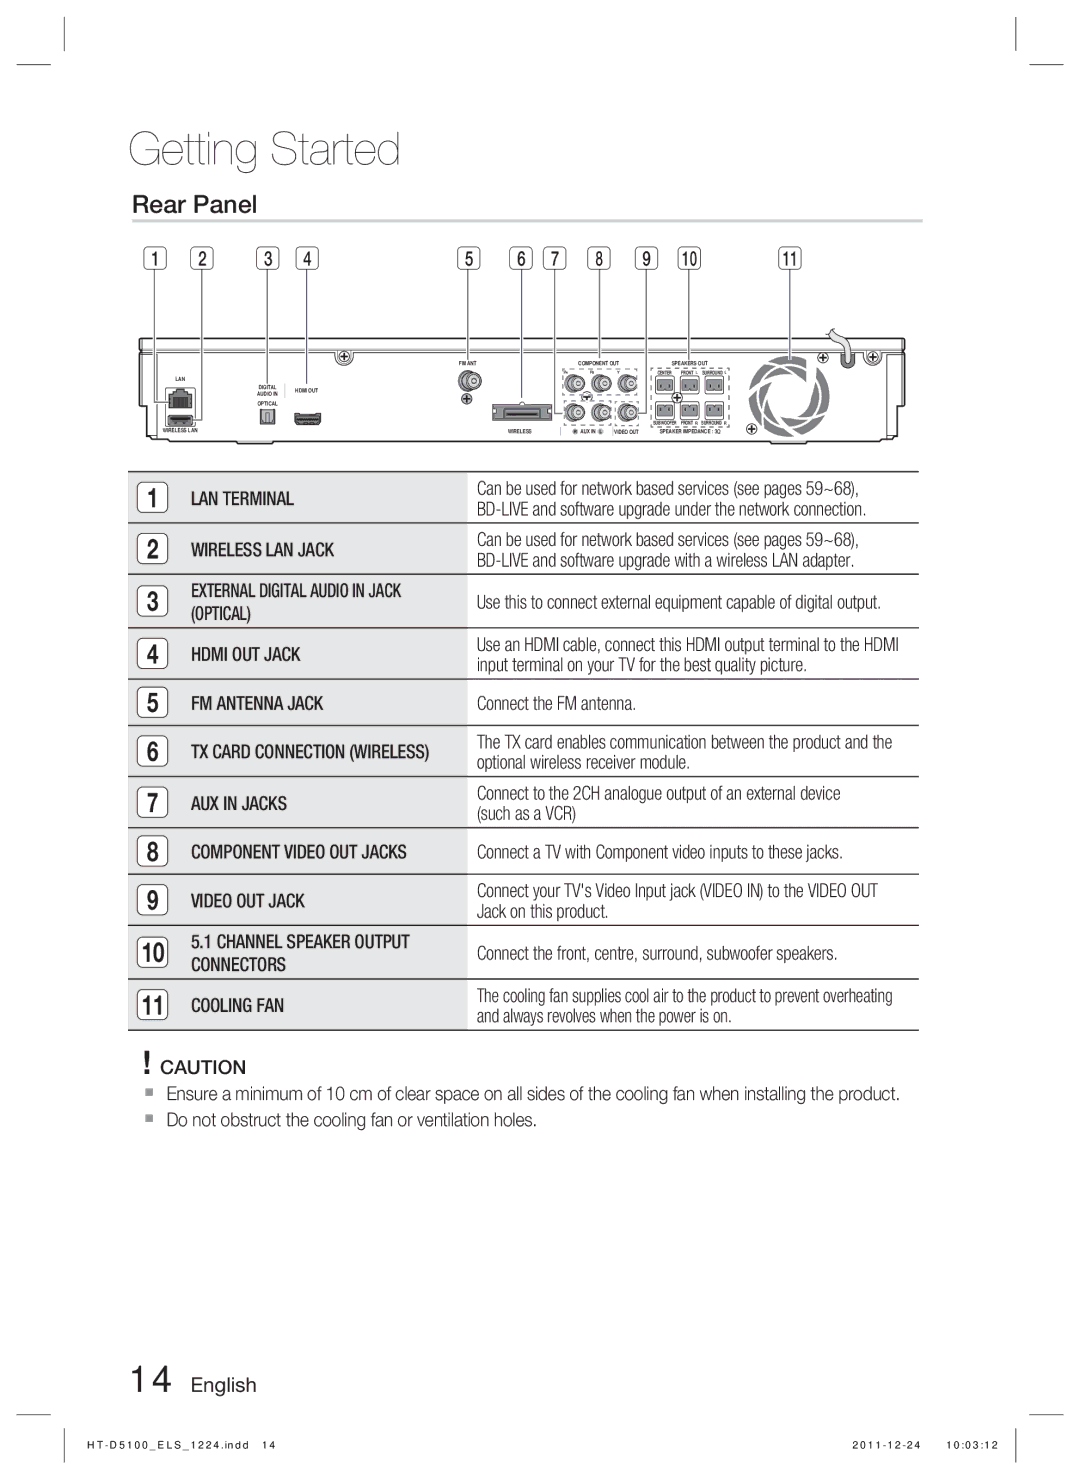
Safety Warnings
Safety Information
Wiring the Main Power Supply Plug UK Only
English
Viewing TV using the 3D function
Precautions
Handling and Storing Discs
Holding discs
Disc Storage
Licence
Contents
Software Upgrade
Change Password
Network Remote Control
Using the Disc menu / Title menu / Popup menu
Getting Started
Icons that will be used in manual
BD-LIVE
Discs that cannot be played
DVD-RAM
Audio CD CD-DA
Region Code
Disc Types
BD-RE/-R
Supported File Formats
Using Jpeg disc
Disc Format
Video File Support
Audio decoder
Restrictions
Video decoder
Music File Support
For Power cord For Speaker cables
Accessories
Check for the supplied accessories below
Supported devices
Front Panel
Description
Rear Panel
Tour of the Remote Control
Remote Control
Installing batteries in the Remote Control
TV Brand Code List
Setting the Remote Control
If the TV turns off, the setting is complete
Connecting the Speakers
Connections
Front Speaker L
Connecting The Speakers
Speaker Components
Centre Speaker Surround Speaker L Front Speaker R
Wireless Receiver Module
Wireless Receiver Module SWA-5000
Connecting the Optional Wireless Receiver Module
Surround
FM ANT Component OUT Speakers OUT
Hdmi Auto Detection Function
Connecting the Video Out to your TV
Choose one of the three methods for connecting to a TV
Method 2 Component Video Better Quality
Method 3 Composite Video Good Quality
Connecting Audio from External Components
Optical Connecting an External Digital Component
AUX Connecting an External Analogue Component
Broadband modem With integrated router
Connecting to the Network
Broadband Service
Wireless LAN Adapter not supplied
Broadband service Wireless IP sharer
Connecting the FM Antenna
Networking with PC for AllShare function See
Setup
My Contents
My Contents
Display
3D Settings
3D Blu-ray Playback Mode
Screen Size
TV Aspect
Resolution
BD Wise is Samsung’s latest inter-connectivity feature
Smart Hub Screen Size
Resolution according to the output mode
Hdmi Colour Format
Still Mode
Progressive Mode
Movie Frame 24 Fs
Level
Speaker Settings
Audio
Distance
User EQ
Musical Auto Calibration Mode
Musical Auto Calibration
Measurement
Audio Return Channel
It can be activated when Hdmi Audio is on
Hdmi Audio
Digital Output
Bitstream
Dynamic Range Control
Digital Output Selection
PCM
Audio Sync
Network Settings
Wired Network
Network
Wireless Network
Setting Up the Wireless Network Connection Manual
Wpspbc
BD-LIVE Internet Connection
Initial Settings
Network Status
One Foot Connection
BD Data Management
Reset
Anynet+ HDMI-CEC
Time Zone
BD Parental Rating
Change Password
Network Remote Control
DVD Parental Rating
By Internet
Software Upgrade
Support
By USB
By Disc
Download in Standby Mode
Contact Samsung
Via download
Playback
Using the Disc Menu
Basic Functions
Disc Structure
Searching for a Desired Scene
Using the Title Menu
Using the Popup Menu
Skipping Chapters
Repeat the Title or Chapter
Slow Motion Play
Step Motion Play
Repeat the Section
Selecting the Audio Language
Using the Tools button
Moving to a Desired Scene Directly
Selecting the Subtitle Language
Changing the Camera Angle
Selecting the Picture Settings
Setting the Bonusview
Caption Function
Buttons on the Remote Control used for Music Playback
Listening to Music
Playlist
Playing an Audio CD CD-DA/MP3
Repeat an Audio CD CD-DA/MP3
Audio CD CD-DA/MP3 Screen Elements
Sound Mode
SFESound Field Effect Mode
DSPDigital Signal Processor Function
Viewing Photo Files
Dolby Pro Logic II Mode
Using the Tools button
Playing back a Picture
Playing back a USB Storage Device
Basic Functions
About RDS broadcasting
Setting Mono/Stereo
Presetting Stations
Listening to Radio
About characters shown in the display
To show the RDS signals
To search for a program using the PTY
PTY Program Type indication PTY-SEARCH function
How to charge the Wireless Transmitter
Ipod Ipod FM
This Product
Operation status of the charging Cradles LED
IPod/iPhone Models You Can Use with
Green LED on
If you move the wireless transmitter around
Operation status of the wireless transmitters LED
How to Link the Wireless Transmitter With the Main Unit
LED Blink
Starting Smart Hub the First Time
Network Services
Using Smart Hub
Screens can take a few seconds to appear
Lets you select a movie, displays a list
Smart Hub at a Glance
Commercial Displays the Smart Hub Guide
Creating an Account
Using the Keypad
Entering Text, Numbers and Symbols
Current keypad
Account Management
Settings Menu Blue D
Account Log
To log in to your Smart TV Account, follow these steps
Register Service Account
Service Manager
Reset
Move
Edit Mode Menu Yellow C
Properties
Detail
Rename Folder
New Folder
Move to Folder
Lock
Unlock
Sort by Menu Green B
For Pay Apps
Delete
Other Includes other miscellaneous services
Accessing the Samsung Apps Screen
Using the Samsung Apps Screen
Samsung Apps by category
Using the AllShare Function
Using the coloured buttons on your remote with Samsung Apps
Using vTuner Function
Help
Troubleshooting
Other Information
To the default values
Standby mode
Using the Reset function will erase all stored settings
Then press the Power button
PC Share Manager, but
BD-LIVE service
An error occurs BD-LIVE service
Cannot see the files Displayed
Specifications
Hdmi
Surround 0.4 kg
Dimensions W x H x D
Weights
140Hz~20kHz
` Asia Pacific
Area Contact Centre Web Site
` Europe
` Middle East
Correct disposal of batteries in this product
Blu-ray 5,1 canaux
Français
Consignes de sécurité
Avertissements de sécurité
Plus Large
Regarder la télévision en 3D
Précautions
Manipulation et rangement des disques
Manipulation des disques
Rangement des disques
Manipulation et rangement des disques Précautions
Licence Droit d’auteur
Table des matières
Avertissements de sécurité Précautions
Connexion des enceintes
Sécurité
Télécommande réseau
Mode Son
Contrôle parent. BD
USB
Prise en main
Icônes utilisées dans ce guide
Types de disques et caractéristiques
Compatibilité des disques Blu-ray
Les disques qui ne peuvent pas être lus
Disque DVD HD
CD Audio CD-DA
Code régional
Type de disque
Formats de fichiers pris en charge
Conteneur Codec vidéo Codec audio Résolution
Format du disque
Utilisation dun disque Jpeg
Prise en charge des fichiers musicaux
Décodeur vidéo
Décodeur audio
Conteneur Codec audio Plage de prise en charge
Périphériques pris en charge
Accessoires
Vérifiez que vous disposez bien des accessoires suivants
Guide de l’utilisateur
Panneau avant
Panneau arrière
Boîtier de la télécommande
Télécommande
Pour contrôler un téléviseur à l’aide de la télécommande
Réglage de la télécommande
Installation des piles dans la télécommande
Liste des codes par marque de téléviseur
Branchements
Connexion des enceintes
Enceinte avant G Enceinte centrale Caisson de graves
Composants des enceintes
Connexion des enceintes
Rouge
Enceinte Ambiophonique G
Module récepteur sans fil SWA-5000
Connexion du module récepteur sans fil proposé en option
Port
Subwoofer Front Surround Wireless AUX Video OUT
Connexion de la sortie vidéo au téléviseur
Fonction Détection auto Hdmi
Méthode 2 Vidéo en composante Bonne Qualité
Méthode 3 Vidéo composite Bonne Qualité
Connexion audio de composants externes
Optique Connexion d’un composant numérique externe
AUX Connexion d’un composant analogique externe
Modem large bande Avec routeur intégré
Service large Bande
Connexion au réseau
Adaptateur LAN sans fil non fourni
Antenne FM fournie
Voir
Connexion de l’antenne FM
Menu Accueil
Configuration
Paramètre initial
Pour accéder au menu Paramètres
Affichage
Mode lecture 3D Blu-ray
Paramètres 3D
Taille écran
Taille écran Smart Hub
Résolution
Format écran
BD Wise Produits Samsung uniquement
Configuration
Résolution selon le mode de sortie
Mode Hdmi Mode Composante
Sortie Hdmi / connecté Hdmi / non connecté
Format couleurs Hdmi
Mode image fixe
Mode progressif
Trame vidéo 24Fs
Français Distance
Param. haut-parleur
Niveau
Test tonalité
Étalonnage auto pour la musique
Étalonnage auto pour la musique
Eg. util
Mesure
Sortie numérique
Audio Hdmi
Fonct. Retour Audio
Arrêt Permet de désactiver la fonction Canal retour audio
Sélections de l’option Sortie numérique
Configuration
Contrôle de la dynamique
Non traité DTS réencodé Réencodé
Réseau
Sync. audio
Paramètres réseau
Réseau câble
Méthode de configuration de la connexion réseau
Réseau sans fil
Configuration dune connexion au Réseau
Appuyez sur les boutons pour sélectionner Wpspbc
Paramètre initial
État du réseau
Connexion internet BD-LIVE
Système
DivX Vidéo à la demande
Gestion données BD
Fuseau Horaire
Réinitialisation
Contrôle parent. DVD
Télécommande réseau
Contrôle parent. BD
Modif. mot de passe
Via Internet
Mise à jour du logiciel
Assistance
Via internet
Via disque
Téléch. en mode veille
Contacter Samsung
Par téléch
Structure des disques
Fonctions de base
Lecture
Utilisation du Menu du disque
Recherche dune scène
Utilisation de Menu Titre
Utilisation de Menu contextuel
Saut de chapitre
Répétition du titre ou Répétition du chapitre
Lecture au ralenti
Lecture pas à pas
Répétition de la section
Sélection de la langue des sous-titres
Accès direct à la scène souhaitée
Sélection de la langue audio
Utilisation du bouton Tools
Paramétrage de Bonusview
Changement dangle de la caméra
Sélection des Paramètres de limage
Fonction Légende
Boutons de la télécommande servant à lécoute de musique
Écouter de la musique
Liste d’écoute
Lecture dun CD audio CD-DA/MP3
Répétition dun CD audio CD-DA/MP3
Éléments de lécran CD audio CD-DA/MP3
Power Bass Virtual User EQ Dspoff
Fonction DSP Processeur de signal numérique
Mode Son
Smart Sound
Utilisation du bouton Tools
Mode Dolby Pro Logic
Visionnage de fichiers photo
Lecture d’image
Lecture de contenu à partir dun Périphérique de stockage USB
Panneau avant du produit
Préréglage des stations radio
Propos de la radiodiffusion de données de service RDS
Réglage Mono/Stéréo
Écoute de la radio
Pour rechercher un programme à l’aide
Pour afficher les signaux RDS
Propos des caractères affichés à l’écran
Des codes PTY TYP Avant de commencer
Sallume en vert
Chargement de lémetteur sans fil
Connexion d’un iPod/iPhone à l’aide ’un câble USB
Témoin DEL
DEL du socle de chargement
État de fonctionnement du témoin
Rouge Allumé
Liaison de l’émetteur sans fil avec ’unité principale
Une fois que vous avez sélectionné le mode
État de fonctionnement du témoin DEL de l’émetteur sans fil
Éteignez votre système Home cinéma
Utilisation de Smart Hub
Services réseau
Démarrage de Smart Hub pour la première fois
Cette fonctionnalité est limitée à certaines régions
Télécharger des services dapplications payants ou gratuits
Smart Hub dun coup dœil
Informations commerciales Affiche le Guide
Création dun compte
Saisie de texte, de chiffres et de symboles
Utilisation du clavier numérique
Gestion de compte
Menu Paramètres Bleu D
Connexion au compte
Vous devez utiliser une adresse e-mail comme ID
Services réseau
Gestionnaire de services
Enreg. compte de service
Réinitialisation
Dépl
Le menu Mode édit. Jaune C
Propriétés
Si vous avez oublié votre mot de passe
Renommer doss
Nouv. dos
Dépl. ds doss
Verrouil
Déver
Tri par menu Vert B
Applications payantes
Supprimer
Les applications Samsung par catégorie
Accès à lécran Apps Samsung
Utilisation de lécran Apps Samsung
Mon compte
Utilisation de la fonction AllShare
Aide
Utilisation de la fonction vTuner
Retour Pour revenir au menu précédent
Autres informations
Dépannage
Appropriée
Appuyez alors sur le bouton Power
’écran
Nutilisez cette fonction qu’en cas d’extrême nécessité
Mais pas les fichiers Donc ne pas s’afficher
Satisfaire aux exigences du service BD-LIVE
Je peux afficher les dossiers
Vérifiez si le réseau est stable
Caractéristiques
Centrale
Dimensions L x H x P Ambiophonique 84 x 104,5 x 68,5 mm
Système denceintes Système d’enceintes 5.1 canaux Avant
Impédance Gamme de fréquences
` CIS
Elimination des batteries de ce produit
1CH Blu-ray Heimkino-System
Deutsch
Sicherheitsinformationen
Sicherheitshinweise
AUS
3D-Funktionen für das Fernsehen verwenden
Vorsichtsmaßnahmen
Verwenden und Lagern von Disks
Halten der Disks
Disk-Lagerung
Lizenz
Datenträgern Lizenz Copyright
Inhalt
Sicherheitshinweise Vorsichtsmaßnahmen
Lautsprecher anschließen
DVD-Sicherungsstufe
Software-Update
BD-Sicherungsstufe
Passwort ändern
Symbole in dieser Bedienungsanleitung
Erste Schritte
Disk-Typen und Merkmale
Blu-ray-Disk-Kompatibilität
Nicht abspielbare Disks
HD DVD-Disk
Audio-CD CD-DA
Regionalcode
Disktypen
JPEG-Disks verwenden
Disk-Format
Unterstützte Dateiformate
Unterstützte Videodatei
Audiodecodierer
Beschränkungen
Videodecodierer
Unterstützte Musikdatei
Zubehör
Notizen zu USB-Anschluss
Unterstützte Geräte
FAT16 und FAT32 -Dateisysteme werden unterstützt
Vorderseite
Beschreibung
Optisch
Netzwerkanschluss
WLAN-ANSCHLUSS
HDMI-AUSGANGSBUCHSE
Übersicht der Fernbedienung
Fernbedienung
Batteriegröße AAA
Markencodeliste des Fernsehgeräts
Fernbedienung einrichten
Fernsehgerät mit der Fernbedienung steuern
Anschlüsse
Lautsprecher anschließen
Den kleineren Ferritkern durch Anheben der Lasche öffnen
Lautsprecherkomponenten
Anschließen der Lautsprecher
TX-Karte
Drahtloses Empfängermodul SWA-5000
Surround Lautsprecher L
Kabelloser Funkempfänger
Anbringen des Ferritringkerns am Netzkabel Des Hausgeräts
Schalten Sie das Gerät aus und wieder ein HT-D5100
Videoausgang an das Fernsehgerät anschließen
Funktion Automatische HDMI-Erkennung
Rot Blau Grün
Methode 2 Component-Video Bessere Qualität
Methode 3 Composite-Video Gute Qualität
Gelb
Externe Audiokomponenten anschließen
Optical Optisch Anschließen eines digitalen externen Geräts
AUX Anschließen eines analogen externen Geräts
Breitband Dienste
Anschluss an das Netzwerk
Breitbandmodem
Mit integriertem Router
Netzwerken mit einem PC mit AllShare-Funktion sehe Seite
UKW-Antenne mitgeliefert
Breitband-Dien- ste Kabelloser IP-Sharer
Zum Anschließen der UKW-Antenne
Die Eingabe Taste drücken, um Start auszuwählen
Einstellung
Ersteinstellung
Autom. Tonkalibrierung screen Scannen wird angezeigt
Zugriff auf das Einstellungen Menü
3D Blu-ray-Wiedergabemod
3D-Einstell
Anzeige
Deutsch Bildgröße
Auflösung
TV-Bildformat
Smart Hub-Bildschirmgröße
BD Wise nur bei Samsung Produkten
HDMI-Modus Component-Modus
Auflösung entsprechend Ausgabegabemodus
Wiedergabe Blu-ray-Disc/E-Inhalte/digitale Inhalte Ausgang
Einstellung
HDMI-Deep Color
HDMI-Farbformat
Film-Bildfrequenz 24 fps
Standbild-Modus
Deutsch Entfernung
Lautsprechereinst
Pegel
Testton
Autom. Tonkalibrierungsmodus
Autom. Tonkalibrierung
Ben.-EQ
Messung
Audioausgabekanal
Digital-Ausgang
Bitstrom Einstellung
Dynamikumfangsteuerung
Auswahl des Digitalausgangs
Verbindung
Netzwerk
Audio-Sync
Netzwerkeinstellungen
Kabelnetzwerk
Die meisten WLAN-Netzwerke verfügen über ein
WLAN-Netzwerk
Die Eingabe Taste drücken
Verwenden Sie die Nummerntasten, um die Nummern einzugeben
Mit Hilfe der Tasten Wpspbc auswählen
Ersteinstellung
Netzwerkstatus
BD-LIVE Internet-Verbindung
Sicherheit
Zurück
BD-Datenmanagement
Zeitzone
Passwort ändern
BD-Sicherungsstufe
DVD-Sicherungsstufe
Frontdisplay
Über Internet
Software-Update
Unterstützung
Per USB
Über Download
Samsung kontaktieren
Über Disk
Download im Standby-Modus
Disk-Struktur
Grundfunktionen
Wiedergabe
Diskmenü verwenden
Nach gewünschter Szene suchen
Titelmenü verwenden
Popup-Menü verwenden
Kapitel überspringen
Wiederholung des aktuellen Kapitels oder Titels
Wiedergabe in Zeitlupe
Einzelbildwiedergabe
Abschnittwiederholen
Die Taste Tools verwenden
Audiosprache wählen
Untertitelsprache wählen
Eine Gewünschte Szene Direkt Auswählen
Bonusview Einstellen
Kamerawinkel Ändern
Bildeinstellungen Wählen
Untertitelfunktion
Tasten auf der Fernbedienung für die Musikwiedergabe
Musik hören
Eine Audio-CD CD-DA/MP3 wiederholen
Wiedergabeliste
Tonmodus
DSP Digital Signal Processor-Funktion
SFE Klangfeldeffekt -MODUS
Die Taste Extras verwenden
Dolby Pro Logic II-Modus
Fotodateien betrachten
Ein Bild wiedergeben
Wiedergabe eines USB-Speichergeräts
Sender voreinstellen
Über RDS-Signale
Einstellen des Mono-/Stereo-Modus
Radio hören
PTY Programm-Typ Anzeige und PTY-SUCH-Funktion
Zur Anzeige der RDS-Signale
Über im Bildschirm angezeigte Zeichen
Bevor Sie beginnen
AUX R. Ipod W. Ipod
Wie man den Drahtlosen Sender auflädt
IPod/iPhone mithilfe eines USB-Kabels Anschließen
Ladekontrollleuchte grün auf
Grünes LED EI
Ladezustand der LED-Ladestation
Display Funktion
Rotes LED Eing
Schalten Sie Ihr Heimkino aus
Betriebszustand der LED des drahtlosen Senders
So verbindet man den drahtlosen Sender mit der Haupteinheit
Abschwächen oder verlieren
Smart Hub verwenden
Netzwerkdienste
Erster Start von Smart Hub
Wiedergeben
Smart Hub auf einen Blick
Anleitung Zeigt die Smart Hub
Verwenden der Tastatur
Eingabe von Text, Zahlen und Symbolen
Ab, Ab, AB Zahlen oder Symbole
Erstellen eines Kontos
Kontenmanagement
Das Einstellungen Menü Blaues D
Beim Konto anmelden
Wiederholen Sie die Schritte 7 und
Zurücksetzen
Registrieren eines Dienst Kontos
Verschieben
Das Bearbeiten Modus Menü Gelbes C
Eigenschaften
Mehr
Ordner umbenennen
Neuer Ordner
Ordner verschieben
Sperren
Sperrung aufheben
Das Sortieren nach Menü Grüne B
Gebührenpflichtige Anwendungen
Löschen
Mein Konto
Zugriff auf den Samsung Apps Bildschirm
Samsung Apps nach Kategorien
AllShare-Funktion verwenden
Hilfe
Die vTuner-Funktion benutzen
Sonstige Informationen
STANDBY-Modus gedrückt
Geändert werden
Diskhülle zurück, und wählen Sie die entsprechende Funktion
Geräusche zu hören
Möglicherweise instabil. Verbindung überprüfen
Von BD-LIVE- Service
Ich kann durch den PC Share
Server Netzwerktestmenü ausführen
Technische Daten
Schalldruck-Ausgabe 86 dB/W/M 88 dB/W/M
Lautsprecher-System
Front Surround Center Subwoofer Impedanz Frequenzbereich
Eingangs-Bewertung 165 W 170 W
` CIS
Korrekte Entsorgung der Batterien dieses Produkts
Korrekte Entsorgung von Altgeräten Elektroschrott
Blu-ray 5.1 canali
Italiano
Informazioni sulla sicurezza
Avvertenze per la sicurezza
Guardare la TV utilizzando la funzione 3D
Precauzioni
Manipolazione e conservazione dei dischi
Manipolazione dei dischi
Conservazione dei dischi
Licenza
Indice
Sicurezza
Cambia password
Collegamento del trasmettitore wireless all’unità
Grado Blocco Can. BD
Operazioni preliminari
Icone utilizzate nel manuale
Tipi di dischi e caratteristiche
Compatibilità dei dischi Blu-ray
Dischi non riproducibili
Disco HD DVD
Codice regionale
Tipi di dischi
Utilizzo di dischi Jpeg
Formato del disco
Formati file supportati
File video supportati
Decoder audio
Restrizioni
Decoder video
File musicali supportati
Dispositivi supportati
Accessori
Appunti sui collegamenti USB
Antenna FM Microfono ASC Manuale utente
Pannello anteriore
Descrizione
Pannello posteriore
Descrizione del telecomando
Telecomando
Inserimento delle batterie nel telecomando
Elenco codici marche TV
Impostazione del telecomando
Tipo di batterie AAA
Connessioni
Collegamento degli altoparlanti
Diffusore anteriore sx Diffusore centrale Subwoofer
Composizione dei diffusori
Collegamento dei diffusori
SX dx
Modulo ricevitore wireless SWA-5000
Collegamento del modulo di ricezione wireless opzionale
Attenzione
Collegamento delluscita video al televisore
Funzione di rilevamento automatico Hdmi
Metodo 2 Video Component Qualità Ottima
Metodo 3 Video composito Buona Qualità
Collegamento dellaudio da apparecchi esterni
Ottico Collegamento di un componente digitale esterno
AUX Collegamento di un componente analogico esterno
Destra
Router Modem a Banda larga Servizio a banda larga
Connessione alla rete
Servizio a Banda larga
Modem a banda larga con router integrato
Collegamento dellantenna FM
Servizio a banda larga IP sharer wireless
Antenna FM fornita
Premere il tasto Invio per selezionare Avvio
Impostazione
Impostazione iniziale
Menu principale
Impostazioni
Invio
Dim. schermo
Impostazioni 3D
Riproduzione 3D Blu-ray
Per arrestare un filmato durante la riproduzione
BD Wise solo prodotti Samsung
Dimensioni schermo Smart Hub
Aspetto TV
Risoluzione
Impostazione
Risoluzione in base al modo di uscita
Modo Hdmi Modo Component
Modo
Hdmi Profondità colori
Formato colore Hdmi
Fotogramma Video24Fs
Modalità pausa
Italiano Distanza
Imposta altoparlanti
Livello
Test tono
Calibrazione musicale auto
Calibrazione musicale auto
EQ Utente
Impostazione Calibrazione musicale auto
Può essere attivato quando Hdmi Audio è su on
Canale ritorno audio
Uscita Digitale
Off Disattivare la funzione Canale ritorno audio
Bitstream Bitstream DTS Bitstream Dolby
Controllo gamma dinamica
Selezione delluscita digitale
Connessione
Rete
Sincronia audio
Impostazioni di rete
Rete via cavo
Impostazione di una connessione di rete wireless Auto
Rete wireless
Wireless Generale Utilizzando Wpspbc One Foot Connection
Premere i tasti per selezionare Wireless Generale
Premere i tasti per selezionare Wpspbc
Impostazione iniziale
Stato rete
Connessione Internet BD-LIVE
Sistema
Fuso orario
La password predefinita è
Gestione dei dati BD
Display frontale
Grado Blocco Can. BD
Grado Blocco Can. DVD
Telecomando di Rete
Tramite USB
Aggiornamento software
Supporto
Con file scaric
Contattare Samsung
Tramite disco
Download in standby
Struttura dei dischi
Funzioni di base
Riproduzione
Utilizzo del menu del disco
Utilizzo del menu popup
Utilizzo del menu Titolo
Ricerca della scena desiderata
Salto di capitoli
Riproduzione al rallentatore Fotogramma per fotogramma
Riproduzione al rallentatore
Ripetizione di una sezione
Riproduzione ripetuta
Selezione della lingua dei sottotitoli
Spostamento immediato alla scena desiderata
Selezione della lingua dellaudio
Utilizzo del tasto Tools
Selezione di Impostazioni immagine
Modifica dellangolo della videocamera
Impostazione di Bonusview
Funzione Didascalie
Alla traccia successiva della playlist
Ascolto di musica
Tasti Ricerca
Tasti Numerici Durante la riproduzione di una
Riproduzione di un CD audio CD-DA/MP3
Ripetere un CD audio CD-DA /MP3
Modo audio
SFE Sound Field Effect Mode Mod. SFE Effetto campo audio
Funzione DSP Processore di segnale digitale
Sala
Utilizzo del tasto Tools
Modo Dolby Pro Logic
Visualizzazione di file foto
Riproduzione di unimmagine
Funzioni di base
Riproduzione da un dispositivo di Memorizzazione USB
Passare al menu principale
Trasmissione RDS
Impostazione mono/stereo
Memorizzazione delle stazioni
Radio
Indicazione PTY Tipo programma Funzione PTY-SEARCH
Per visualizzare i segnali RDS
Caratteri utilizzati sul display
Per ricercare un programma usando
RIPRODUZIONE, PAUSA, ARRESTO, #
Caricamento del trasmettitore wireless
Collegamento delliPod/iPhone Utilizzando il cavo USB
BD/DVD AUX R. Ipod
Completata
Modelli iPod/iPhone utilizzabili con Questo prodotto
Sotto tensione / ricarica
Ricarica in corso
LED
Stato operativo del led del trasmettitore wireless
Collegamento del trasmettitore wireless Allunità principale
Successo
Utilizzo di Smart Hub
Servizi di rete
Primo avvio di Smart Hub
Configurare le impostazioni di rete. Vedere le pagine 36~39
Utilizzabile durante l’uso di Smart Hub tranne
Smart Hub in breve
Questa funzione è limitata a alcune regioni
Creazione di un account
Utilizzo del tastierino
Inserimento di testo, numeri e simboli
Gestione account
Login all’account
Impostazioni BLU D
È necessario utilizzare un indirizzo e-mail come ID
Ripristina
La funzione Cambia password consente di
Cambia password
Registra account servizio
Sposta
Mod. modif Giallo C
Proprietà
Rinomina cart
Nuova cart
Sposta in cart
Blocco
Sblocco
Il menu Ordina per Verde B
Applicazioni a pagamento
Elimina
Applicazioni Samsung per categoria
Accesso alla schermata delle applicazioni Samsung
Uso della schermata Appl. Samsung
Account pers
Utilizzo della funzione vTuner
Utilizzo della funzione AllShare
Risoluzione dei problemi
Altre informazioni
Standby
Arresto
Verificare che la rete sia stabile
Share Manager, ma non i file
Potrebbero non essere visualizzati
Intermittente
Specifiche
40Hz ~ 160Hz
Dimensioni L x a x P
Sistema di diffusori
English
Italiano
Suomi
Polski
Hrvatski
ประกาศเกี่ยวกับ Cinavia
ﺔϴΑήﻌﻟا ﺔϐϠﻟا
` CIS
Corretto smaltimento delle batterie del prodotto