LFD Ekranas Vartotojo instrukcija
Turinys
Specifikacijos
Autorių teisės
Prieš naudojant gaminį
Valymas
Saugos priemonės
Simboliai
Dėmesio
Elektra ir saugumas
Laikymas
Diegimas
Samsung
Veikimas
Ventiliacijos angą ar įvesties / išvesties prievadus ir pan
Page
Sudedamosios dalys
Pasiruošimas
Sudedamųjų dalių tikrinimas
Laidas
Atskirai parduodami priedai
Tinklo dėžutė
Valdymo skydelis
Dalys
Valdymo klavišas
Mygtukai Aprašymas
Return
Power Off
Valdymo meniu
MygtukaiAprašymas
RJ45
Galinė pusė
Prievadas Aprašymas
Logotipo kortelė
Nuo vagystės apsaugantis užraktas
VOL
Nuotolinio valdymo pultas
Sparčiai pasirinkti dažnai naudojamas funkcijas
Kaip įdėti elementus į nuotolinio valdymo pultą
Nuotolinį pultą
Daugiau nei vieno ekrano valdymas naudojant
Vėdinimas
Palenkimo kampas ir pasukimas
Montavimas ant statmenos sienos
Pav. Šoninis vaizdas
Montavimas ant dantytos sienos
Matmenys
Plokštuminis vaizdas
Modelio
Lizdo Dangtelio naudojimas
Sieninio laikiklio komplekto specifikacijos Vesa
Sieninio laikiklio pritvirtinimas
Sieninio laikiklio pritvirtinimas
Kiekis
Modelio Vesa varžtų skylių
Pavadinimas
Milimetrais
Nuotolinio valdymo pultas RS232C
Adatėlė Signalas
Laidų jungtys
RS232C laidas
LAN vietinio kompiuterių tinklo laidas
Kontaktų Įprasta spalva Signalas Skaičius
Lizdinė „Rx „Tx
„Tx „Rx
Tiesioginis LAN laidasPC į HUB
Signalas
Pereinamasis LAN laidas PC į PC
Jungtis RJ45
Sujungimas
Jungtis
Kontroliavimas nustatyti kontrolinę komandą
Kontroliniai kodai
Komanda
Komandos tipas Komanda
Maitinimo valdymas
Power maitinimo kodas, kuris bus nustatytas gaminyje NAK
Garsumo valdymas
ERR kodas, kuris nurodo, kokia įvyko klaida
Įvesties šaltinio nustatymas nustatyti įvesties šaltinį
Įvesties šaltinio valdymas
Ekrano dydžio valdymas
Ekrano veiksenos valdymas
Funkcija
Vaizdo dydžio nustatymas nustatyti vaizdo dydį
PIP įjungimo / išjungimo valdymas
Auto Adjustment 0x00 visada ACK
Automatinio reguliavimo valdymas tik jungtims PC ir BNC
PIP įjungimas / išjungimas Įjungti / Išjungti PIP
Apsauginis užraktas
Vaizdo sienos veiksenos valdymas
Vaizdo sienos nustatymas nustatyti vaizdo sienos veikseną
Full Natural
Vaizdo sienos vartotojo valdymas
Vaizdo sienos įjungimas
Išjungti
10x10 vaizdo sienos modelis
WallSNo Gaminio numerio kodas, nustatytas gaminyje
10x10 vaizdo sienos modelis 1 ~
Nustatytas skaičius Duomenys
0x02
Šaltinio įrenginio prijungimas ir naudojimas
Prijungimas naudojant D-SUB laidą analoginio tipo
Prieš prijungiant
Jungimas prie AK
Prijungimas naudojant HDMI-DVI laidą
Prijungimas naudojant DVI laidą skaitmeninio tipo
Atsargumo priemonės naudojant DP
Prijungimas naudojant Hdmi laidą
Prijungimas naudojant DP laidą
Prijungimas naudojant komponentinės jungties laidą
Jungimas prie vaizdo prietaiso
Prijungimas naudojant AV laidą
Hdmi arba HDMI-DVI laido iki 1080p naudojimas
LAN laido prijungimas
Prijungimas prie garso sistemos
MagicInfo režimo įjungimas
Tinklo dėžutės prijungimas parduodamas atskirai
„MagicInfo
Nustatymus
Pasirinkite rodymo režimą
PIM pritvirtinimas parduodama atskirai
„Plug In Module
Source
Įvesties šaltinio keitimas
Edit Name
Information
MDC programos diegimas / pašalinimas
MDC naudojimas
Programos pašalinimas
Įtraukti / panaikinti programą
Monitor Computer
Prisijungimas prie MDC
Prijungimas tiesioginiu LAN kabeliu
Naudojant MDC per eternetą
Prijungimas kryžminio tipo LAN kabeliu
Player
Pagrindinio ekrano funkcija
Player
Schedule Template
Prijungto įrenginio patvirtinimas iš serverio
Atsisiuntus tvarkaraštį jis bus paleistas
Laiko nustatymas
Location įveskite dabartinę įrenginio vietą
Local Channel
Network Channel
Deployed Folders
My Templates
Parinkties pavadinimas Naudojimas
Player puslapyje pateikiamos funkcijos
Player puslapyje pateikiami meniu elementai
Settings
Player puslapio meniu Settings
Settings
Landscape / Portrait
――Taikoma tik atkuriant Network Channel / Local Channel
Kai leidžiamas turinys
Leidžiamo turinio išsamios informacijos peržiūra
Leidžiamo turinio nustatymų keitimas
Picture Mode
Playlist
Music
Šablonų failai ir LFD .lfd failai
Su Player suderinami failų formatai
Tinklo tvarkaraščio kelių vaizdų funkcija
Failo plėtinys Plėtinys Vaizdo kodekas Skyra Kadrų greitis
Turinys
Kadr./sek Mbps
AAC HE-AAC WMA DD+ MPEGMP3 DTS Core G.711ALaw, μ-Law
Vaizdai
Vaizdas Garsas
Diagramos Vertikalusis tekstas
„Flash technologija Power Point
Objektų įterpimas
Nepalaikomos funkcijos
Šablono failas
Diagramos
Palaiko Network Channel ir Local Channel
Suderinami dokumentų failų formatai -- Plėtinys .lfd
Vaizdas
Su Video Wall suderinami failų formatai
Neprieinama
Apribojimai
Įmanoma
Schedule puslapyje pateikiamos funkcijos
Schedule
Schedule puslapyje pateikiami meniu elementai
Parinkties Naudojimas Pavadinimas
Kanalo tvarkaraščio redagavimas
Kanalų tvarkaraščių konfigūravimas
Template puslapyje pateikiamos funkcijos
Template
Home → Template → Enter E
Market
Pasirinkite langą Edit Text ir įveskite tekstą
Teksto įvedimas
Fono vaizdo / foninės muzikos konfigūravimas
Preview
Save Cancel
Jei šabloną norite išsaugoti, paspauskite mygtuką Save
Sukonfigūruokite Template Name ir Storage
Clone Product
Clone Product
Home → Clone Product → Enter E
Storage device?
ID Settings
ID Settings
Device ID
PC Connection Cable
Apply to
Video Wall
Video Wall
Home → Video Wall → Enter E
Horizontal x Vertical
Video Wall
Screen Position
Format
Network Status
Network Status
Patikrinkite esamą tinklą ir interneto ryšį
Home → Network Status → Enter E
Picture Mode
Picture Mode
On Timer
On/Off Timer
On/Off Timer
Home → On/Off Timer → Enter E
Holiday Management
Off Timer
Pasirinkti On Timer ir Off Timer nebus suaktyvinami
More settings
More settings
Home → More settings → Enter E
Ticker
Home → URL Launcher → Enter E
URL Launcher
Picture
Menu m → Picture → Picture Mode → Enter E
Ekrano reguliavimas
Koreguojamosios parinktys
Picture Mode
Menu m → Picture → Enter E
Gaminyje yra kelios vaizdo kokybės reguliavimo parinktys
Menu m → Picture → Colour Temperature → Enter E
Colour Temperature
Menu m → Picture → White Balance → Enter E
White Balance
Point
Calibrated value
Gamma
Menu m → Picture → Gamma → Enter E
Menu m → Picture → Calibrated value → Enter E
Picture Mode Koreguojamosios parinktys Parametrai
Advanced Settings
Advanced Settings
Dynamic Contrast
RGB Only Mode
Black Tone
Flesh Tone
Film Mode Off Dynamic Backlight
Digital Clean View Off Mpeg Noise Filter Hdmi Black Level
Picture Options
Picture Options
Colour Tone
Digital Clean View
Mpeg Noise Filter
Off / Cool / Standard / Warm
Colour Tone Off Digital Clean View Mpeg Noise Filter
Film Mode
Hdmi Black Level
Dynamic Backlight
Picture Size
· Position Resolution
Picture Size
Picture Size
Picture Size
Position
Zoom/Position
Galima skyra Off / 1024x768 / 1280x768 / 1360x768
Resolution
PC Screen Adjustment
Auto Adjustment
Menu m → Picture → Reset Picture → Enter E
Reset Picture
Picture Off
Menu m → Picture → Picture Off → Enter E
PIP parametrai
OnScreen Display
OnScreen Display
Pagrindinis vaizdas Šalutinis vaizdas
PIP
Rotation
Rotate Content
Rotate menu
Aspect Ratio
Auto Protection Time
Screen Protection
Screen Burn Protection
Screen Protection
Screen Burn Protection
Timer
Pixel Shift
Immediate display
Message Display
No Signal Message
Source Info
MDC Message
OnScreen Display
Menu Language
High / Medium / Low
Menu m → OnScreen Display → Menu Transparency → Enter E
Menu m → OnScreen Display → Reset OnScreen Display → Enter E
Reset OnScreen Display
Sound
Sound Mode
Garso nustatymas
Virtual Surround
Sound Effect
Dialog Clarity
Equalizer
Sound on Video Call
Hdmi Sound
Menu m → Sound → Hdmi Sound → Enter E
Menu m → Sound → Sound on Video Call → Enter E
TV Sound Output
Speaker Settings
Auto Volume
Menu m → Sound → Reset Sound → Enter E
Reset Sound
Network Settings
Network Settings
Network
Network Type
Prijungimas prie laidinio tinklo
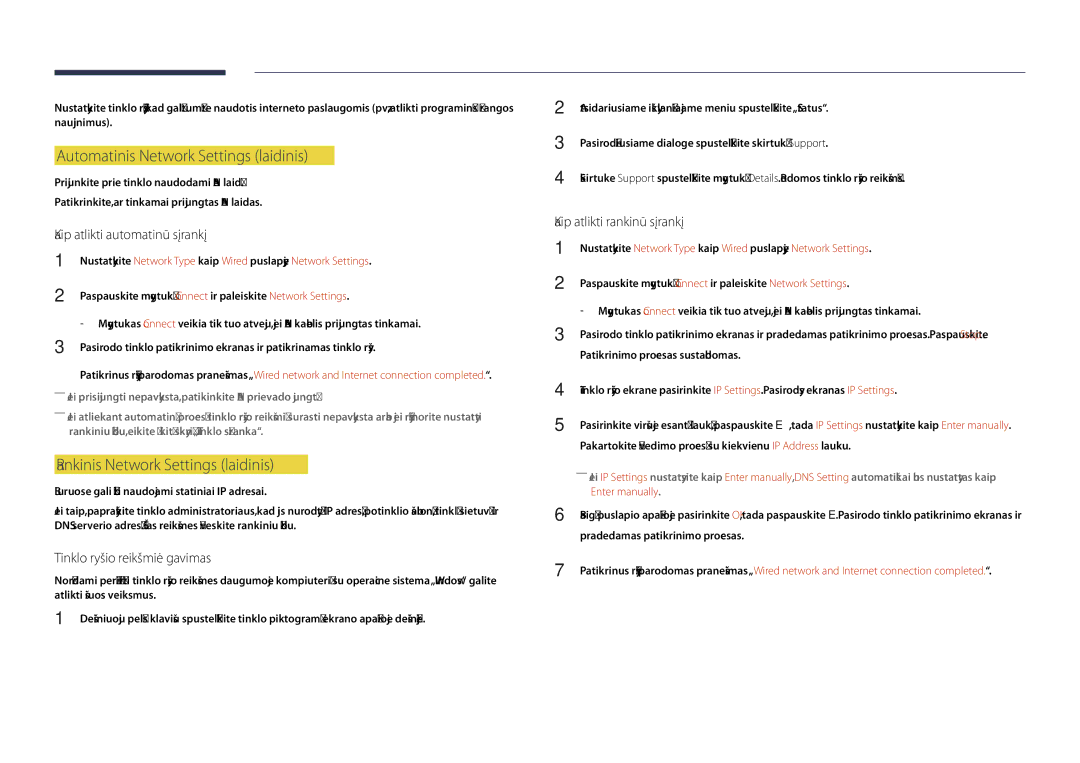
Tinklo nustatymai laidinio
Enter manually
Automatinis Network Settings laidinis
Rankinis Network Settings laidinis
Prijungimas prie belaidžio tinklo
Tinklo nustatymas belaidis
Automatinė tinklo sąranka belaidis
Kelvedį, kuris nėra apsaugotas, pereikite prie 7 veiksmo
Rankinė tinklo sąranka belaidis
Setup and ready to use
Pasibaigus tinklo sąrankai pasirodys tinklo ryšio ekranas
Nustatymas naudojant Wpspbc
Multimedia Device Settings
Wi-Fi Direct
MENUm → Network → Wi-Fi Direct → Entere
MENUm → Network → Multimedia Device Settings → Entere
Screen Mirroring
Server Network Settings
MENUm → Network → Device Name → Entere
Device Name
System
Setup
Pradiniai nustatymai System
System
Touch Control
Admin Menu Lock
Menu m → System → Touch Control → Enter E
Sukonfigūruokite valdymo lietimu funkcijas
Power On Delay
Sleep Timer
Time
Clock Set
Auto Source Switching
Auto Source Switching
Primary Source Recovery
Primary Source
Auto Power On
Power Control
PC Module Power
Max. Power Saving
Auto Power On Off PC Module Power Max. Power Saving
Power Button
Standby Control
Network Standby
Eco Solution
Eco Solution
Energy Saving
Eco Sensor
No Signal Power Off
Temperature Control
Auto Power Off
Energy Saving Off Eco Sensor Screen Lamp Schedule
Device Manager
Keyboard Settings
Device Manager
Select Keyboard
Keyboard Settings
Mouse Settings
Select Mouse
Mouse Options
Keyboard Settings Mouse Settings
Pointer Settings
Pointer Size
Pointer Speed
Change PIN
Play via
Menu m → System → Play via → Enter E
Menu m → System → Change PIN → Enter E
Security
General
BD Wise
General
Anynet+ HDMI-CEC
Hdmi Hot Plug DivX Video On Demand Game Mode
Anynet+ HDMI-CEC
„Anynet+ meniu Aprašymas
Auto Turn Off
Anynet+ HDMI-CEC
Device search
Device search
„Anynet+ trikčių diagnostika
Problema Galimas sprendimas
„Disconnecting Anynet+ device
Patikrinkite, ar tinkamai prijungtas Hdmi kabelis
Patikrinkite, ar įrenginys palaiko „Anynet+ funkcijas
Vėl atlikite „Anynet+ įrenginių paiešką
Kai kurie Hdmi kabeliai gali nepalaikyti „Anynet+ funkcijų
DivX Video On Demand Game Mode
Game Mode
Hdmi Hot Plug
DivX Video On Demand
Menu m → System → Reset System → Enter E
Reset System
Update now
Software Update
Auto update
Contact Samsung
Go to Home
On/Off Timer
Picture Mode
More settings
Network Status
Support
Reset All
Menu m→ Support → Reset All → Enter E
Netinka naudoti didesnės kaip 2 TB talpos USB
Failų sistema ir formatai
Su medijos leistuvu suderinami įrenginiai
USB įrenginio atjungimas
USB įrenginio naudojimas
USB įrenginio prijungimas
Kompiuterio ar mobiliojo įrenginio ryšio patvirtinimas
Prisijungus prie namų tinklo Dlna
Medijos turinio sąrašo puslapyje pateikiamos funkcijos
Source → Source → USB
Filter
Parinkties Naudojimas Photos Videos Music Pavadinimas
Medijos turinio sąrašo puslapyje pateikiami meniu elementai
Atkuriant nuotraukas pateikiami mygtukai ir funkcijos
Select Scene
Rewind / Fast Forward
Picture Size
Audio Language
Atkuriant muziką pateikiami mygtukai ir funkcijos
Pakeiskite Sound Mode
Pristabdykite arba paleiskite muziką
Shuffle
Subtitrai
Palaikomi subtitrų ir medijos leistuvo failų formatai
Palaikomos vaizdo skyros
Išorinė
Palaikomi vaizdo įrašo formatai
Palaikomi muzikos failų formatai
Failo plėtinys Tipas Kodekas Komentarai
Vaizdo dekoderis
DivX 3.11 / 4.x / 5.x 1920 x ~30
Avi
Mkv
Asf
Skyros ir dažnio tikrinimas
Gedimų nustatymo ir šalinimo instrukcija
Gaminio tikrinimas
Sunkumai dėl ekrano
Patikrinkite toliau išvardytus dalykus
Sunkumai diegiant kompiuterio veiksena
Gaminys išsijungs automatiškai
Balta spalva nėra visiškai balta
Ekrane nėra vaizdo, o LED lemputė mirksi kas 0,5-1 sekundę
Sharpness
Sunkumai dėl garso
Eikite į Sound ir pakeiskite Speaker Settings į Internal
Sunkumai dėl šaltinio įrenginio
Sunkumai dėl nuotolinio valdymo pulto
Veikiant Hdmi režimui nėra garso
Kitos problemos
Garso įvestis Ekrano režimas Automatinis
Garso įvestis stereofoniniai
Neveikia IR jutiklis
Klausimas Atsakymas
Klausimai ir atsakymai
Kaip įjungti energijos taupymo režimą?
Ekrano užsklandos parametrai arba Bios Setup Bios sąranka
Klausimas
Modelio pavadinimas
Specifikacijos
Bendros
Page
„PowerSaver
Modelio pavadinimas DH40D / DH48D / DH55D
Iš anksto nustatytos laiko sinchronizavimo veiksenos
Page
Atsakomybė už mokamą techninę priežiūrą klientų išlaidos
Priedas
Tai nėra gaminio defektas
Gaminio gedimas dėl kliento kaltės
Valstybėse, kuriose yra atskiros surinkimo sistemos
Tinkamas šio produkto akumuliatorių išmetimas
Apsauga nuo liekamojo vaizdo išdegimo
Optimali vaizdo kokybė
Liekamojo vaizdo išdegimas. Kas tai?
Subpikselių skaičius pagal ekrano tipą
Venkite skirtingo skaisčio teksto ir fono spalvų derinių
Kaip išvengti liekamojo vaizdo
Reguliarus teksto spalvų keitimas
Licencija
480i / 480p / 720p
Terminologija