Connecting to an External Source

GB

The auxiliary input can be used to take advantage of the sound quality of your micro-component system when listening to other sources.

Examples: A television

A video disc player

A Hi-Fi stereo video cassette recorder

To connect to the external source, the source must have an audio output. In addition, you need an RCA connection cable.

1

Set the system to standby mode and disconnect it and the external


source from the main socket.


2

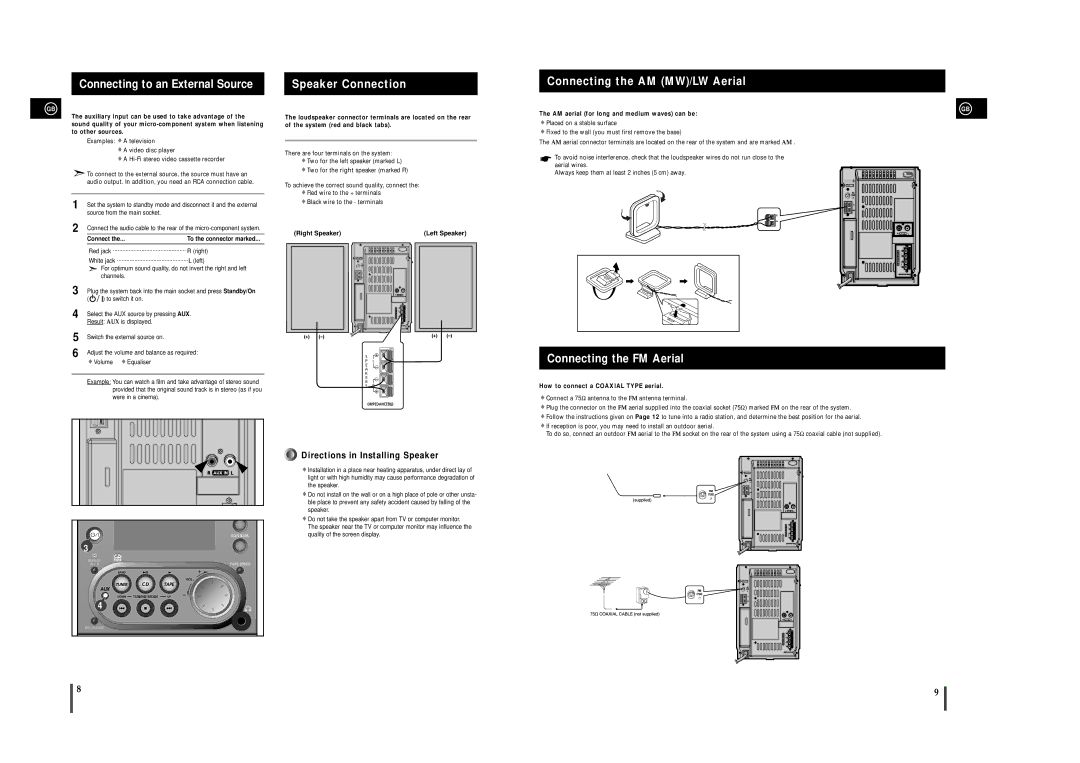
Connect the audio cable to the rear of the micro-component system.


Connect the...


To the connector marked...


Red jack

..............................................

R (right)


White jack

.............................................

L (left)


For optimum sound quality, do not invert the right and left


channels.


3

Plug the system back into the main socket and press Standby/On

4

(


) to switch it on.


Select the AUX source by pressing AUX.


Result: AUX is displayed.


5

Switch the external source on.


6

Adjust the volume and balance as required:


Volume


Equaliser


Example: You can watch a film and take advantage of stereo sound provided that the original sound track is in stereo (as if you were in a cinema).

Speaker Connection

The loudspeaker connector terminals are located on the rear of the system (red and black tabs).

There are four terminals on the system:

Two for the left speaker (marked L)

Two for the right speaker (marked R)

To achieve the correct sound quality, connect the:

Red wire to the + terminals

Black wire to the - terminals

(Right Speaker)

(Left Speaker)


6

Connecting the AM (MW)/LW Aerial

GB

The AM aerial (for long and medium waves) can be:

Placed on a stable surface

Fixed to the wall (you must first remove the base)

The AM aerial connector terminals are located on the rear of the system and are marked AM .

To avoid noise interference, check that the loudspeaker wires do not run close to the aerial wires.

Always keep them at least 2 inches (5 cm) away.

Connecting the FM Aerial

How to connect a COAXIAL TYPE aerial.

Connect a 75antenna to the FM antenna terminal.

Plug the connector on the FM aerial supplied into the coaxial socket (75) marked FM on the rear of the system.

Follow the instructions given on Page 12 to tune into a radio station, and determine the best position for the aerial.

If reception is poor, you may need to install an outdoor aerial.

To do so, connect an outdoor FM aerial to the FM socket on the rear of the system using a 75coaxial cable (not supplied).

3

.

4

Directions in Installing Speaker

Installation in a place near heating apparatus, under direct lay of light or with high humidity may cause performance degradation of the speaker.

Do not install on the wall or on a high place of pole or other unsta- ble place to prevent any safety accident caused by falling of the speaker.

Do not take the speaker apart from TV or computer monitor. The speaker near the TV or computer monitor may influence the quality of the screen display.

8

9


Page 5
Image 5
Samsung MM-J4, MMJ4RH/ELS, MMJ4QH/XFO Connecting to an External Source, Speaker Connection, Connecting the AM MW/LW Aerial

MM-J4, MMJ4RH/ELS, MMJ4QH/XFO specifications

The Samsung MMJ4QH/XFO and MMJ4RH/ELS are two innovative models from the renowned electronics manufacturer, showcasing the convergence of cutting-edge technology and user-friendly design. These models are primarily recognized for their versatility in the realm of modern home appliances, specifically in portable air conditioning units, which serve to enhance indoor comfort.

One of the standout features of both models is their impressive cooling capabilities, which efficiently circulate cool air throughout the room, making it ideal for hot summer days. With a powerful cooling capacity, these units are designed to quickly lower the temperature in medium to large-sized spaces, ensuring comfort for users in various environments.

These models are equipped with advanced inverter technology, which not only provides efficient cooling but also significantly reduces energy consumption. By adjusting the compressor speed to maintain the desired temperature, the MMJ4QH/XFO and MMJ4RH/ELS can lower electricity bills while minimizing environmental impact. This energy-efficient operation makes these air conditioners a responsible choice for eco-conscious consumers.

User convenience is another key aspect of these models. Featuring intuitive digital controls, users can easily adjust settings such as temperature, fan speed, and operational modes. Moreover, the inclusion of a remote control allows for effortless adjustments from a distance, further enhancing usability.

In terms of design, both models boast a sleek, modern aesthetic that can complement any interior decor. Their compact size allows for easy placement in various locations, whether it's a bedroom, living room, or office. Additionally, portability is a significant advantage, as these units can be moved effortlessly between rooms, catering to specific cooling needs.

The MMJ4QH/XFO and MMJ4RH/ELS also prioritize air quality with built-in filtration systems that help to capture dust and allergens, promoting a healthier indoor environment. This feature is particularly beneficial for individuals with allergies or respiratory issues, ensuring that the air circulated is clean and free from harmful particles.

Furthermore, noise level is a crucial consideration in any air conditioning unit. Both models operate quietly, ensuring a peaceful atmosphere, whether during work, relaxation, or sleep.

In summary, the Samsung MMJ4QH/XFO and MMJ4RH/ELS stand out as exemplary air conditioning units that combine advanced technologies with outstanding functionality. Their energy efficiency, user-friendly features, modern design, and focus on air quality make them a top choice for consumers seeking reliable and effective climate control solutions.