DVR a 8/16 Canali
Caratteristiche principali del DVR
Compreso CON IL DVR
Non smontare, riparare, rimodellare il prodotto
Norme di sicurezza
Assicurare la sufficiente ventilazione
Non tirare il cavo di alimentazione
Dichiarazione DI Conformità
Prima di iniziare
Avvertenza
Indice
Ricerca E Riproduzione Smart Viewer
Presentazione del DVR a 8/16 canali
Comandi DEL DVR
Pulsante RIPRODUZIONE/PAUSA
LED Power
Pulsante Passo/Riavvolgimento Rapido
Pulsante Avanzamento Rapido/Passo
SPOT1 Uscita 1 canale esclusivo Spot
Jack Pannello Posteriore
Retro 5080/5082 Retro 5160/5162
Porta di collegamento USB
Telecomando
Utilizzare i pulsanti Numerici
Cambiare l’ID del telecomando
Aggiunta DI HDD
Installazione
Controllare L’AMBIENTE DI Installazione
Impostare il jumper
Cose da considerare quando si installa un hard disk
Prestare attenzione a non perdere viti o accessori
Come aggiungere hard disk SHR-5082, SHR-5162
Supporto HDD B HDD a
Cacciavite
Cavo primario
Cavo secondario
SHR-5080, SHR-5160
Installazione
Collegare a Internet tramite Ethernet 10/100BaseT
Collegare VIDEO, Audio E Monitor Collegare LA Rete
Le illustrazioni si riferiscono al modello SHR-5162
Collegamento Internet tramite Adsl
Collegare L’USB
Collegare L’ENTRATA/ Uscita Allarme
Collegare IL Dispositivo RS-485
Modalità Schermo Live
Live
Utilizzo DEL Sistema
Icone schermo Live
Icona Evento Movimento
Modalità schermo Live
Icona Sensore Attivo
Modalità singola
Impostazione Audio On/Off in modalità schermo completo
Impostare Audio ON/OFF
Selezionare la modalità schermo live
Impostazione Audio On/Off in modalità 16-split
Funzione Freeze
Freeze E Zoom
Monitoraggio Evento
Funzione Zoom
Monitoraggio SPOT-OUT
Sistema
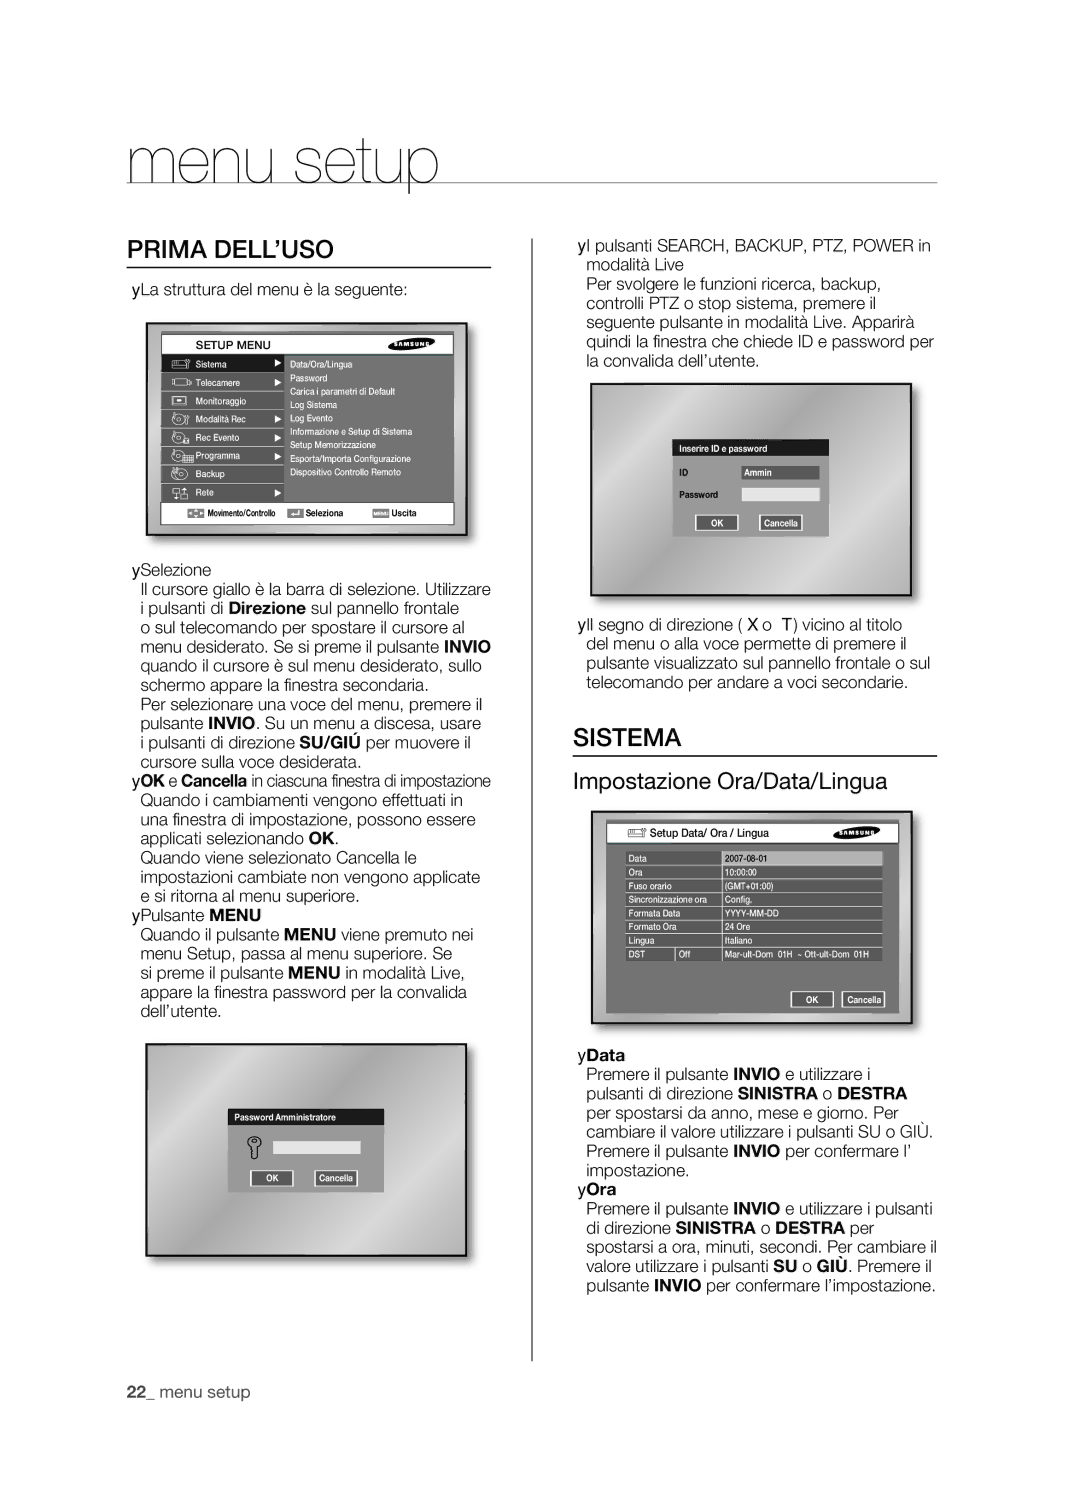
Menu setup
Prima DELL’USO
Impostazione Ora/Data/Lingua
Password
Log Evento
Carica i parametri di Default
Log sistema
Log Sistema
Informazioni di sistema e Setup
Setup Memorizzazione
Esporta/Importa Configurazione
Dispositivo Controllo Remoto
Configurazione della telecamera
Telecamera
Impostazione Schermo
Monitoraggio
Dispositivo PTZ
Modalità REC
Qualità registraz. ed elimin. autom
Velocità registraz e dim video
Durata registrazione Evento
Impostazione Motion detector
Setup Allarme
Modalità REC Evento
Programmazione
Setup Perdita Video
Rec su timer
Posizione IP
Rete
Programma emissione allarme
Setup del Protocollo di trasferimento
Lmpostazioni Trasferimento Immagine
Setup Richiamata
Possibile configurare il numero di porta di Web Viewer
Impostaz. Porta WebViewer
Caso di protocollo di trasferimento TCP
Configurare LE Rete
Configurazione porta per collegare Smart Viewer
Caso di protocollo di trasferimento UDP
Dati di registrazione discontinui
Backup
Per configurare le impostazioni correlate
Operazioni Base PTZ
Controllo telecamera PTZ
Modalità Controllo Telecamera PTZ
Per impostare una preselezione
Setup Preset
Impostazione Menu Telecamera
Premere il tasto Enter
Preset View
Altre Viste
REC Registrazione Normale
REC SU Timer
Registrazione
Registrazione Evento
Ricerca Evento
Ricerca e riproduzione
Ricerca Calendario
Per effettuare una ricerca calendario
Per effettuare una ricerca evento
Ricerca Data ORA
Ricerca VAI AL Primo
Per effettuare una ricerca data/ora
Riproduzione
Ricerca Backup
Ricerca VAI ALL’ULTIMO
DVR solo con il Media Player del PC
Vedere tutte le immagini
Mod alità riproduzione
Riproduzione veloce
Riproduzione Audio
Caratteristiche Principali
Smart Viewer
Introduzione
Specifiche PC Consigliate
Esecuzione DEL Programma Smart Viewer
Modalità Impostazione
La schermata mostra i luoghi monitorati
Impostazione DVR
Smart Viewer
Telecomando
Telecamera
Durata Registrazione Evento
Impostazione monitoraggio
Registrazione
Programmazione
Rete
Impostazione Viewer
Elenco DVR
Impostazione Luogo
Collegamento Automatico
L’audio non viene riprodotto
Elenco Luogo
Modifica
Versione S/W
Per modificare un luogo esistente, cliccare
Modalità Monitoraggio
Casi di errore nel collegamento
Errore di certificazione della Password
Informazioni Tempo
Schermo di collegamento
Pulsante di conversione modalità
Informazioni collegamento
Finestra Visualizzazione Log Evento
Scollegato.. Quando il DVR è scollegato
Pulsante Modalità Sequenza
Finestra di indicazione collegamento telecamera
Pulsanti di selezione Split schermo
Display Stato Monitoraggio
Pulsante Preferito
Pulsante Successivo
Pulsante Callback
Pulsante Registrazione Video
Pulsanti di controllo Telecamera PTZ
Pulsante Controllo Volume Audio
Pulsante Controllo Luminosità/ Contrasto Video
Impostazione Menu personale dispositivo PTZ
Modalità Ricerca
Lo schermo mostra i canali di riproduzione
Finestra Calendario
Pulsanti Volume Audio, Luminosità/ Contrasto Video
Modalità Remota
Impostazione Viewer Conversione File Ubicazione Jpeg
Pulsante Conversione File
Per eseguire questa funzione
Pulsante Ricaricare
Linea di Tempo
Pulsante Successivo
Modalità locale
Caratteristiche DEL Prodotto
Web Viewer
Cosè Web Viewer?
Requisiti DEL Sistema
Cliccare Install ActiveX Control…
Cliccare Install
Utilizzare Live Viewer
Display DI Informazioni OSD
DVR Collegato
Schermo Suddiviso
Modo Schermo COM
Cambiare LA Modalità Schermo Live
Salvare LO Schermo Live SUL PC
Cambiare IL Canale Schermo Live
Utilizzare LA Telecamera PTZ
Potete salvare il predefinito fino a
Utilizzare Search Viewer
DVR Collegato
Cercare I Video Registrati NEL Calendario
Modalità estesa
Cercare I Video Registrati Nella Linea DI Tempo
Modalità normale
Controllare LA Riproduzione
Info
Risoluzione 720X480 720X576
Appendice
Specifiche DEL Prodotto
Elocità Frame 480ips16Ch 400ips16Ch 240ips8Ch 200ips8Ch
Mezzo D1
MAX HDD Size 500GB x 3 = 1.5TB
MAX HDD Size 500GB x 4 = 2TB
Dettagliate Particolari
Schema
5080 Schema
5082 Schema
5160 Schema
5162 Schema
Impostazioni DI Fabbrica
Classificazione
Cancellazione automatica
Ips NTSC/6.2 ips PAL
DNS
Controllare l’impostazione Modalità Registrazione nel
Risoluzione DEI Problemi FAQ
Se si è dimenticata la password, resettare DVR con
Usc. Allarme
Durata Monitoraggio Evento Off
Allarme Rilevamento movimento/Perdita Video
Stato disattivato
Problema Soluzione
Preamble
Open Source License Report on the Product
GNU General Public License
Appendice
No Warranty
How to Apply These Terms to Your New Programs
Repair or Correction
We protect your rights with a two-step method
You must cause the whole of the work to
Appendice
Executable
END of Terms and Conditions
No Warranty
How to Apply These Terms to Your New Libraries
Foundation
OpenSSL License
Loss of USE, DATA, or Profits or Business Interruption
This Software is Provided by Eric Young ‘‘AS IS’’

