DVR de 8 canales/16 canales
Descripción general
Características
Español
Instrucciones Importantes DE Seguridad
Descripción General
Advertencia
Antes DE Comenzar
Descripción General
Aprobaciones DE LAS Normativas
Índice
Español
Nombres DE Componentes Y Funciones Parte Frontal
REC
Alarm
Mode
Audio
7080/7082 Rear
Nombres DE Componentes Y Funciones Parte Posterior
8080/8082 Rear 8160/8162 Rear
Audio OUT
Video OUT
VGA
Hdmi
DVR
Mando a Distancia
Utilización del botón numérico
Canal
Cambio de la ID del mando a distancia
Monitor
Canal Pulse cualquier botón entre 1 y
Instalación
Comprobación DEL Entorno DE Instalación
Instalación Adición DE UN Disco Duro
Instalación EN Bastidor
Precauciones al añadir un Disco Duro
Instalación
Si se añaden DD a los modelos SHR-7080, 7160, 8080 y
Adición de un DD
Si se añaden DD a los modelos SHR-7082, 7162, 8082 y
Cierre la cubierta y coloque los tornillos
Conexión DE LA RED
Conexión DE VIDEO, Audio Y Monitor
Conexión a Internet a través de Ethernet 10/100/1000BaseT
Conexión DEL DD Sata Externo
Conexión DE USB
Conexión a Internet a través de Adsl
Conexión a otro dispositivo
Conexión DE UN Dispositivo POS
Conexión DE LA ENTRADA/SALIDA DE Alarma
Conexión a Otro Dispositivo
Conecte el dispositivo RS-485 a través del puerto posterior
Conexión DEL Dispositivo RS-485
Ej. DVRTX+/- SCC-C6433,35RX+ DVRTX+/- SCC-C6403,07TX+
Inicio del sistema
Introducción
Apagado del sistema
Directo
Directo
Inicio de sesión
Iconos de la pantalla en directo
Configuración DE LA Pantalla EN Directo
Menú de la pantalla en directo
Información de errores
Menú de modo de división
Menú de modo de división
Zoom
Menú del modo Única
PTZ
Visualización del menú del lanzador
Cambio del modo de pantalla
Modo Directo
Cambio del modo de división
Secuencia automática
Cambio manual
Ajuste de canalesAjuste de canales
Canal can 9~12 Canal can 13~16
Ej. si desea cambiar del can 1 al can
Selección de un modo de Salida Puntual
Salida Puntual
Cambio al modo Única
Nombres de componentes y funciones Parte posterior. Página
Audio ACT/DES
Zoom
Congelar
Audio ACT/DES en modo Única
Supervisión DE Eventos
Fecha/Hora/Idioma
Configuración DEL Sistema
Ajuste de Fecha/Hora/Idioma
Utilización del DVR
Utilización del calendario
Ajuste de vacaciones
Utilización DEL DVR
Seleccione Vacaciones
Una vez confi gurado el administrador, pulse Acept
Ajuste del Administrador
Gestión de permisos
Utilización del teclado virtual
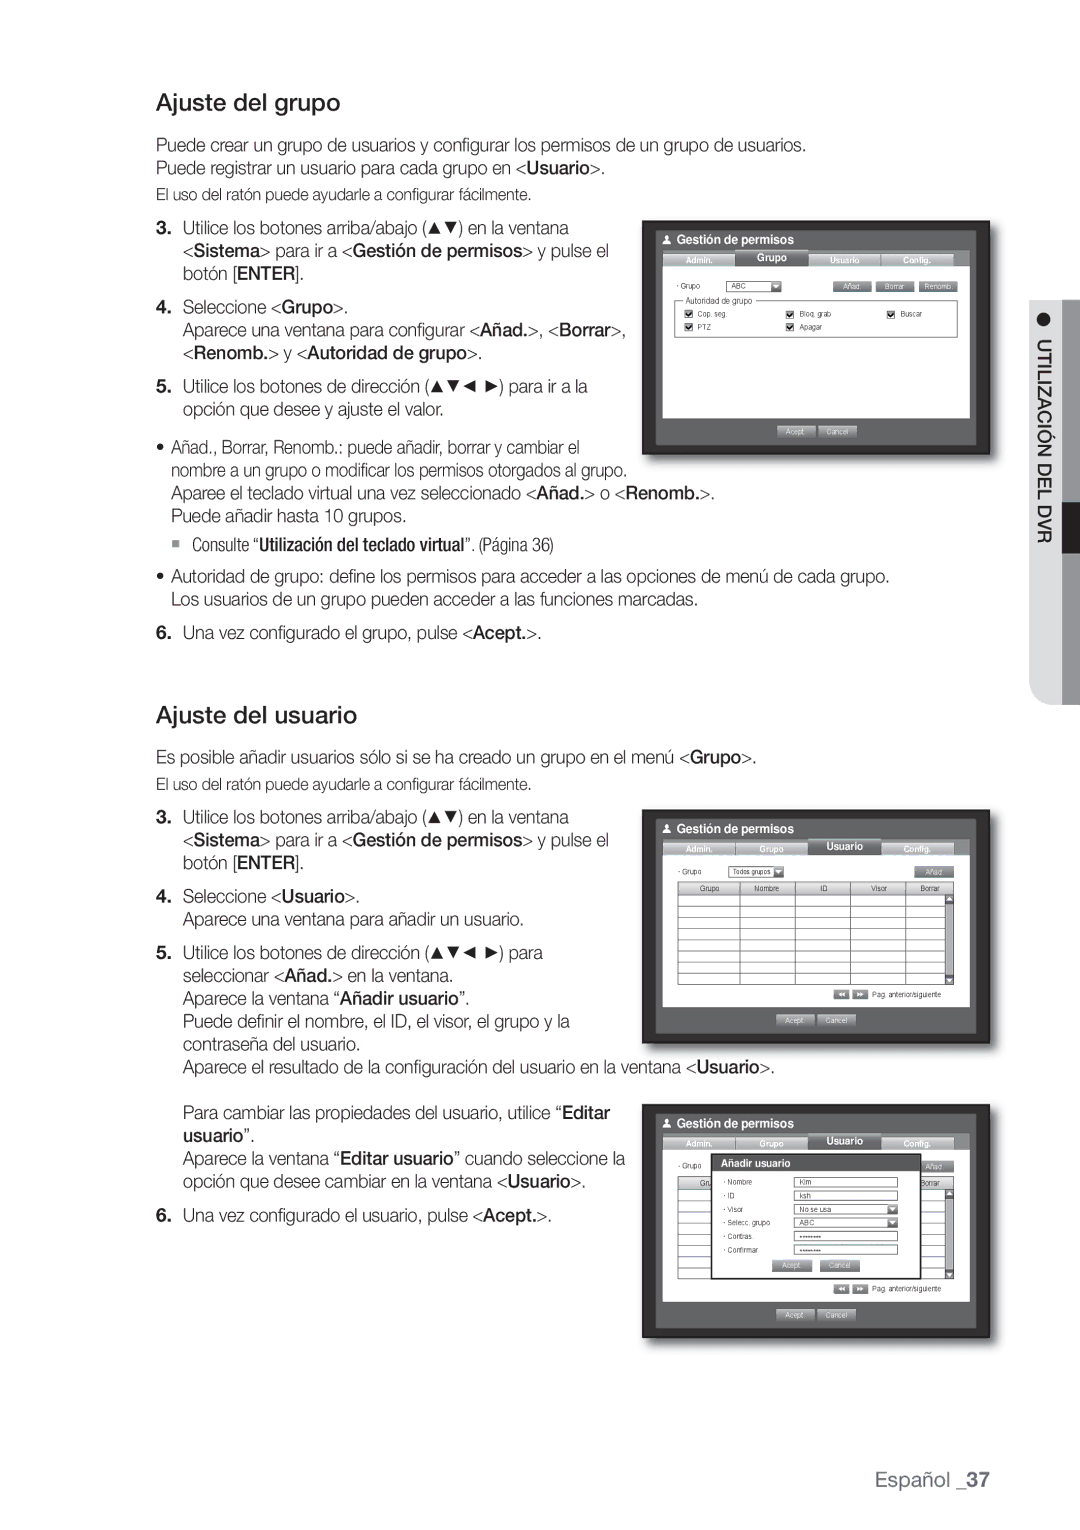
Ajuste del usuario
Ajuste del grupo
Utilización
Ajuste de permisos
Gestión del sistema
Comprobación de la información del sistema
Marcada restringida Sin marcar accesible
DEL DVR
Actualización del software
FormatoActualizemisión . delNTSCsistema
Actualizar software
Configuración
Información de registro
Registro del sistema
Puede examinar los registros del sistema y eventos
Cámara
Ajuste DEL Dispositivo
Registro de eventos
Ajuste de la cámara
Una vez confi gurada la cámara, pulse Acept
Ajuste de PTZ
Conf. pantalla
Confirmación de dispositivos
Dispositivo de almacenamiento
Formateo
Seleccione Alarma DD
Alarma DD
Alarma DD
Una vez realizado el formateo, pulse Acept
Dispositivos POS
Dispositivos remotos
Dispositivo remoto
Dispositivo POS
Ajuste de la supervisión
Supervisar
Seleccione Supervisar
Ajuste del modo de pantalla
Ajuste de la Salida Puntual
Seleccione Modo
Pantalla en directo
Programación de la grabación
Ajuste DE LA Grabación
Grab
Programar grabación
Calidad/Resolución
Duración de grabación de eventos
Etiquetas del color de la grabación
Ajuste de las propiedades de grabación estándar
Ajuste de las propiedades de grabación de eventos
Opción de grabación
Resolución
Detección de sensor
Ajuste DEL Evento
Una vez confi gurada la opción de grabación, pulse Aceptar
Apag el sensor no está operativo
Ajuste del área de detección de movimiento
Detección de movimiento
Programación de alarma
Programación de alarmas
Detección de pérdida de vídeo
Detección de pérdida de vídeo
Ajuste de la copia de seguridad
Copia DE Seguridad
Cop. seg
Cop. seg
Modo de conexión
Configuración DE RED
Ajuste de la conexión
Una vez confi gurada la conexión, pulse Acept
Ajuste del protocolo
Protocolo
Conexión y ajuste de la red
Ddns
Cuando no se utiliza ningún enrutador
Utilización DEL
Cuando se utiliza un enrutador
Ajuste de Ddns
Transf. en directo
Transf. en directo
Ajuste de Smtp
Servicio de correo
Ajuste de eventos
Defi ne el servidor de correo Smtp
El receptor se defi ne aparte del grupo de usuarios del DVR
Ajuste del receptor
En la ventana de ajuste de Red, pulse el botón arriba
Abajo para ir a Servicio de correo y pulse el
Dispositivo PTZ
Control DE UN Dispositivo PTZ
Introducción sobre PTZ
Utilización de la cámara PTZ
Ajuste de la cámara
Ajuste de predefinido
Buscar hora
Buscar
Buscar y reproducir
Búsqueda de copia de seguridad
Búsqueda de eventos
Buscar Y Reproducir
Búsqueda de movimiento
Buscar POS
Seleccione Buscar POS en el menú Buscar
Buscar POS
Reproducir
Reproducción
Buscar Y
¿Qué es Web Viewer?
Introducción Sobre WEB Viewer
Características DEL Producto
Requisitos DEL Sistema
WEB Viewer
Conexión DE WEB Viewer
Web viewer
Utilización DE Live Viewer
División DE Pantalla
Pantalla DE Información OSD
Modo Único Modo DE Cuatro Modo DE Nueve
Modo DE Dieciseis
Cambio DEL Modo DE Pantalla EN Directo
DVR Conectado
Intervalo predefinido 10 segundos
DVR de 16 canales
Almacenamiento EN EL PC DE LA Pantalla EN Directo
Capture guarda la pantalla actual en un archivo BMP o Jpeg
Utilización DE LA Cámara PTZ
Cambio DEL Canal DE Pantalla EN Directo
Cada función de PTZ es igual que la del DVR
Utilización DE Search Viewer
Modo Único
Pantalla Dividida
Cuatro
Captura guarda la pantalla actual en un archivo BMP o Jpeg
Búsqueda EN LA Línea DE Tiempo DE Vídeo Grabado
Búsqueda EN EL Calendario DE Vídeo Grabado
Sistema
Configuración DEL Visor
Control DE LA Reproducción
Fecha/Hora/Idioma
Vacaciones
Administrador Puede cambiar el ID y la contraseña del Admin
Gestión de permisos
Gestión del sistema
Cámara
Dispositivo
Dispositivo de almacenamiento
Dispositivo POS
Dispositivo remoto
Supervisión
Programar grabación
Grabar
Dur. de grab. de eventos
Evento
Calidad y resolución de grabación
Opción de grabación
Det. de movim
Programación de alarmas
Detección de pérdida de vídeo
Conexión
Red
Ddns
Transf. en directo
Smtp
Servicio de correo
Evento
Grupo
Acerca DE
Visor DE Copia DE Seguridad SEC
Backup viewer
Requisitos recomendados para el sistema
Backup Viewer
94 apéndice
Especificaciones DEL Producto
Ntsc PAL
DD Sata
Cifs
Apéndice
DD SATA-MAX
96 apéndice
RS-232C POS
RAM 2G
SHR-8162
Vista DEL Producto
98 apéndice
Ajuste Predeterminado
De fábrica
Movimiento
De fábrica
100 apéndice
Solución DE Problemas
102 apéndice
GNU General Public License
Open Source License Report on the Product
Preamble
We protect your rights with two steps
On the Program is not required to print an announcement
104 apéndice
No Warranty
END of Terms and Conditions
How to Apply These Terms to Your New Programs
106 apéndice
Terms and Conditions
108 apéndice
Español
Additional Terms
110 apéndice
No Surrender of Others Freedom
Patents
112 apéndice
GNU Lesser General Public License
Revised Versions of this License
Limitation of Liability
Español
Is included without limitation in the term modifi cation
114 apéndice
Español
Promoting the sharing and reuse of software generally
116 apéndice
Copyright C year name of author
How to Apply These Terms to Your New Libraries
118 apéndice
OpenSSL License
Loss of USE, DATA, or Profits or Business Interruption
This Software is Provided by Eric Young ‘‘AS IS’’
Eliminación correcta de las baterías de este producto