These limits are designed to provide reasonable protection against harmful interference in a residential installation.
This equipment generates, uses, and can radiate radio frequency energy and, if not installed and used in accordance with the instructions, may cause harmful interference to radio communications. However, there is no guarantee that interference will not occur in a particular installation. If this equipment does cause harmful interference to radio or television reception, which can be deter-mined by turning the equipment off and on, the user is encouraged to try to correct the interference by one or more of the following measures:
•Re-orient or relocate the receiving antenna.
•Increase the separation between the equipment and receiver.
•Connect the equipment into an outlet on a circuit different from that to which the receiver is connected.
•Consult the dealer or an experienced radio/TV technician for help.
CAUTION
Change or modifications not expressly approved by the manufacturer
 While operating
Handle with caution to prevent damage from external shock.
 Other
Other
•Never allow food particles or foreign substances to enter the drive casing.
Do not drop the drive, and protect it fromsevere shocks.
•It can damage the drive or cause it to malfunction.
• To protect against the risk of |
fire, do ot spill such liquids as |
alcohol and benzene on the |
| Do not move the drive while in operation | Do not use cracked, distorted or |
| and do not attempt to open the disc tray | damaged discs. |
| byforce. Make sure to close all working | |
| programs before attempting to open the tray | |
| and always use the open/close button. | |
| Do not insert a pin into the emergency | In particular, a disc with a crack on the |
| opening while in operation. | inner tracks may break while in use. |
| |
| Do not disassemble, attempt to repair or | Important to read and understand |
| at all times |
| modify the device without express |
| |
approval as directed in the manual.
•To reduce the risk of damage,
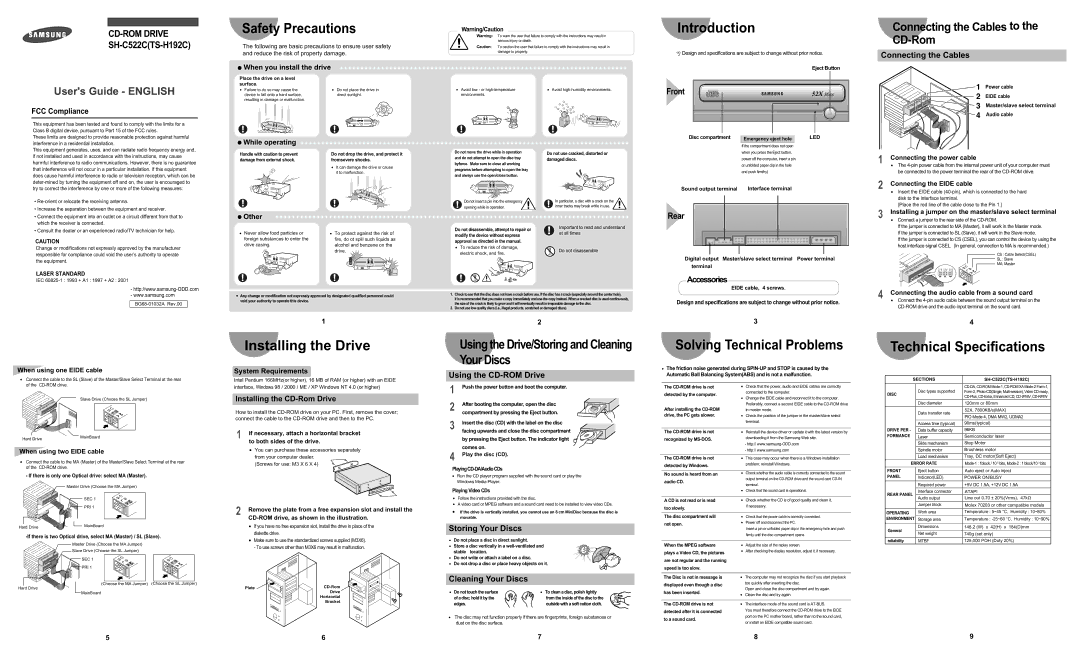
Disc compartment | Emergency eject hole | LED |
| | |
If the compartment does not open when you press the Eject button, power off the computer, insert a pin or unfolded paper clip in the hole and push firmlhy)
Sound output terminal | Interface terminal |
Rear
1Connecting the power cable
•The 4-pin power cable from the internal power unit of your computer must be connected to the power terminal the rear of the CD-ROM drive.
2Connecting the EIDE cable
•Insert the EIDE cable (40-pin), which is connected to the hard disk to the interface terminal.
(Place the red line of the cable close to the Pin 1.)
3Installing a jumper on the master/slave select terminal
•Connect a jumper to the rear side of the CD-ROM.
If the jumper is connected to MA (Master), it will work in the Master mode. If the jumper is connected to SL (Slave), it will work in the Slave mode.
If the jumper is connected to CS (CSEL), you can control the device by using the host interface signal CSEL. (In general, connection to MA is recommended.)
When using one EIDE cable
•Connect the cable to the SL (Slave) of the Master/Slave Select Terminal at the rear of the CD-ROM drive.
Slave Drive (Choose the SL Jumper)
When using two EIDE cable
•Connect the cable to the MA (Master) of the Master/Slave Select Terminal at the rear of the CD-ROM drive.
- If there is only one Optical drive: select MA (Master).
Master Drive (Choose the MA Jumper)
SEC 1
PRI 1
-If there is two Optical drive, select MA (Master) / SL (Slave).
Master Drive (Choose the MA Jumper)
Slave Drive (Choose the SL Jumper)
SEC 1
PRI 1
(Choose the MA Jumper) (Choose the SL Jumper)
Hard Drive
MainBoard
1
Installing the Drive
System Requirements
Intel Pentium 166MHz(or higher), 16 MB of RAM (or higher) with an EIDE interface, Windows 98 / 2000 / ME / XP Windows NT 4.0 (or higher)
Installing the CD-Rom Drive
How to install the CD-ROM drive on your PC. First, remove the cover; connect the cable to the CD-ROM drive and then to the PC.
1If necessary, attach a horizontal bracket to both sides of the drive.
• You can purchase these accessories separately
from your computer dealer. (Screws for use: M3 X 6 X 4)
2Remove the plate from a free expansion slot and install the CD-ROM drive, as shown in the illustration.
•If you have no free expansion slot, install the drive in place of the diskette drive.
•Make sure to use the standardized screws supplied (M3X6). - To use screws other than M3X6 may result in malfunction.
Plate | CD-Rom |
| Drive |
| Horizontal |
| Bracket |
2
Using the Drive/Storing and Cleaning Your Discs
Using the CD-ROM Drive
1Push the power button and boot the computer.
2
3Insert the disc (CD) with the label on the disc facing upwards and close the disc compartment
by pressing the Eject button. The indicator light comes on.
4Play the disc (CD).
PlayingCD-DA/AudioCDs
•Run the CD player program supplied with the sound card or play the Windows Media Player.
Playing Video CDs
•Follow the instructions provided with the disc.
•A video card or MPEG software and a sound card need to be installed to view video CDs.
•If the drive is vertically installed, you cannot use an 8 cm MiniDisc because the disc is movable.
Storing Your Discs
•Do not place a disc in direct sunlight.
•Store a disc vertically in a well-ventilated and
stable location.
• Do not write or attach a label on a disc.
• Do not drop a disc or place heavy objects on it.
Cleaning Your Discs
• Do not touch the surface | • To clean a disc, polish lightly |
of a disc; hold it by the | from the inside of the disc to the |
edges. | outside with a soft cotton cloth. |
•The disc may not function properly if there are fingerprints, foreign substances or dust on the disc surface.
3
Solving Technical Problems
•The friction noise generated during SPIN-UP and STOP is caused by the Automatic Ball Balancing System(ABS) and is not a malfunction.
The CD-ROM drive is not | • Check that the power, audio and EIDE cables are correctly |
detected by the computer. | connected to the computer. |
|
•Change the EIDE cable and reconnect it to the computer.
Preferably, connect a second EIDE cable to the CD-ROM drive
After installing the CD-ROMin master mode.
drive, the PC gets slower.• Check the position of the jumper in the master/slave select
terminal.
The CD-ROM drive is not | • Reinstall the device driver or update it with the latest version by |
recognized by MS-DOS. | downloading it from the Samsung Web site. |
|
-http:// www.samsung-ODD.com
-http:// www.samsung.com
| The CD-ROM drive is not | • This case may occur when there is a Windows installation |
| detected by Windows. | problem; reinstall Windows. |
| |
| | |
| No sound is heard from an | • Check whether the audio cable is correctly connected to the sound |
| audio CD. | output terminal on the CD-ROM drive and the sound card CD-IN |
| terminal. |
| |
•Check that the sound card is operational.
| A CD is not read or is read | • Check whether the CD is of good quality and clean it, |
| too slowly. | if necessary. |
| |
| | |
| The disc compartment will | • Check that the power cable is correctly connected. |
| not open. | • Power off and disconnect the PC. |
| Insert a pin or unfolded paper clip in the emergency hole and push |
| |
| | firmly until the disc compartment opens. |
| | |
| When the MPEG software | • Adjust the size of the replay screen. |
| plays a Video CD, the pictures | • After checking the display resolution, adjust it, if necessary. |
| |
| are not regular and the running | |
| speed is too slow. | |
| | |
| The Disc is not in message is | • The computer may not recognize the disc if you start playback |
| displayed even though a disc | too quickly after inserting the disc. |
| Open and close the disc compartment and try again. |
| has been inserted. |
| • Clean the disc and try again. |
| |
| | |
| The CD-ROM drive is not | • The interface mode of the sound card is AT-BUS. |
| detected after it is connected | You must therefore connect the CD-ROM drive to the EIDE |
| to a sound card. | port on the PC mother board, rather than to the sound card, |
| or install an EIDE compatible sound card. |
| |
4
Technical Specifications
| SECTIONS | SH-C522C(TS-H192C) |
| | | |
| | Disc types supported | CD-DA, CD-ROM Mode-1, CD-ROM XA Mode-2 Form-1, |
| DISC | Form-2, Photo-CD(Single, Multi-session), Video CD ready, |
| | CD-Plus, CD-Extra, Enhanced CD, CD-I/FMV, CD-R/RW |
| | |
| | | |
| | Disc diameter | 120mm or 80mm |
| | Data transfer rate | 52X, 7800KB/s(MAX) |
| | |
| | PIO Mode 4, DMA MW2, UDMA2 |
| | |
| | Access time (typical) | 90ms(typical) |
| DRIVE PER - | Data buffer capacity | 96KB |
| FORMANCE | Laser | Semiconductor laser |
| | | |
| | Slide mechanism | Step Motor |
| | | |
| | Spindle motor | Brushless motor |
| | | |
| | Load mechanism | Tray, DC motor(Soft Eject) |
| | | |
| ERROR RATE | Mode-1 : 1block / 1012 bits, Mode-2 : 1 block/10 9 bits |
| | | |
| FRONT | Eject button | Auto eject or Auto inject |
| PANEL | | |
| Indicator(LED) | POWER ON/BUSY |
| | | |
| | Required power | +5V DC 1.5A, +12V DC 1.5A |
| | | |
| REAR PANEL | Interface connector | ATAPI |
| Audio output | Line out 0.70 ± 20%(Vrms), 47kΩ |
| |
| | Jumper block | Molex 70203 or other compatible models |
| OPERATING | Work area | Temperature : 5~45 °C, Humidity : 10~80% |
| ENVIRONMENT | Storage area | Temperature : -25~60 °C, Humidity : 10~90% |
| | | |
| General | Dimensions | 148.2 (W) x 42(H) x 184(D)mm |
| | |
| Net weight | 740g (set only) |
| |
| | | |
| reliability | MTBF | 125,000 POH (Duty 20%) |