User Guide - ENGLISH
FCC Compliance
This equipment has been tested and found to comply with the limits for a Class B digital device, pursuant to Part 15 of the FCC rules.
These limits are designed to provide reasonable protection against harmful interference in a residential installation.
This equipment generates, uses, and can radiate radio frequency energy and, if not installed and used in accordance with the instructions, may cause harmful interference to radio com- munications. However, there is no guarantee that interference will not occur in a particular installation. If this equipment does cause harmful interference to radio or television reception, which can be
Safety Precautions
The following are basic precautions to ensure user safety and reduce the risk of property damage.
 When you install the drive
Place the drive on a level surface.
• Failure to do so may cause the | • Do not place the drive in |
device to fall onto a hard surface, | direct sunlight. |
resulting in damage or malfunction. |
|
Warning/Caution
Warning: To warn the user that failure to comply with the instructions may result in serious injury or death.
Caution: To caution the user that failure to comply with the instructions may result in damage to property.
• Avoid low- or | • Avoid |
environments. |
|
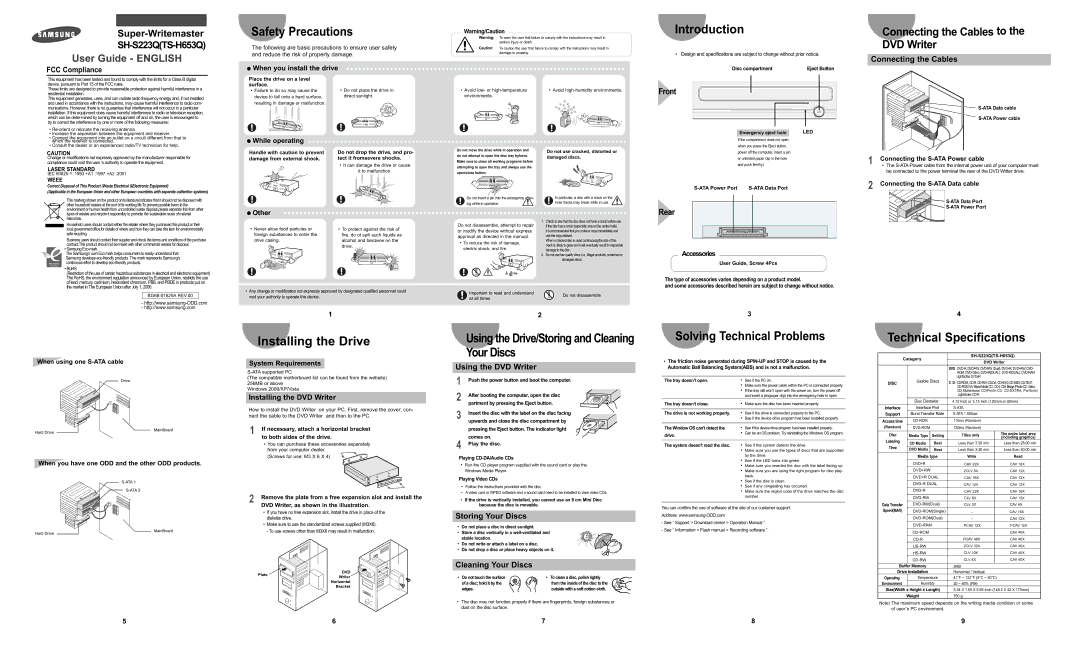
Introduction
•Design and specifications are subject to change without prior notice.
Disc compartment | Eject Button |
Front
Connecting the Cables to the DVD Writer
Connecting the Cables

S-ATA Data cable 


S-ATA Power cable
•
•Increase the separation between the equipment and receiver.
•Connect the equipment into an outlet on a circuit different from that to which the receiver is connected.
•Consult the dealer or an experienced radio/TV technician for help.
CAUTION
Change or modifications not expressly approved by the manufacturer responsible for compliance could void the user ’s authority to operate the equipment.
LASER STANDARD
IEC
WEEE
Correct Disposal of This Product (Waste Electrical &Electronic Equipment)
(Applicable in the European Union and other European countries with separate collection systems)
 While operating
Handle with caution to prevent damage from external shock.
Do not drop the drive, and pro- tect it fromsevere shocks.
•It can damage the drive or cause it to malfunction.
Do not move the drive while in operation and | Do not use cracked, distorted or |
do not attempt to open the disc tray byforce. | damaged discs. |
Make sure to close all working programs before |
|
attempting to open the tray and always use the |
|
open/close button. |
|
Emergency eject hole | LED |
If the compartment does not open when you press the Eject button, power off the computer, insert a pin or unfolded paper clip in the hole and push firmlhy)
1Connecting the S-ATA Power cable
•The
2Connecting the S-ATA Data cable
This marking shown on the product or its literature,indicates that it should not be disposed with other household wastes at the end of its working life.To prevent possible harm to the environment or human health from uncontrolled waste disposal,please separate this from other types of wastes and recycle it responsibly to promote the sustainable reuse of material resources.
Household users should contact either the retailer where they purchased this product,or their local government office,for details of where and how they can take this item for environmentally safe recycling.
Business users should contact their supplier and check the terms and conditions of the purchase contract.This product should not be mixed with other commercial wastes for disposal.
•Samsung Eco-mark
The Samsung’s own Eco mark helps consumers to easily understand that Samsung develops
•RoHS
(Restriction of the use of certain hazardous substances in electrical and electronic equipment) The RoHS, the environment regulation announced by European Union, restricts the use of lead, mercury, cadmium, hexavalent chromium, PBB, and PBDE in products put on the market in The European Union after July 1, 2006.
 Other
Other
•Never allow food particles or foreign substances to enter the drive casing.
•To protect against the risk of fire, do ot spill such liquids as alcohol and benzene on the drive.
Do not insert a pin into the emergency open- ing while in operation.
Do not disassemble, attempt to repair or modify the device without express approval as directed in the manual.
•To reduce the risk of damage, electric shock, and fire.
In particular, a disc with a crack on the inner tracks may break while in use.
1.Check to see that the disc does not have a crack before use. If the disc has a crack (especially around the center hole), it is recommended that you make a copy immediately and use the copy instead.
When a cracked disc is used continuously,the size of the crack is likely to grow and it will eventually result in irreparable damage to the disc.
2.Do not use low quality discs (i.e., illegal products, scratched or damaged discs).
Rear
Accessories
User Guide, Screw 4Pcs
The type of accessories varies depending on a product model.
and some accessories described herein are subject to change without notice.
S-ATA Data Port 
S-ATA Power Port
BG68-01625A REV.00
-
• Any change or modification not expressly approved by designated qualified personnel could | Important to read and understand | Do not disassemble | |
void your authority to operate this device. | |||
at all times | |||
| |||
|
| ||
1 |
| 2 |
3
4
When using one
Drive
Installing the Drive
System Requirements
(The compatible motherboard list can be found from the website) 256MB or above
Windows 2000/XP/Vista
Installing the DVD Writer
How to install the DVD Writer on your PC. First, remove the cover; con- nect the cable to the DVD Writer and then to the PC.
Using the Drive/Storing and Cleaning Your Discs
Using the DVD Writer
1Push the power button and boot the computer.
2 After booting the computer, open the disc partment by pressing the Eject button.
3Insert the disc with the label on the disc facing
Solving Technical Problems
•The friction noise generated during
The tray doesn't open. | • See if the PC on. |
| • Make sure the power cable within the PC is connected properly. |
| • If the tray still won't open with the power on, turn the power off |
| and insert a pin(paper clip) into the emergency hole to open. |
|
|
The tray doesn't close. | • Make sure the disc has been inserted properly. |
|
|
The drive is not working properly. | • See if the drive is connected properly to the PC. |
| • See if the device drive program has been installed properly. |
Technical Specifications
| Category |
| |
| DVD Writer | ||
|
|
| |
|
|
| DVD : |
|
|
| ROM, |
|
|
| LightScribe DVD±R |
DISC |
| Usable Discs | C D : |
|
| ||
|
|
| |
|
|
| CD), Multisession |
|
|
| LightScribe |
|
|
|
|
|
| Disc Diameter | 4.72 Inch or 3.15 Inch (120mm or 80mm) |
Interface |
| Interface Port | |
Support |
| Burst Transfer Rate | |
Hard Drive
MainBoard
1If necessary, attach a horizontal bracket to both sides of the drive.
•You can purchase these accessories separately from your computer dealer.
(Screws for use: M3 X 6 X 4)
upwards and close the disc compartment by pressing the Eject button. The indicator light comes on.
4Play the disc.
Playing
The Window OS can't detect the | • | See if the device drive program has been installed properly. |
drive. | • Can be an OS problem. Try reinstalling the Windows OS program. | |
|
| |
|
|
|
The system doesn't read the disc. | • | See if the system detects the drive. |
| • | Make sure you use the types of discs that are supported |
| • | by the drive. |
| See if the LED turns into green. | |
Access time |
|
| 110ms (Random) |
| |
(Random) |
| 130ms (Random) |
| ||
|
|
|
|
| |
Disc | Media Type | Setting | Titles only | The entire label area | |
Labeling |
|
|
| (including graphics) | |
CD Media | Best | Less than 3:30 min | Less than 28:00 min | ||
Time | |||||
|
|
|
| ||
DVD Media | Best | Less than 3:30 min | Less than 30:00 min | ||
| |||||
|
|
|
|
| |
| Media type | Write | Read | ||
When you have one ODD and the other ODD products.
2 Remove the plate from a free expansion slot and install the |
DVD Writer, as shown in the illustration. |
• If you have no free expansion slot, install the drive in place of the |
diskette drive. |
•Run the CD player program supplied with the sound card or play the Windows Media Player.
Playing Video CDs
•Follow the instructions provided with the disc.
•A video card or MPEG software and a sound card need to be installed to view video CDs.
•If the drive is vertically installed, you cannot use an 8 cm Mini Disc because the disc is movable.
Storing Your Discs
• | Make sure you inserted the disc with the label facing up. |
• | Make sure you are using the right program for disc play- |
• | back. |
See if the disc is clean. | |
• | See if any congealing has occurred. |
• | Make sure the region code of the drive matches the disc |
| number. |
|
|
You can confirm the use of software at the site of our customer support.
Address:
| DVD+R | CAV 22X | CAV 16X |
| DVD+RW | ZCLV 8X | CAV 12X |
| DVD+R DUAL | CAV 16X | CAV 12X |
| CAV 12X | CAV 12X | |
| CAV 22X | CAV 16X | |
|
| ||
| CLV 6X | CAV 12X | |
|
|
|
|
Data Transfer | CLV 2X | CAV 6X | |
Speed(MAX) | - | CAV 16X | |
| - | CAV 12X |
Hard Drive
MainBoard
• Make sure to use the standardized screws supplied (M3X6). |
- To use screws other than M3X6 may result in malfunction. |
Plate | DVD | |
Writer | ||
| ||
| Horizontal | |
| Bracket |
•Do not place a disc in direct sunlight.
•Store a disc vertically in a
stable location.
• Do not write or attach a label on a disc.
• Do not drop a disc or place heavy objects on it.
Cleaning Your Discs
• Do not touch the surface | • To clean a disc, polish lightly |
of a disc; hold it by the | from the inside of the disc to the |
edges. | outside with a soft cotton cloth. |
•The disc may not function properly if there are fingerprints, foreign substances or dust on the disc surface.
-See “ Support > Download center > Operation Manual ”.
-See “ Information > Flash manual > Recording software ”.
|
| PCAV 12X | PCAV 12X | ||
|
| - | CAV 48X |
| |
|
| PCAV 48X | CAV 40X | ||
|
| ZCLV 32X | CAV 40X | ||
|
| CLV 10X | CAV 40X | ||
|
| CLV 4X | CAV 40X | ||
|
|
|
|
| |
Buffer Memory | 2MB |
|
| ||
Drive Installation | Horizontal / Vertical |
|
| ||
Operating |
| Temperature | 41°F ~ 122°F (5°C ~ 50°C) |
|
|
Environment |
| Humidity | 20 ~ 80% (RH) |
|
|
Size(Width x Height x Length) | 5.34 X 1.65 X 6.69 Inch (148.2 X 42 X 170mm) | ||||
|
|
|
|
|
|
| Weight | 750 g |
|
| |
Note) The maximum speed depends on the writing media condition or some of user`s PC environment.
5 | 6 | 7 | 8 | 9 |