BN68-03506C-02
Czech
Still image warning
For more information on how to use e-Manual p
Securing the Installation Space
Digital TV notice
AV / Component Adapter
Accessories
Viewing the Control Panel
Features
Buttons on the remote control
Would use the and buttons on the remote control
Installing batteries Battery size AAA
Viewing the Remote Control
Changing the Input Source
Connecting to an Antenna
Plug & Play Initial Setup
Using an Hdmi or an Hdmi to DVI cable up to 1080p
Connecting to an AV devices
Component connection
Using an Optical Digital or a Headphone Connection
Connecting to a Audio device and PC
1280 x 63.981 60.020 108.000
800 x 48.077 72.188 50.000
800 x 46.875 75.000 49.500
1152 x 67.500 75.000 108.000
TV Rear
Connecting to a Common Interface slot
LAN Adapter
It is not supported when the network speed is under 10 Mbps
Network Connection
LAN Port on
‰ How to view the e-Manual
Using the Help Display the Product Guide by pressing Help
MENUm→ Support → e-Manual → Entere
Zoom Magnifies a screen Index Displays index screen
Using the Zoom mode
To return to the previous screen, press the Return button
Try Now Displays the corresponding menus
Installing the Wall Mount
Xx Do not mount the TV at more than a 15 degree tilt
Licence List of Features
Troubleshooting
Issues Solutions and Explanations
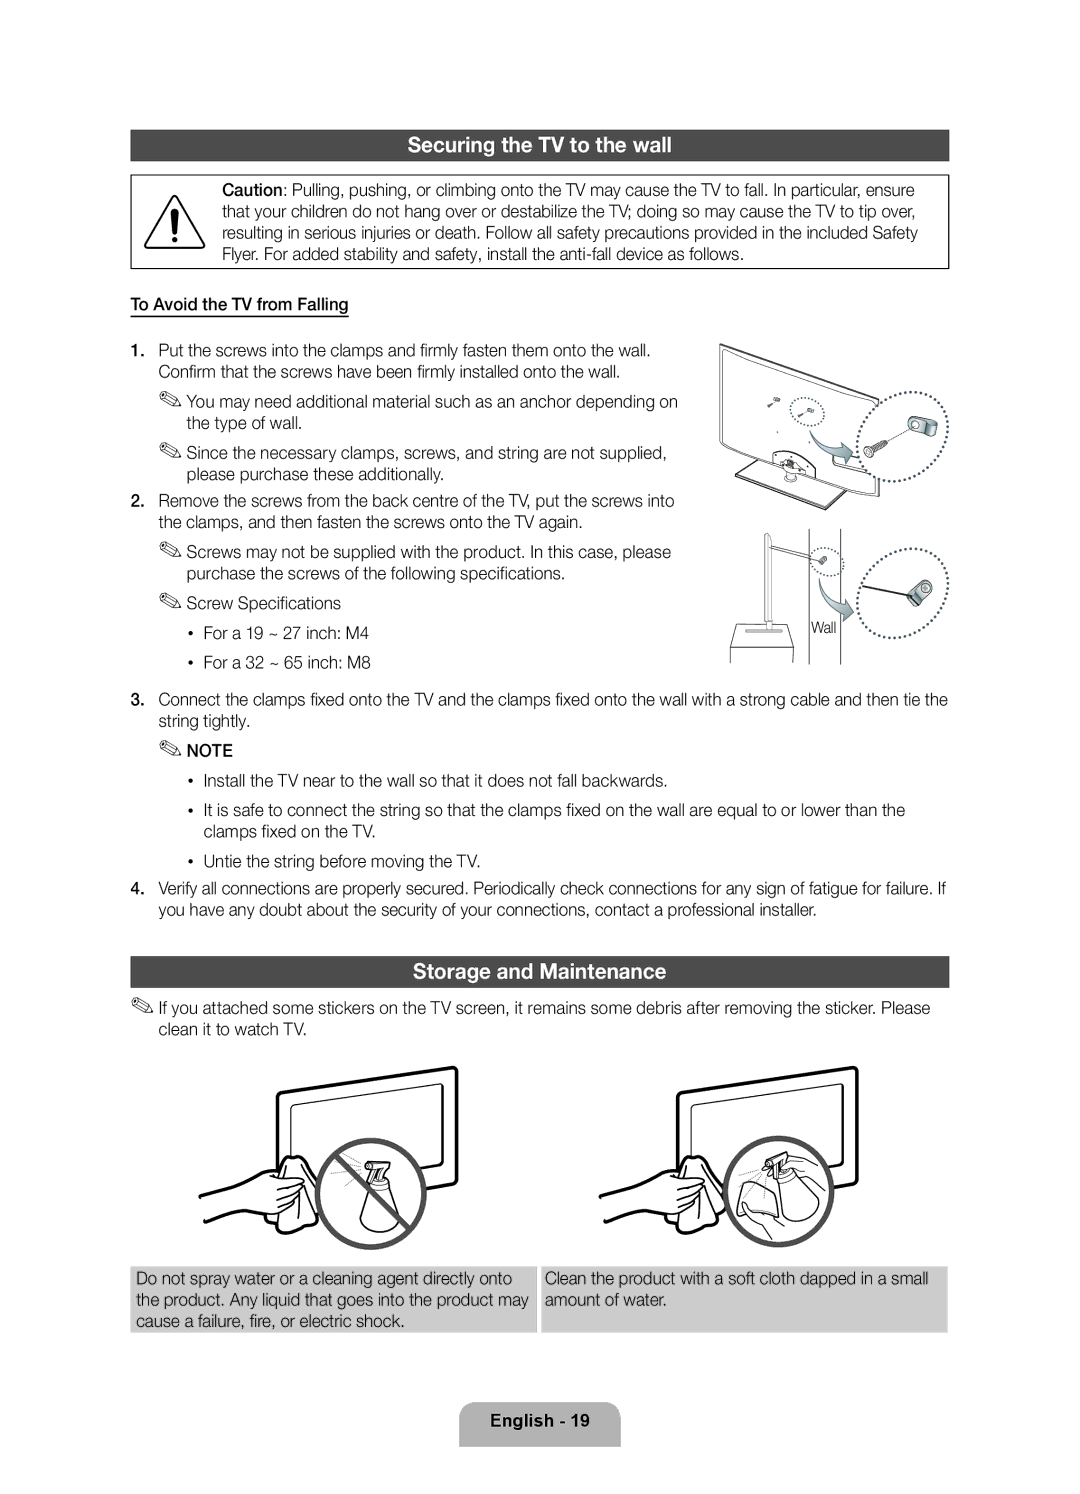
Securing the TV to the wall
Storage and Maintenance
Specifications
This page is intentionally Left blank
Absichern des Aufstellbereichs
Weitere Informationen zur Verwendung des e-Manuals Seite
Hinweis zu Digitalfernsehen
Warnung bei Standbildern
AV / Komponentenadapter
Zubehör
Sourcee Menu
Bedienfeld
Einlegen von Batterien Batteriegröße AAA
Fernbedienung
Aktual
Ändern der Eingangsquelle
Quelle
Name bearb
So setzen Sie diese Funktion zurück
Plug & Play Anfangseinstellung
Mit Hilfe eines HDMI- oder HDMI/DVI-Kabels bis zu 1080p
Anschließen an ein AV-Gerät
Component-Anschluss
Anschließen an ein Audiogerät und einen PC
1920 x 1080p 67,500 60,000 148,500 +/+
Anzeigemodi D-Sub- und HDMI/DVI-Eingang
Modus Auflösung Horizontalfrequenz kHz
Pixeltakt MHz Synchronisationspolarität
Rückseite des Fernsehgeräts
Anschließen an den Common INTERFACE-Steckplatz
Netzwerkverbindung
Diese Funktion ist in manchen Menüs nicht verfügbar
Elektronischer Form auf Ihrem Fernsehgerät lesen
MENUm→ Unterstützung → e-Manual → Entere
Manual-Anleitung
‰‰Ändern des voreingestellten Bildmodus
Methode
Anbringen der Wandhalterung
LED-Fernseher
VESA-Spezifikation Standardschraube
19~22 75 X 23~27 200 X
32~40 200 X 46~55 400 X 60~65 600 X
Fehlerbehebung
Probleme Lösungen und Erklärungen
Lizenz Liste der Funktionen
Wand
Befestigen des Fernsehgeräts an der Wand
Lagerung und Wartung
So verhindern Sie, dass das Fernsehgerät umkippt
Technische Daten
This page is intentionally Left blank
Avertissement d’image fixe
Sécurisation de l’espace d’installation
Installation avec un support de montage mural 10 cm
Avis concernant le téléviseur numérique
AV / Adaptateur composant
Accessoires
Télécommande et piles AAA x
Manuel d’utilisation
Témoin d’alimentation
Présentation du panneau de configuration
Installation des piles type de pile AAA
Présentation de la télécommande
Utiliser pour sélectionner le téléviseur
Modif. Nom
Modif. favoris
Rafraîchir
AntenneSélection d’une
Plug & Play configuration initiale
HorlogeRéglage du Mode
Domicile Sélection d’un pays
Utilisation d’un câble Hdmi ou Hdmi vers DVI jusqu’à 1080p
Connexion à un périphérique AV
Connexion à composantes
Connexion entre un PC et un périphérique audio
1152 x 67,500 75,000 108,000
Synchronisation H/V
800 x 48,077 72,188 50,000
800 x 46,875 75,000 49,500
Téléviseur
Connexion à un port Interface Commune
Insérez l’adaptateur de carte CI dans les deux trous du
Arrière du
Modem externe
Connexion réseau
Connecteur LAN
Mural
‰ Consultation du manuel électronique Manual
MENUm→ Assistance → e-Manual → Entere
Manual Guide
Cette fonction n’est pas disponible dans certains menus
‰‰Changement du Mode Image prédéfini
Utilisation du mode Zoom
Affichage du contenu
Samsung
Installation du support mural
46~55 400 X 60~65 600 X
Pouces
Vis standard Quantité Produits 19~22 75 X 23~27 200 X
32~40 200 X
→ Support → Downloads par le biais d’un périphérique USB
Résolution des problèmes
Problèmes Solutions et explications
Licence Liste des fonctions
Mur
Fixation du téléviseur au mur
Stockage et entretien
Mur
Caractéristiques techniques
This page is intentionally Left blank
Avvertenza per la visualizzazione di immagini fisse
Messa in sicurezza della posizione di installazione
Ulteriori informazioni sull’uso del Manuale elettronico p
Avviso relativo alla trasmissione TV digitale
Piedistallo con fermacavo
Accessori
Telecomando e batterie 2 tipo AAA
Istruzioni per l’utente
Televisore
Vista del Pannello di controllo
Modalità standby
Questo tasto come si usa il tasto Enter Edel telecomando
Inserimento delle batterie tipo AAA
Vista del telecomando
Collegamento all’antenna
Modifica della sorgente di ingresso
’opzione può differire a seconda del paese
→ 4 → Power on
Plug & Play Impostazione iniziale
Completata
Uso di un cavo Hdmi o HDMI-DVI fino a 1080p
Collegamento a un dispositivo AV
Xx Usare un cavo Hdmi di max mm di spessore
Connessione Component
Uso di un collegamento ottico digitale o cuffie
Connessione a un PC e a un dispositivo audio
Uso di un cavo HDMI, HDMI-DVI o D-sub
Del televisore
Connessione a un alloggiamento Common Interface
Inserire la Scheda CI o CI+
Inserire l’adattatore della Scheda CI nelle due aperture
Connessione di rete
Questa funzione non è disponibile in alcuni menu
MENUm→ Supporto → e-Manual → Entere
Uso della Guida
Passaggio dal manuale elettronico ai menu corrispondenti
‰‰ Cambiare la Modalità immagine preimpostata
‰‰Cambiare la Modalità immagine preimpostata
Installazione del supporto a parete
Prodotti
Spec. Vesa a * B
Problemi Soluzioni e spiegazioni
Risoluzione dei problemi
Licenza Elenco delle funzioni disponibili
Conservazione e manutenzione
Fissaggio del televisore alla parete
Specifiche

