User Guide
Contents
Chapter Getting Started
Software Usage Instructions
Before You Start
OS and Software Support
Safety Precaution Notations
Text Notations
Copyright
About Memory Capacity Representation
Performance Information and Restriction
About the Product Capacity Representation Standard
About the capacity representation of the storage
There is a danger of suffocation
Safety Precautions
Installation Related
Keep the plastic bags out of the reach of children
There is a danger of electric shock or fire
Power Related
Do not touch the main plug or power cord with wet hands
Do not unplug the power cord by pulling the cable only
Use only the AC adapter supplied with the product
AC Adapter Usage Precautions
Connect the power cord to the AC adapter firmly
There is a danger of electric shock or choking
Battery Usage Related
Use an authorized battery and AC adapter only
There is a danger of an explosion or fire
There is a danger of electric shock or damage to the product
Usage Related
This may result in harming or burning your skin
Upgrade Related
Never disassemble the power supply or AC adapter
Failure to do so may cause electric shock
Security and Movement Related
Dispose of worn-out batteries properly
Use only a battery authorized by Samsung Electronics
Do not place a heavy object over the product
Do not drop or knock the product
Use a wall outlet or multi-plug with a grounding part
Check CDs for cracks and damage prior to use
Do not insert your fingers into the PC Card Slot
Never disassemble or repair the product by yourself
Carefully touch a part or device of the product
Take care not to throw or drop a computer part or device
Use parts authorized by Samsung Electronics only
Safety Precautions
When Using the AC Power Plug
Using the Power Supply in an Airplane
When Using the Airplane Charging Coverter
When Using the Auto Adapter
Proper Posture
Proper Posture During Computer Use
Keep your arm at a right angle as shown by the figure
Eye Position
Hand Position
Illumination
Volume Control Headphones and Speakers
Check your volume first to listen to music
Use Time Break Time
Touch Screen
Overview
Front View
Speaker
Optional
Right View
Button
Volume Control
Left View
Top View
Jack to connect the AC adapter that
Supplies power to the computer
Dock Connector Connector to the keyboard dock Optional
Bottom View
Rear View
Camera Flash Used when taking photos Optional
About Windows Activation
Adjusting the screen brightness
Turning the Computer On and Off
Turning the computer on
Save all your data before clicking on Shut down
Click Settings Power Shut down
Turning the computer off
Purchased operating system
Chapter Using Windows
Information
What is Microsoft Windows 8?
Select Charm menu Settings Help
Displaying Help
Start Screen
Screen At a Glance
Display the Charms
Desktop
Displaying Documents and Files
Top or bottom right of the screen to
Activating the Charms
Using the Charms
Function Description
Changing the Settings
Change PC settings
Click the Charms Settings
Displaying Currently Running Apps
Using Apps
Using Apps
Starting/Exiting an App
Store App
Running Two Apps at the Same Time
Right, you can split the screen to display multiple Apps
Supported screen split ratios are 37 or
Continue after registering your Microsoft Account
Using the Windows Store
Adding/Removing an App to/from the Start Screen
Is activated at the bottom of your screen
Configuring your Microsoft Account
Windows Hot Key Function
Chapter Using the computer
Touch Operation Function Description
Using the Touch Screen
Using the Touch Screen
Learning basic touch screen operations
Touching and dragging
Displays the last run App
Slightly press with your finger to select an item
Screen, the corresponding capability is activated
Your mouse
Touch Operation
Zooms in or out of the target
Target or more detailed information
Pen structure and functions
Using the S Pen optional
Taking Out the S Pen
Screen Calibration
Settings Calibrate
Replacing the pen tip
Press All Apps
Using the Tablet PC Input Panel
Entering Characters
Press the Touch Keyboard icon
Entering characters using the Touch Keyboard
Input Mode
Display the Tablet PC Input Panel
Tablet PC Input
Entering characters in Handwriting Mode
Touch screen use precautions
Press the Handwriting Mode icon
Micro SD Card Slot Optional
Using the card
Format
To remove a memory card
To format a memory card
Click the Windows Explorer
D-SUB port of the monitor or the TV
Connecting an External Display Device
Connecting to the monitor port Optional
Movie
Extend
Connecting through the Micro Hdmi port Optional
Alternatively, to set up dual view
Duplicate
Connecting an External Display Device
Click the Charms menu Settings to adjust the control bar
Adjusting the Volume
Adjusting the volume with the buttons
Adjusting the Volume using the Volume Adjustment Program
Recording Device
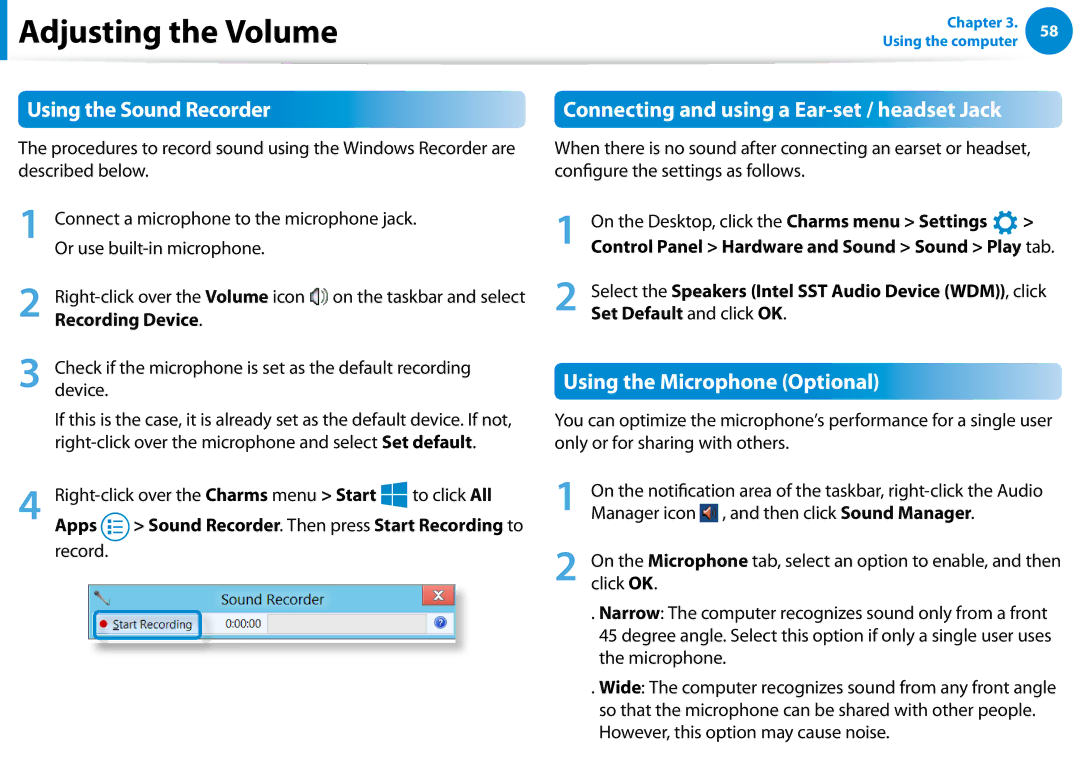
Using the Sound Recorder
Using the Microphone Optional
Set Default and click OK
LCD Brightness Control
Controlling the Brightness Using the Keyboard
What is an Access Point AP?
Wireless Network Optional
Connections icon, a list of available APs appears
Connecting to a Wireless LAN
If you click the Charms menu Settings
Mobile broadband Wireless WAN, Optional
Contact with the NFC antenna
Simultaneously sharing a website between two computers
By Tap Put the NFC antenna
At the back of the computer
NFC Near Field Communication Optional Connecting a device
Restrictions
Antenna
Caps Lock
Using the Keyboard Dock Optional
Power
Status LEDs
Separating the Computer
Installing/Separating
Connected, the keyboard dock power indicator is turned
Attaching the computer
Shortcut Keys
Shortcut Keys
Shortcut Keys Name Function
Last Run Window Opening Function
Touchpad
Displaying Additional Menus of a Currently Running App
Charms Menu Activating Function
Zoom Functions
Scroll Function
Appbar
Creating a note
Tap Finish
Voice memo Favorites
Tap and hold to change Add a Photos or contents
Exit S Note Menu
Undo / Redo
Newly created note icon
Upward Tap Save to finish creating the note
Select Appbar More Print
Folder. The note is selected
Select Charm menu Share
Click Agree
Samsung Software Update
Click SW Update in the All Apps
Menu item
Diagnosing
Diagnosing the Computer Status and Troubleshooting
This computer is equipped with an internal battery
Battery
Charging the Battery
Battery Usage Time Information
Measuring the Remaining Battery Charge
Extending the Battery Usage Time
Confirming the battery charge in the Taskbar
Using the power management program
Entering the Bios Setup
Bios Setup
Help
Bios Setup Screen
Setup Items
Setup Menu Description
Chapter Troubleshooting
Power button
Recovering the Computer Optional
Recovery process from a failed boot
Through All Apps SW Update
Files such as your photo, video and music
Computer Recovery Function in Windows
Reinstall Windows again
Follow the onscreen instructions to proceed with
Q3 The App disappeared in the Start screen
Q5 How can I install a printer driver?
Windows 8 Related
Q1 I cannot find the Start button on the Desktop
How to activate Active
Click the program. Then click uninstall
Settings, type size, color, and so on?
For AMD graphics cards
Display Related
Sound Related
For Intel graphics cards
Q2 The letters on the computer screen overlap
Touch screen Related
Chapter Appendix
Setting Up your System
Important Safety Information
Safety Instructions
Care During Use
Instruction On Safety Operation of NotePC
Laser Safety Note
Replacement Parts and Accessories
Battery Disposal
Laser Safety
General Requirements
Power Cord Requirements
Connect and Disconnect the AC adapter
Regulatory Compliance Statements
Wireless Guidance
Explosive Device Proximity Warning
USA and Canada Safety Requirements and Notices
United States of America
Use On Aircraft Caution
Safety Notices for Other Devices in the Wireless Network
Unintentional Emitter per FCC Part
If fitted with 2.4G band or 5G band
Intentional emitter per FCC Part
Health and safety information
Intentional Emitter per RSS
Canada
Unintentional Emitter per ICES-003
Si l’appareil est équipé d’une bande 2,4 G ou 5 G
European Union CE Marking and Compliance Notices
Brazil
European Union
Low band 5.15 5.35 GHz is for indoor use only
European Directives
Danish
Česky
Czech
Dansk
Polish
Magyar
Hungarian
Polski
Local Restriction of 802.11b/802.11g Radio Usage
Manufacturer Information
France
Adapter Information
General
Belgium
Level required to reach the network
RF Exposure for corresponding 3G models only
General Statement on RF energy
Limiting exposure to radio frequency RF fields
Representative in the EU
Declaration of Conformity For corresponding 3G models only
Product details
Declaration & Applicable standards
Applicable in countries with separate collection systems
Weee Symbol Information
India Only
Samsung Packaging Take-Back Program
For more information, please visit
Some of the Usability features of TCO Certified Tablets
TCO Certified for corresponding models only
Corporate Social Responsibility
Product Specifications
Energy Star Partner
Registered Trademarks
Glossary
Firewall
Hibernation Mode
Protocol
Network Administrator
Notification Area
Partition
System File
Sleep Mode
Share
Shared Folder
Index