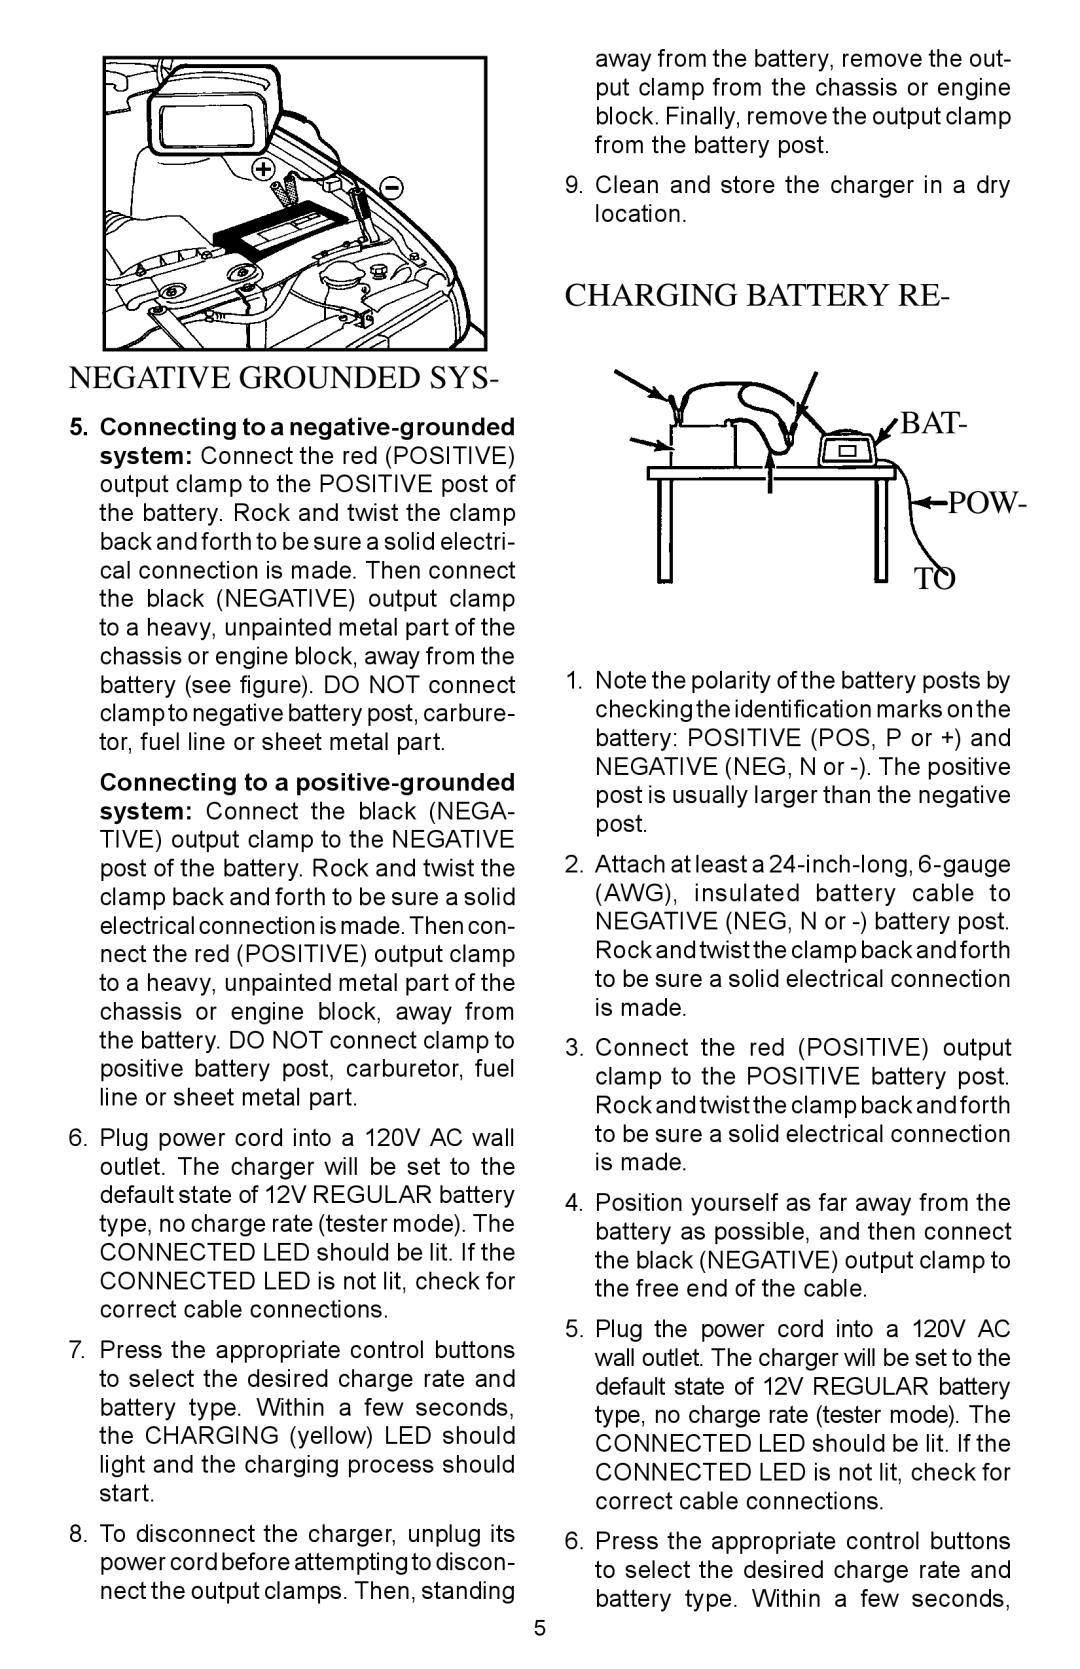
NEGATIVE GROUNDED SYS-

5.Connecting to a negative-grounded system: Connect the red (POSITIVE) output clamp to the POSITIVE post of the battery. Rock and twist the clamp back and forth to be sure a solid electri- cal connection is made. Then connect the black (NEGATIVE) output clamp to a heavy, unpainted metal part of the chassis or engine block, away from the battery (see figure). DO NOT connect clamp to negative battery post, carbure- tor, fuel line or sheet metal part.

Connecting to a positive-grounded system: Connect the black (NEGA- TIVE) output clamp to the NEGATIVE post of the battery. Rock and twist the clamp back and forth to be sure a solid electrical connection is made. Then con- nect the red (POSITIVE) output clamp to a heavy, unpainted metal part of the chassis or engine block, away from the battery. DO NOT connect clamp to positive battery post, carburetor, fuel line or sheet metal part.

6.Plug power cord into a 120V AC wall outlet. The charger will be set to the default state of 12V REGULAR battery type, no charge rate (tester mode). The CONNECTED LED should be lit. If the CONNECTED LED is not lit, check for correct cable connections.

7.Press the appropriate control buttons to select the desired charge rate and battery type. Within a few seconds, the CHARGING (yellow) LED should light and the charging process should start.

8.To disconnect the charger, unplug its power cord before attempting to discon- nect the output clamps. Then, standing

away from the battery, remove the out- put clamp from the chassis or engine block. Finally, remove the output clamp from the battery post.

9.Clean and store the charger in a dry location.

Charging Battery Re-

BAT-

POW-

TO

1.Note the polarity of the battery posts by checking the identification marks on the battery: POSITIVE (POS, P or +) and NEGATIVE (NEG, N or -). The positive post is usually larger than the negative post.

2.Attach at least a 24-inch-long, 6-gauge (AWG), insulated battery cable to NEGATIVE (NEG, N or -) battery post. Rock and twist the clamp back and forth to be sure a solid electrical connection is made.

3.Connect the red (POSITIVE) output clamp to the POSITIVE battery post. Rock and twist the clamp back and forth to be sure a solid electrical connection is made.

4.Position yourself as far away from the battery as possible, and then connect the black (NEGATIVE) output clamp to the free end of the cable.

5.Plug the power cord into a 120V AC wall outlet. The charger will be set to the default state of 12V REGULAR battery type, no charge rate (tester mode). The CONNECTED LED should be lit. If the CONNECTED LED is not lit, check for correct cable connections.

6.Press the appropriate control buttons to select the desired charge rate and battery type. Within a few seconds,

Page 6
Image 6
Schumacher 94080027, 00-99-000742 owner manual Negative Grounded SYS

00-99-000742, 94080027 specifications

Schumacher 94080027,00-99-000742 is a highly regarded product designed for automotive and motorcycle battery maintenance. One of its standout features is its ability to provide reliable jump-starting capabilities. This product is engineered to deliver high peak currents, making it effective for a wide range of vehicles, from compact cars to larger trucks and motorcycles.

One of the core technologies employed in the Schumacher 94080027 is smart charging technology. This intelligent system automatically adjusts the charge rate according to the battery's condition, ensuring optimal charging performance and prolonging battery life. The ability to switch between maintenance and boost modes enhances its versatility, allowing users to cater to various battery needs efficiently. This feature is particularly beneficial for seasonal vehicle owners, ensuring their batteries remain charged during periods of inactivity.

In terms of safety, Schumacher incorporates several critical characteristics into this model. It includes reverse polarity protection, ensuring that users cannot inadvertently connect the positive and negative clamps incorrectly, which can cause damage. The unit is also equipped with overcharge protection, helping to prevent battery overheating and ensuring a safe, smooth charging process.

The design of Schumacher 94080027 emphasizes user-friendliness. It comes with color-coded clamps for easy identification, and the lightweight yet durable casing allows for easy portability, making it suitable for both home and on-the-go use. The compact design fits conveniently in most trunks or storage compartments, ensuring it is always within reach when needed.

Another significant advantage of this model is its energy efficiency. It utilizes advanced technology to minimize power consumption during charging cycles, thus reducing electricity costs and environmental impact. This model also offers a quick-charge feature, which allows for rapid recharging of both the unit and the vehicle’s battery, making it an efficient choice for those on tight schedules.

Schumacher 94080027,00-99-000742 combines robust performance, smart technology, and safety features that make it an outstanding choice for anyone seeking a dependable battery maintenance solution. Its blend of power, efficiency, and ease of use positions it as a must-have tool for vehicle owners who prioritize battery health and performance.