Assembly Instructions


3/16 X 2”


Leg


Handle Brace


Cotter Pin


Nut


1/4-20 X 1/2”


Lock


Hex Bolt


Washer


Drive Wheel


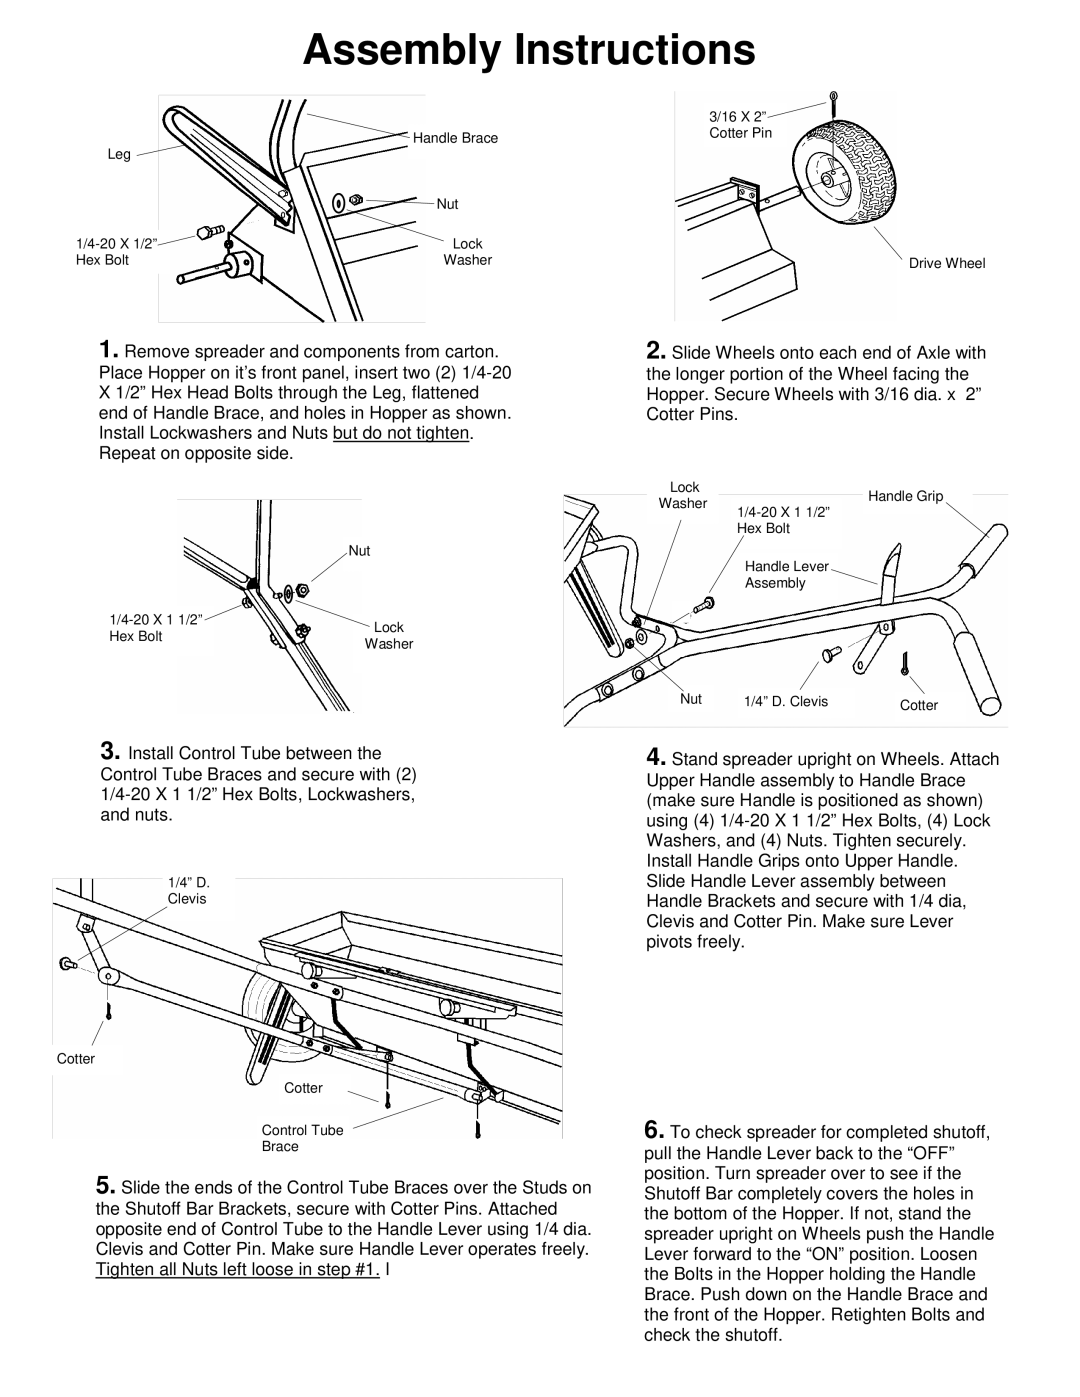
1. Remove spreader and components from carton. Place Hopper on it’s front panel, insert two (2) 1/4-20 X 1/2” Hex Head Bolts through the Leg, flattened end of Handle Brace, and holes in Hopper as shown. Install Lockwashers and Nuts but do not tighten. Repeat on opposite side.


Nut


1/4-20 X 1

1/2”


Lock


Hex Bolt


Washer


3. Install Control Tube between the Control Tube Braces and secure with (2) 1/4-20 X 1 1/2” Hex Bolts, Lockwashers, and nuts.

1/4” D. Clevis

Cotter

Cotter

Control Tube

Brace

5. Slide the ends of the Control Tube Braces over the Studs on the Shutoff Bar Brackets, secure with Cotter Pins. Attached opposite end of Control Tube to the Handle Lever using 1/4 dia. Clevis and Cotter Pin. Make sure Handle Lever operates freely. Tighten all Nuts left loose in step #1. I

2. Slide Wheels onto each end of Axle with the longer portion of the Wheel facing the Hopper. Secure Wheels with 3/16 dia. x 2” Cotter Pins.

Lock


Handle Grip

Washer


1/4-20 X 1 1/2”


Hex Bolt


Handle Lever


Assembly


Nut


1/4” D. Clevis


Cotter


4. Stand spreader upright on Wheels. Attach Upper Handle assembly to Handle Brace (make sure Handle is positioned as shown) using (4) 1/4-20 X 1 1/2” Hex Bolts, (4) Lock Washers, and (4) Nuts. Tighten securely. Install Handle Grips onto Upper Handle. Slide Handle Lever assembly between Handle Brackets and secure with 1/4 dia, Clevis and Cotter Pin. Make sure Lever pivots freely.

6. To check spreader for completed shutoff, pull the Handle Lever back to the “OFF” position. Turn spreader over to see if the Shutoff Bar completely covers the holes in the bottom of the Hopper. If not, stand the spreader upright on Wheels push the Handle Lever forward to the “ON” position. Loosen the Bolts in the Hopper holding the Handle Brace. Push down on the Handle Brace and the front of the Hopper. Retighten Bolts and check the shutoff.

Page 2
Image 2
Scotts CD36C owner manual Assembly Instructions

CD36C specifications

The Scotts CD36C is a state-of-the-art compact utility vehicle that redefines efficiency and versatility for both commercial and residential use. Designed with both functionality and comfort in mind, the CD36C is the perfect solution for a variety of outdoor tasks, from landscaping to light construction.

One of the standout features of the CD36C is its powerful electric drive system. This advanced system offers silent operation, which is essential for use in noise-sensitive environments. The electric motor provides instant torque, allowing for quick acceleration and efficient operation without the delays often associated with traditional gas-powered vehicles. Additionally, the electric drive system ensures reduced maintenance costs and a lower environmental impact, aligning with the growing demand for sustainable solutions.

The CD36C boasts a robust modular design, making it highly adaptable to various tasks and terrains. The vehicle can be customized with a range of attachments, including cargo beds, snow plows, and brush clearing tools. This versatility ensures that the CD36C can easily handle different jobs, whether transporting materials across a job site or clearing snow from a driveway.

Another notable characteristic is its compact size, which allows it to maneuver easily in tight spaces. With a tight turning radius, the CD36C excels in both urban settings and densely landscaped areas. This is particularly beneficial for landscape professionals and groundskeepers who need to navigate around flower beds or trees without damaging surrounding plants.

Moreover, the ergonomic design of the operator’s station enhances user comfort and efficiency. The CD36C is equipped with an adjustable seat, intuitive controls, and ample legroom, making it suitable for extended use. Safety features, including a roll-over protection structure (ROPS) and safety belts, ensure operator safety while enhancing productivity.

In terms of battery life, the CD36C is equipped with high-capacity lithium-ion batteries, providing extended range and reducing downtime for charging. This makes it an ideal choice for long workdays, as operators can rely on its dependability for sustained performance.

Overall, the Scotts CD36C exemplifies modern engineering and design, designed to meet the demands of professionals and homeowners alike. Its combination of powerful electric performance, modular capability, and user-centric design makes it a standout in the realm of compact utility vehicles. With the CD36C, users can expect efficiency, versatility, and unmatched reliability, making it an indispensable tool for any outdoor project.