U Series 9 ce Installation Guide
ST3160022ACE, ST3120025ACE and ST380012ACE ATA Interface Disc Drives
Publication Number: 100271708, Rev. B, December 2003
The easiest way to install your drive
DiscWizardTM, available exclusively from Seagate, provides you with cus- tomized installation instructions for your hard drive. You can download Dis- cWizard for free from the Seagate web site at www.seagate.com/support or run the program directly from your web browser. In either case, you should run DiscWizard before you install your drive.
If you cannot run DiscWizard, follow the instructions on this installation sheet to install and configure your drive.
What you need
•A Phillips screwdriver and four
•
•An ATA interface cable. For optimum drive performance and data integ- rity, we recommend using an
Handling precautions/Electrostatic discharge protection
•Disc drives are fragile. Do not drop or jar the drive. Handle the drive only by the edges or frame. Keep the drive in the protective SeaShellTM con- tainer until you are ready to install it to minimize handling damage.
•Drive electronics are extremely sensitive to static electricity. While installing the drive, wear a wrist strap and cable connected to ground.
•Turn off the power to the host system during installation.
•Do not disassemble the drive; doing so voids the warranty. Return the entire drive for depot service if any part is defective.
•Do not apply pressure or attach labels to the circuit board or to the top of the drive.
Breather filter hole precaution
Breather Hole
Do not cover
or seal.
Caution. Do not cover, seal, or insert any object into this hole. This hole has two purposes:
•To allow condensation inside the hard disc to escape
•To allow air pressure inside the hard disc to equalize with ambient pres- sure
Note. If this hole is covered, sealed, or penetrated by any object, the drive reliability may be compromised and could lead to permanent
Installation instructions
1. Set the jumpers
Note. The instructions below assume that you are installing your new Seagate drive in a system that already has a working hard drive. To install the drive in a system that has no working hard drive, see the section titled, “What to do if you don’t have a working hard drive” located on back of this sheet.
a.Make sure that your existing drive is set up as a “master.” See the drive label or manufacturer’s web site for jumper settings.
b.Your new drive is shipped with a jumper in the “cable select” position. Set the drive as a “slave” by removing this jumper from the jumper pins. Save the jumper in case you ever need to reconfigure the drive.
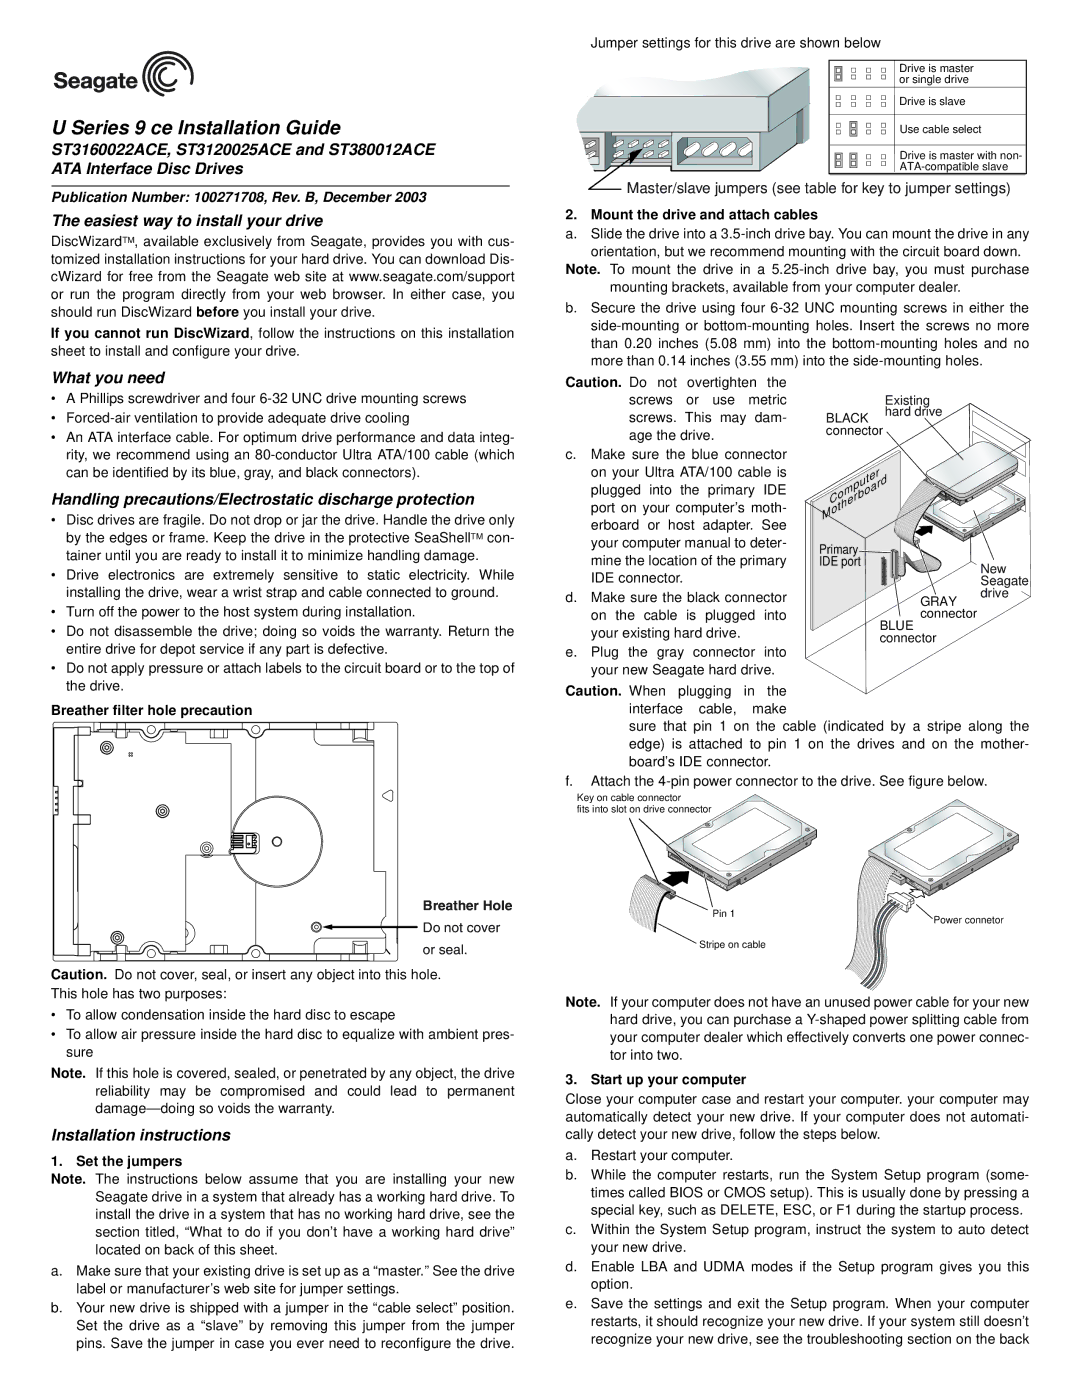
Jumper settings for this drive are shown below
Drive is master or single drive
Drive is slave
Use cable select
Drive is master with non-
Master/slave jumpers (see table for key to jumper settings)
2. Mount the drive and attach cables
a.Slide the drive into a
Note. To mount the drive in a
b.Secure the drive using four
Caution. Do not overtighten the |
|
| ||
screws or | use | metric |
| Existing |
screws. This | may | dam- | BLACK | hard drive |
| ||||
age the drive. | connector |
|
c.Make sure the blue connector
on your Ultra ATA/100 cable is | Computer |
|
plugged into the primary IDE |
| |
port on your computer’s moth- |
| |
Motherboard |
| |
erboard or host adapter. See |
| |
|
| |
your computer manual to deter- | Primary |
|
mine the location of the primary |
| |
IDE port | New | |
IDE connector. |
| |
| Seagate | |
d. Make sure the black connector |
| drive |
| GRAY | |
on the cable is plugged into |
| connector |
your existing hard drive. | BLUE | |
connector | ||
|
e.Plug the gray connector into your new Seagate hard drive.
Caution. When plugging in the interface cable, make
sure that pin 1 on the cable (indicated by a stripe along the edge) is attached to pin 1 on the drives and on the mother- board’s IDE connector.
f.Attach the
Key on cable connector
fits into slot on drive connector
Pin 1
Power connetor
Stripe on cable
Note. If your computer does not have an unused power cable for your new hard drive, you can purchase a
3. Start up your computer
Close your computer case and restart your computer. your computer may automatically detect your new drive. If your computer does not automati- cally detect your new drive, follow the steps below.
a. Restart your computer.
b. While the computer restarts, run the System Setup program (some- times called BIOS or CMOS setup). This is usually done by pressing a special key, such as DELETE, ESC, or F1 during the startup process. c. Within the System Setup program, instruct the system to auto detect
your new drive.
d. Enable LBA and UDMA modes if the Setup program gives you this option.
e. Save the settings and exit the Setup program. When your computer restarts, it should recognize your new drive. If your system still doesn’t recognize your new drive, see the troubleshooting section on the back